
Add and style type
This guide shows how to add the three kinds of type in VectorCraft, flow one story through several frames, and set the font, size, spacing and alignment of the text. It ends with turning letters into paths for artwork that no longer needs to be edited as text. The following image shows one example of each kind of type in one document.
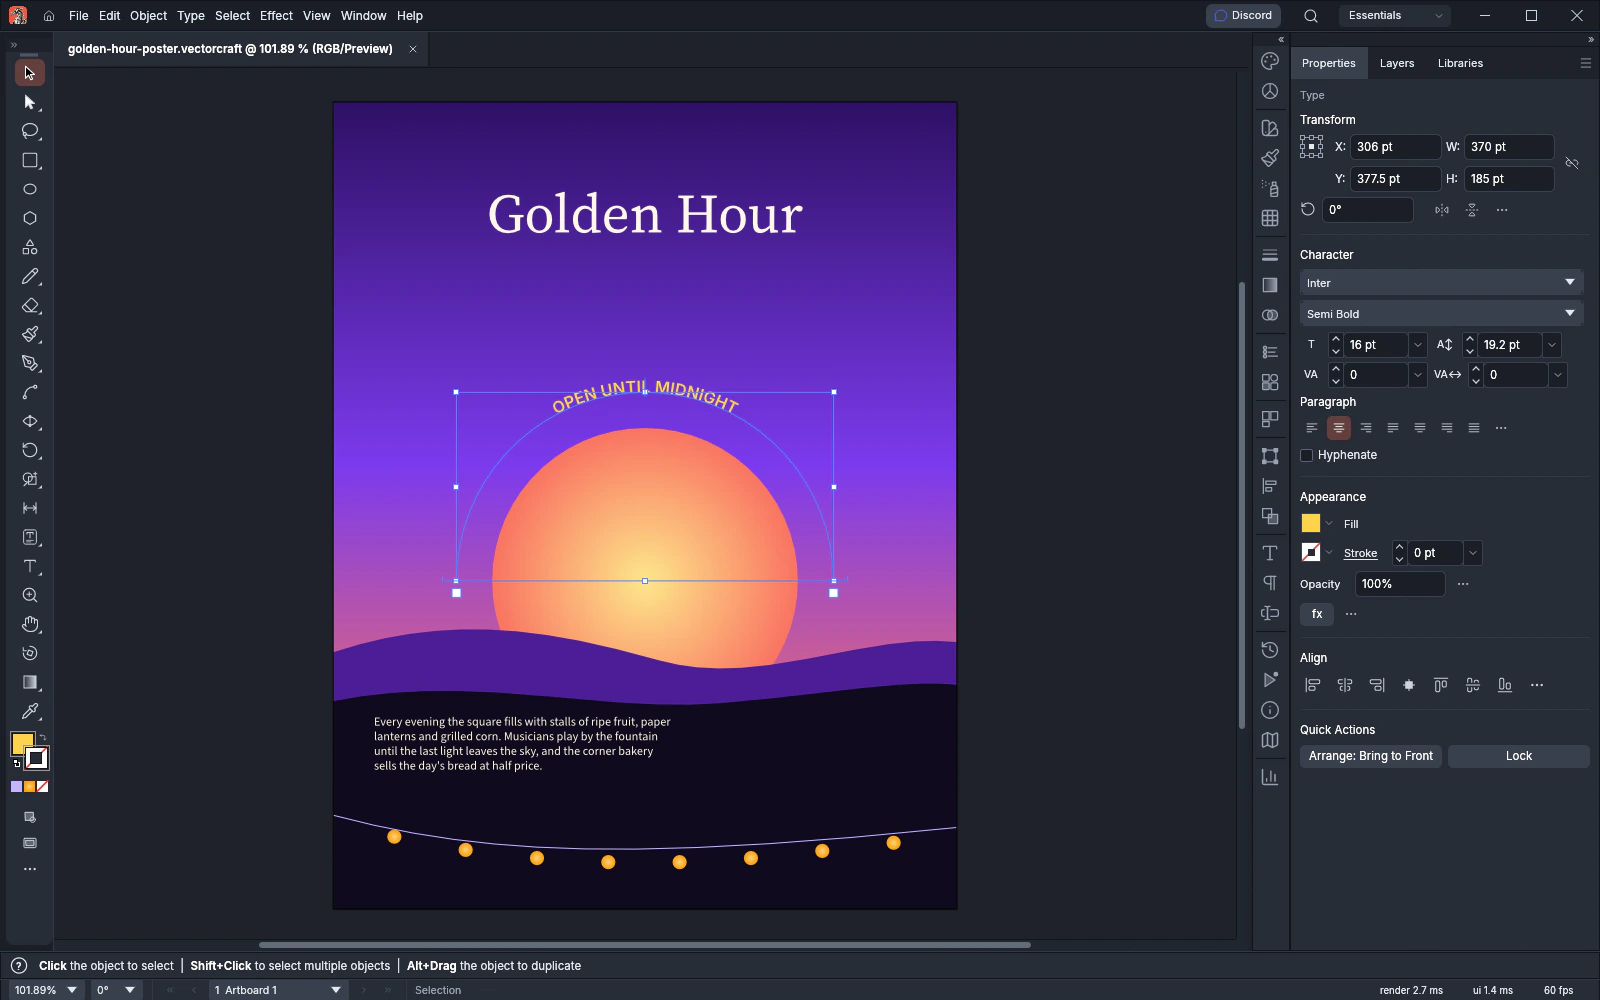
Kinds of type
Section titled “Kinds of type”| Kind | How to make it | What shapes it |
|---|---|---|
| Point type | Click with the Type tool and type. | Point type does not wrap. Each line ends where you press Enter. |
| Area type | Drag a frame with the Type tool, or click the outline of a closed path. | The text wraps at the frame’s edges. Type → Area Type Options… sets rows, columns, gutters and inset. |
| Type on a path | Click the outline of an open path with the Type tool, or click any path with the Type on a Path tool. | The text follows the path. Drag the start, center and end brackets, or set options in Type → Type on a Path → Type on a Path Options…. |
Choose a type tool
Section titled “Choose a type tool”The seven type tools share one group in the toolbar. The Type tool shows by default. Press and hold it to choose another tool from the group.
| Tool | Shortcut | What it does |
|---|---|---|
| Type Tool | T | A click on empty canvas makes point type, and a drag makes area type. A click on the outline of a closed path sets type inside the path, and a click on an open path sets type along it. |
| Area Type Tool | None | A click on the outline of a closed path sets type inside the path. On empty canvas, the tool works as the Type tool does. |
| Type on a Path Tool | None | A click on the outline of an open or closed path sets type along the path. On empty canvas, the tool works as the Type tool does. |
| Vertical Type Tool | None | Works as the Type tool does, with each line running from top to bottom. |
| Vertical Area Type Tool | None | Works as the Area Type tool does, with vertical lines. |
| Vertical Type on a Path Tool | None | Works as the Type on a Path tool does, with vertical type. |
| Touch Type Tool | Shift+T | Moves, scales and rotates single characters of existing type, which stays editable. |
Before you start typing, hold Shift while you click to use the vertical version of a horizontal tool, or the horizontal version of a vertical one. With the Area Type or Type on a Path tool, hold Alt (Option on macOS) while you click to use the other of those two tools. Set vertical type covers the vertical tools.
To change one character with the Touch Type tool:
- Choose the Touch Type tool (Shift+T) and click a character of a type object. A box with handles appears around that character.
- Drag the box, or its lower-left handle, to move the character along its line or up and down. Drag the upper-left handle to scale it vertically, the lower-right handle to scale it horizontally, or the upper-right handle to scale it proportionally. Drag the handle in the middle of the top edge to rotate it.
Each drag is one undo step. Press Escape to let go of the character.
Add point type
Section titled “Add point type”- Choose the Type tool (T).
- Click an empty part of the artboard and type.
- Press Enter to start a new line.
- Click an empty part of the canvas to stop editing. The next click makes new type.
If you click to place point type and leave it empty, VectorCraft removes it when you stop editing.
Add area type
Section titled “Add area type”- Choose the Type tool (T).
- Drag on the artboard to draw a frame, then type. The text wraps when it reaches the frame’s edge.
- To set type inside a shape you already drew, click the outline of the closed path with the Type tool instead. The path becomes the frame, and its fill and stroke are removed.
- With the type selected, choose Type → Area Type Options… to set the number of rows and columns, the gutter between them, the inset from the frame’s edge, the first baseline, the vertical alignment of the lines, and how the frame fits its text (None, Auto Size or Shrink Text to Fit).
To set up columns in a frame:
- Select the area type with the Selection tool.
- Choose Type → Area Type Options….
- Set the options from the following table, for example Columns 2 and Gutter 12 pt.
- Click OK.
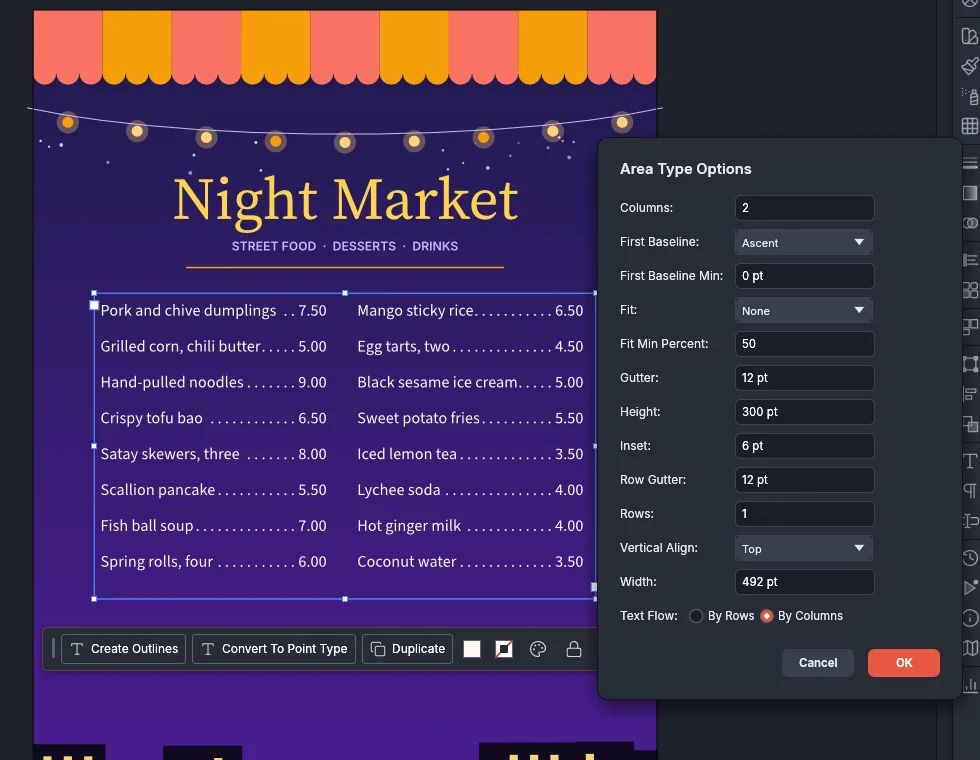
| Option | What it sets | Default |
|---|---|---|
| Columns and Rows | How many columns and rows the frame is divided into, from 1 to 100 | 1 |
| First Baseline | Where the first line sits below the top of the frame: Ascent, Cap Height, x Height, Leading or Fixed | Ascent |
| First Baseline Min | The smallest distance from the top of the frame to the first baseline | 0 pt |
| Fit | How the frame and its text fit each other. None keeps the frame’s size, and text that does not fit overflows. Auto Size makes the frame’s height follow the text after every edit; typing a Height turns it off. Shrink Text to Fit scales text that does not fit down until it fits. | None |
| Fit Min Percent | The smallest size, in percent of the original, that Shrink Text to Fit scales the text to, from 10 to 100. Size, leading and baseline shift scale together. | 50 |
| Gutter | The space between columns, and between rows unless Row Gutter differs, from 0 to 10,000 pt | 18 pt |
| Height and Width | The size of the frame, measured from its top-left corner. The text reflows at the new size. | The frame’s size |
| Inset | The space between the frame’s edge and the text, from 0 to 10,000 pt | 0 pt |
| Row Gutter | The space between rows when it differs from the gutter between columns. While it matches Gutter, it changes with Gutter. | The Gutter value |
| Vertical Align | Where the lines sit in each row or column: Top, Center, Bottom or Justify | Top |
| Text Flow | By Columns fills each column from top to bottom before it moves across. By Rows fills each row across before it moves down. | By Columns |
To switch a selected type object between the two kinds, choose Type → Convert To Area Type or Type → Convert To Point Type. Converting area type to point type turns each soft line wrap into a line break.
Converting point type to area type puts a frame around the text as it is laid out.
Put type on a path
Section titled “Put type on a path”- Draw a path with the Pen, Curvature or Pencil tool, or use a shape.
- Choose the Type tool and click the outline of an open path. For a closed path, choose the Type on a Path tool from the Type tool’s group and click the outline.
- Type the text. It runs along the path, and the path’s fill and stroke are removed.
- Switch to the Selection or Direct Selection tool. The selected type shows a start bracket, a center bracket and an end bracket.
- Drag the start or end bracket to set where the type begins or ends along the path.
- Drag the center bracket along the path to slide the type. Drag it across the path to flip the type to the other side. Hold Ctrl (Cmd on macOS) while you drag to slide the type without flipping it.
The Type → Type on a Path submenu applies an effect that changes how each letter sits on the path: Rainbow, Skew, 3D Ribbon, Stair Step or Gravity. Type → Type on a Path → Type on a Path Options… sets the effect, the flip, Align to Path (Ascender, Descender, Center or Baseline) and the spacing.
| Effect | How each letter sits on the path |
|---|---|
| Rainbow | Each letter turns with the path. This is the default. |
| Skew | The vertical edges of the letters stay vertical, and the baseline follows the path. |
| 3D Ribbon | The horizontal edges of the letters stay horizontal, and the vertical edges stand at right angles to the path. |
| Stair Step | The letters do not turn. The left end of each letter’s baseline sits on the path. |
| Gravity | The center of each letter’s baseline sits on the path, and each letter points away from the path’s center. |
The submenu shows a check mark beside the effect of the selected type. To set every option in one dialog:
- Select the type on a path with the Selection tool.
- Choose Type → Type on a Path → Type on a Path Options…, or click Type on a Path Options in the Contextual Task Bar.
- Set the options from the following table. With Preview on, the type on the canvas changes as you edit them.
- Click OK. Cancel undoes the preview.
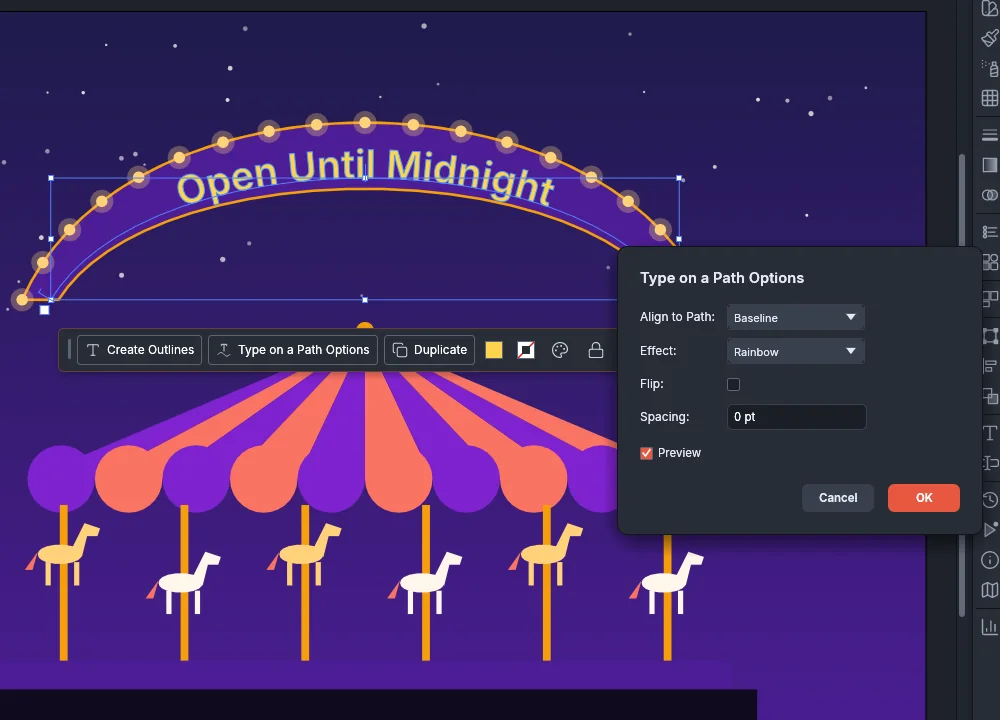
| Option | What it sets | Default |
|---|---|---|
| Align to Path | Which height of the type runs along the path. With Ascender, the type hangs below the path. With Descender, it stands above the path. Center runs the path halfway between the ascender and the descender, and Baseline puts the baseline on the path. | Baseline |
| Effect | Rainbow, Skew, 3D Ribbon, Stair Step or Gravity, as described in the effects table | Rainbow |
| Flip | Moves the type to the other side of its path. The checkbox is off each time the dialog opens, so turning it on again flips the type back. | Off |
| Spacing | Spaces the letters as if they were set this far above the path. On a curve, the letters close up on the outside of the curve and open up on the inside. | 0 pt |
| Preview | Shows the changes on the canvas before you click OK | Off |
To turn type on a path back into point type and a plain path, see Release type from a path.
Flow text between frames
Section titled “Flow text between frames”Threaded text is one story that flows through several frames in order. Area type and type on a path can be threaded in any mix.
- Select two or more area-type frames, type on a path objects or closed paths.
- Choose Type → Threaded Text → Create.
VectorCraft threads the objects in stacking order. Closed paths in the selection become area-type frames. Text that does not fit in one frame continues in the next. The following image shows one story flowing through two frames, with the thread line joining them.
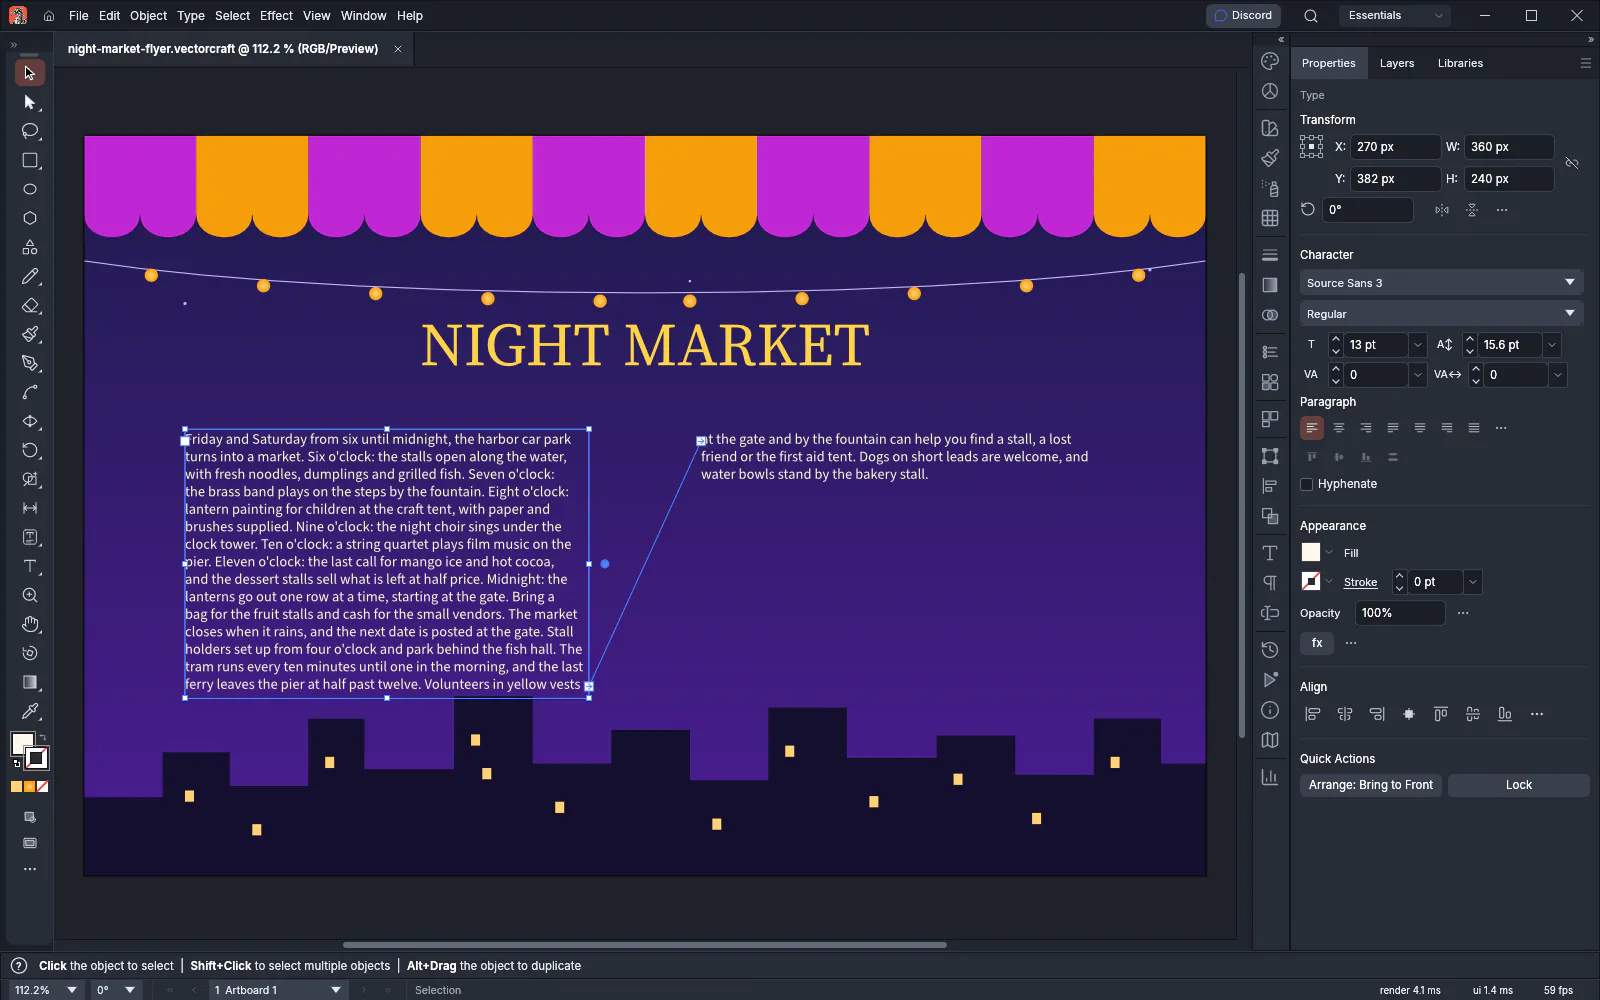
You can also thread from a single frame with the Selection tool:
- Select the area type or type on a path. It shows an in port and an out port.
- Click the out port. The pointer is loaded with the text.
- Click a closed path or another type object to flow the text into it, click empty canvas to make a new frame of the same kind, shape and size, or drag to draw a rectangle for the new frame.
A click on the in port works the same way, except that the new frame comes before the clicked one in the thread. Press Escape to drop the loaded text.
To undo threading:
- Type → Threaded Text → Release Selection takes the selected frames out of their thread. The story flows on through the remaining frames.
- Type → Threaded Text → Remove Threading breaks the threads of the selected frames. Each frame keeps the text it shows.
View → Hide Text Threads (Ctrl+Shift+Y, or Cmd+Shift+Y on macOS) hides the lines drawn between threaded frames. Choose it again to show them.
Set the font, size and spacing
Section titled “Set the font, size and spacing”The Character panel (Window → Type → Character; Ctrl+T, or Cmd+T on macOS) styles the selected type objects, or the characters you selected with the Type tool. Select a type object first; with nothing selected, the panel shows “Select a text object to edit its character attributes.” The following screenshot shows the panel with the point type headline selected.
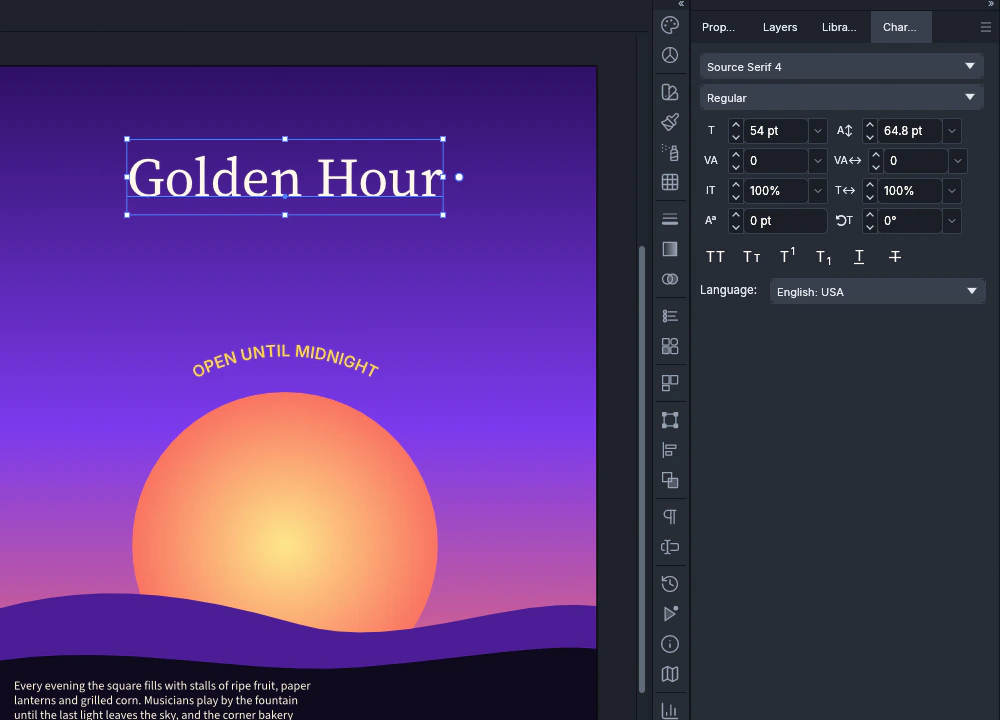
The panel holds these controls. Hover over the symbol beside a field to see the field’s name.
| Control | What it sets |
|---|---|
| Font family and style | The typeface and its weight or style |
| Font Size | The size of the characters |
| Leading | The distance between lines |
| Kerning | The space between a pair of characters; Optical is one of its choices |
| Tracking | The space across a range of characters |
| Vertical Scale % and Horizontal Scale % | The vertical or horizontal stretch of the characters |
| Baseline Shift | How far the characters move up or down from the baseline |
| Character Rotation | The rotation of each character |
| All Caps, Small Caps, Superscript, Subscript, Underline, Strikethrough | Buttons that turn each style on or off |
| Language | The language the characters are shaped in, so the font uses that language’s letter forms |
Hide Options in the panel menu hides every row below the size, leading, kerning and tracking fields, and Show Options shows them again. The panel menu also holds Reset Panel.
When the text uses a variable font, the panel shows a Variable Font button. It opens a slider for each axis of the font, such as its weight or width.
To make the selected type bold or italic, choose Type → Bold or Type → Italic. Bold switches the text to the Bold face of its font family, or back to the regular face when the text is already bold, and keeps italics. Italic switches to the Italic or Oblique face, or back to upright, and keeps the weight. When the family has no such face, the text stays as it is and VectorCraft shows a message. While you edit text with the Type tool, Ctrl+Shift+B and Ctrl+Shift+I (Cmd+Shift+B and Cmd+Shift+I on macOS) run the two commands.
The panel menu, which opens from the button at the top right of the panel, holds these items:
| Menu item | What it does |
|---|---|
| Hide Options or Show Options | Hides or shows the rows below the size, leading, kerning and tracking fields |
| Show Snap to Glyph Options or Hide Snap to Glyph Options | Shows or hides the Snap to Glyph checkbox and the guides it gives: Baseline, x-height, Glyph Bounds, Proximity Guides, Angular Guides and Anchor Point |
| Show Font Height Options or Hide Font Height Options | Shows or hides Set Font Height Reference under Font Size. It sets which height of the font the size measures: Em Box, Cap Height, x-Height or ICF Box. |
| All Caps, Underline, Strikethrough, Small Caps, Superscript, Subscript | The same styles as the panel’s buttons. An item is checked when every character the panel acts on has that style. |
| No Break | Keeps the selected characters together on one line |
| Fractional Widths | Spaces the characters of the whole type object by fractions of a point. It is on by default. |
| System Layout | Spaces the characters of every text object in the document by whole points |
| Refresh Font List | Adds fonts that were installed after VectorCraft started |
| Reset Panel | Returns the characters to tracking 0, Auto leading and kerning, no baseline shift, 100% scales, no rotation, the styles off, No Break off and the Em Box font height reference |
| Float Panel or Dock Panel | Moves the panel out of the dock into a floating window of its own, or back into the dock |
More items appear when you turn on a language option on the Type page of Preferences:
- Show East Asian Options adds Character Alignment, Proportional Metrics, Tate-chu-yoko, Tate-chu-yoko Settings… and Standard Vertical Roman Alignment. Set vertical type describes the tate-chu-yoko commands and Standard Vertical Roman Alignment.
- Show Indic Options adds Digits, Character Direction (Default, Left to Right or Right to Left) and Kashidas.
While you edit horizontal text with the Type tool, the Alt key (Option on macOS) with the arrow keys changes spacing by the increments set in Preferences → Type:
- Alt+Left and Alt+Right (Option+Left and Option+Right on macOS) change the kerning at the caret or the tracking of the selected text.
- Alt+Up and Alt+Down (Option+Up and Option+Down on macOS) change the leading.
- Alt+Shift+Up and Alt+Shift+Down (Option+Shift+Up and Option+Shift+Down on macOS) change the baseline shift.
Set paragraph options
Section titled “Set paragraph options”The Paragraph panel (Window → Type → Paragraph; Ctrl+Alt+T, or Cmd+Option+T on macOS) sets alignment, indents and the space around paragraphs. Its alignment buttons are Align left, Align center, Align right, Justify with last line aligned left, Justify with last line aligned center, Justify with last line aligned right and Justify all lines. Below them are Left Indent, Right Indent, First-line Left Indent, Space Before Paragraph and Space After Paragraph, and the Hyphenate option. With nothing selected, the panel shows “Select a text object to edit its paragraph attributes.”
The alignment applies to the paragraphs of the selected type, or to the paragraphs that the Type tool’s selection touches.
Window → Type also opens the Character Styles, Paragraph Styles, Glyphs, OpenType and Tabs panels.
To set the options of one paragraph:
- Choose the Type tool (T) and click in the paragraph. To change every paragraph of a type object, select the object with the Selection tool instead.
- Open the Paragraph panel.
- Click an alignment button, and type values in the indent and spacing fields.
- Turn on Hyphenate to break long words with a hyphen at the ends of lines.
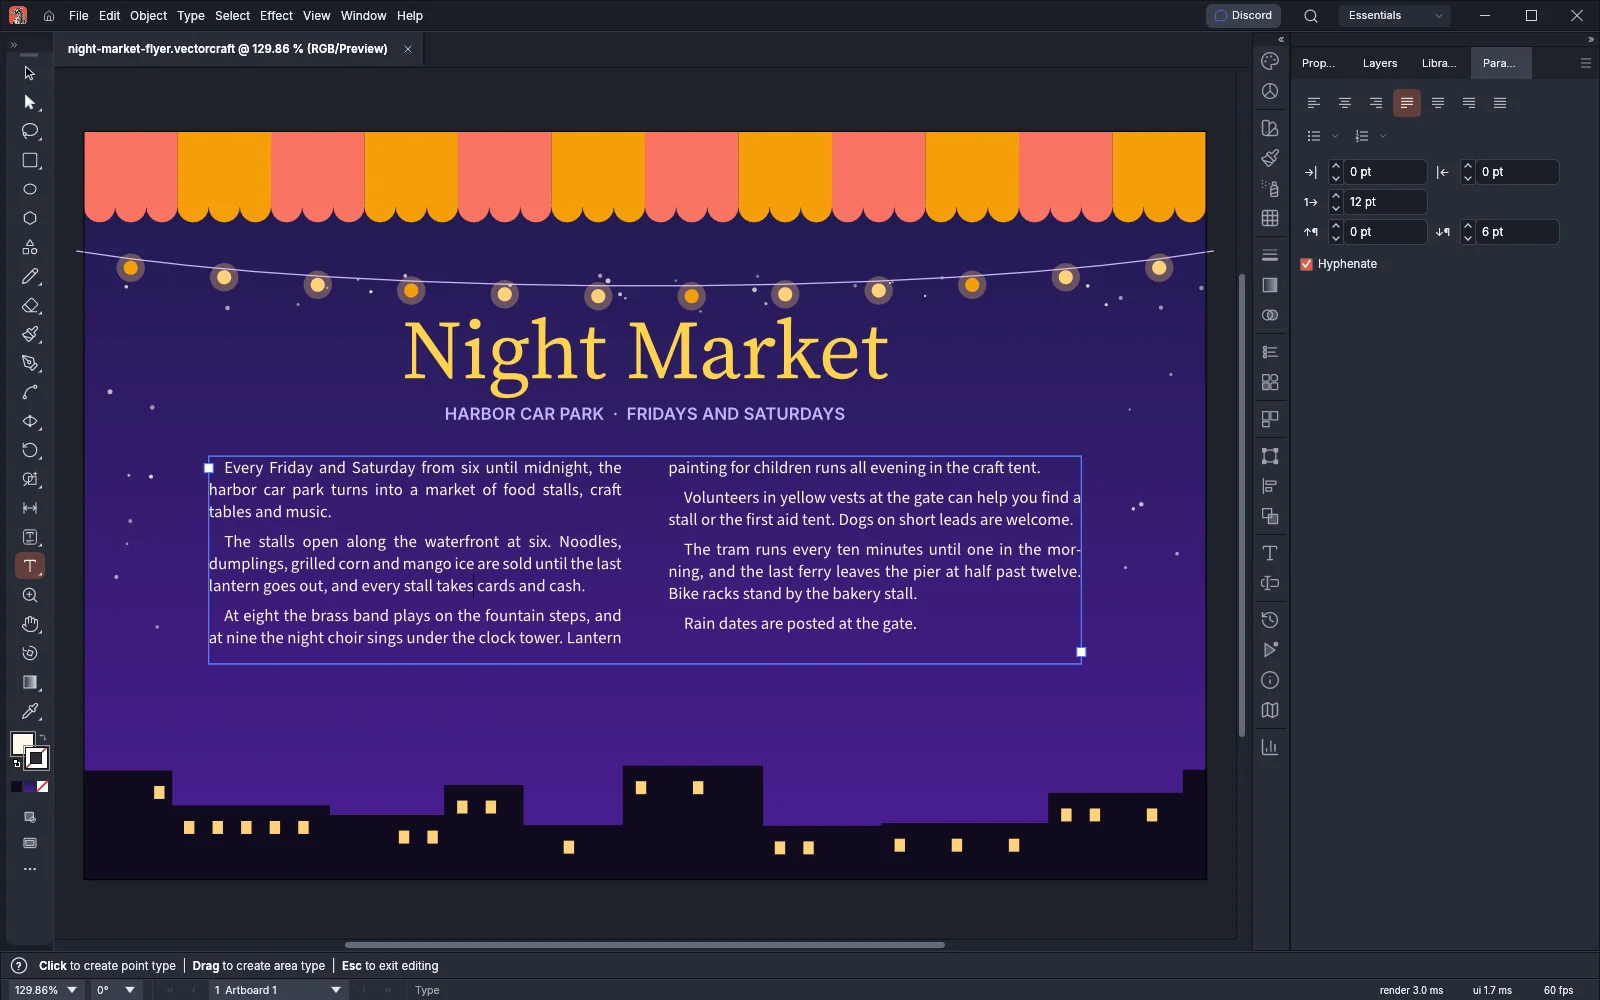
| Control | What it sets |
|---|---|
| Alignment buttons | How the lines of each paragraph line up |
| Bullets | Starts each paragraph with a bullet. The arrow beside the button lists None, Filled Dot, Dash, Hollow Circle and Filled Square. |
| Numbered List | Starts each paragraph with a number. The arrow beside the button lists None, 1, 2, 3, A, B, C, a, b, c, I, II, III, i, ii, iii, 01, 02, 03 and 001, 002, 003. |
| Left Indent and Right Indent | The space between the frame’s sides and the paragraph, from -1296 to 1296 pt |
| First-line Left Indent | The extra indent of the paragraph’s first line, from -1296 to 1296 pt. A negative value makes a hanging indent. |
| Space Before Paragraph and Space After Paragraph | The space above and below the paragraph, from 0 to 1296 pt |
| Hyphenate | Breaks words with a hyphen at the ends of lines, within the limits set in the Hyphenation dialog |
With Show Indic Options on in Preferences, the panel also shows the Left-to-Right Paragraph Direction and Right-to-Left Paragraph Direction buttons after the alignment buttons, and an Insert Kashidas menu. With Show East Asian Options on, it shows the Mojikumi Set and Kinsoku Set menus.
The Paragraph panel menu holds these items:
| Menu item | What it does |
|---|---|
| Hide Options or Show Options | Hides or shows the Hyphenate option and the rows below it |
| Roman Hanging Punctuation | Hangs quotation marks, hyphens, periods and commas at the ends of a line outside the margin |
| Justification… | Opens the Justification dialog, which sets word spacing, letter spacing and glyph scaling for justified lines |
| Hyphenation… | Opens the Hyphenation dialog, which sets which words break and where |
| Single-line Composer | Breaks each line of the paragraph on its own |
| Every-line Composer | Sets the line breaks of the whole paragraph together. This is the default. |
| Reset Panel | Returns the paragraphs to automatic alignment, no bullets or numbering, no indents or spacing, Hyphenate off, the default hyphenation and justification settings, Roman Hanging Punctuation off and the Every-line Composer |
With Show East Asian Options on, the menu also holds Top-to-Top Leading, Bottom-to-Bottom Leading and Burasagari (None, Regular or Force). Fine-tune justification and hyphenation describes the two dialogs and the composers.
Use the Type menu
Section titled “Use the Type menu”| Command | What it does |
|---|---|
| Font and Recent Fonts | Choose a font family, or one you used recently |
| Size | Choose a font size from a list of point sizes |
| Bold and Italic | Switch the selected text to the Bold or Italic face of its font family, or back again, as described in Set the font, size and spacing |
| Glyphs | Open the Glyphs panel |
| Insert Special Character | Insert a bullet, copyright, registered or trademark symbol, section or paragraph symbol, ellipsis, dashes, hyphens or curly quotation marks |
| Insert Whitespace Character and Insert Break Character | Add a special space, a forced line break or a tab, as described in Insert spaces and breaks |
| Convert To Area Type and Convert To Point Type | Switch the selected type between point type and area type |
| Area Type Options… | Set rows, columns, gutters, inset, first baseline, alignment and fit, as described in Add area type |
| Type on a Path | Apply Rainbow, Skew, 3D Ribbon, Stair Step or Gravity, or open Type on a Path Options…, as described in Put type on a path |
| Threaded Text | Create, Release Selection or Remove Threading, as described in Flow text between frames |
| Fit Headline | Track the first line of area type so it fills the width of the frame |
| Find Font… | List the fonts the document uses, mark missing ones, and replace a font with another |
| Change Case | Change the selected text to UPPERCASE, lowercase, Title Case or Sentence case |
| Smart Punctuation… | Replace straight quotes with the quotation marks set in Document Setup, -- and --- with en and em dashes, and ... with an ellipsis character, in the selection or the whole document |
| Bullets and Numbering | Apply Bullets, Apply Numbers, or Convert to Text to turn list markers into ordinary text |
| Create Outlines | Convert the selected type into paths, as described in Turn type into shapes |
| Scale Text Attributes | Move the scale of a scaled type object into its font size, leading, baseline shift and horizontal scale. Rotation and position stay as they are. The command is available only when the selected type has been scaled. |
| Optical Margin Alignment | Hang punctuation and some letters outside the margins of the selected type and its threaded frames, as described in Fine-tune justification and hyphenation |
| Fill with Placeholder Text | Replace the selected text with placeholder text; area type is filled to its frame |
| Insert Inline Symbol | Place the symbol selected in the Symbols panel in the text as one character, as described in Insert spaces and breaks |
| Show Hidden Characters | Show markers for spaces, paragraph ends and story ends |
| Type Orientation | Set the selected type to Horizontal or Vertical lines, as described in Set vertical type |
Turn type into shapes
Section titled “Turn type into shapes”Type → Create Outlines (Ctrl+Shift+O, or Cmd+Shift+O on macOS) converts the selected type into groups of compound paths, one path for each letter. You can then edit the letters with the path tools.
A frame of threaded text that you convert leaves its thread and keeps only the text it shows.
Type shortcuts
Section titled “Type shortcuts”| Command | Windows and Linux | macOS |
|---|---|---|
| Type tool | T | T |
| Touch Type tool | Shift+T | Shift+T |
| Character panel | Ctrl+T | Cmd+T |
| Paragraph panel | Ctrl+Alt+T | Cmd+Option+T |
| Increase font size | Ctrl+Shift+. | Cmd+Shift+. |
| Decrease font size | Ctrl+Shift+, | Cmd+Shift+, |
| Reset tracking and kerning | Ctrl+Alt+Q | Cmd+Option+Q |
| Align left | Ctrl+Shift+L | Cmd+Shift+L |
| Align center | Ctrl+Shift+C | Cmd+Shift+C |
| Align right | Ctrl+Shift+R | Cmd+Shift+R |
| Justify with last line aligned left | Ctrl+Shift+J | Cmd+Shift+J |
| Justify all lines | Ctrl+Shift+F | Cmd+Shift+F |
| Bold, while you edit text | Ctrl+Shift+B | Cmd+Shift+B |
| Italic, while you edit text | Ctrl+Shift+I | Cmd+Shift+I |
| Switch between the Single-line and Every-line Composer | Ctrl+Alt+Shift+C | Cmd+Option+Shift+C |
| Hyphenate | Ctrl+Alt+Shift+H | Cmd+Option+Shift+H |
| Hide Text Threads | Ctrl+Shift+Y | Cmd+Shift+Y |
| Show Hidden Characters | Ctrl+Alt+I | Cmd+Option+I |
| Create Outlines | Ctrl+Shift+O | Cmd+Shift+O |
To change these shortcuts, choose Edit → Keyboard Shortcuts…. Keyboard shortcuts lists every type shortcut.