
Organize with layers and symbols
This guide shows how to sort a drawing into layers and sublayers, find a layer or object, hide and lock them while you work, and draw over a placed sketch on a template layer. It also shows how to turn art you repeat into a symbol, so that one edit changes every copy, how to share symbols through libraries, and how to spray many copies of a symbol at once.
Work in the Layers panel
Section titled “Work in the Layers panel”Open the panel with Window → Layers (F7). The panel lists layers at the top level, with their sublayers, groups and objects inside them.
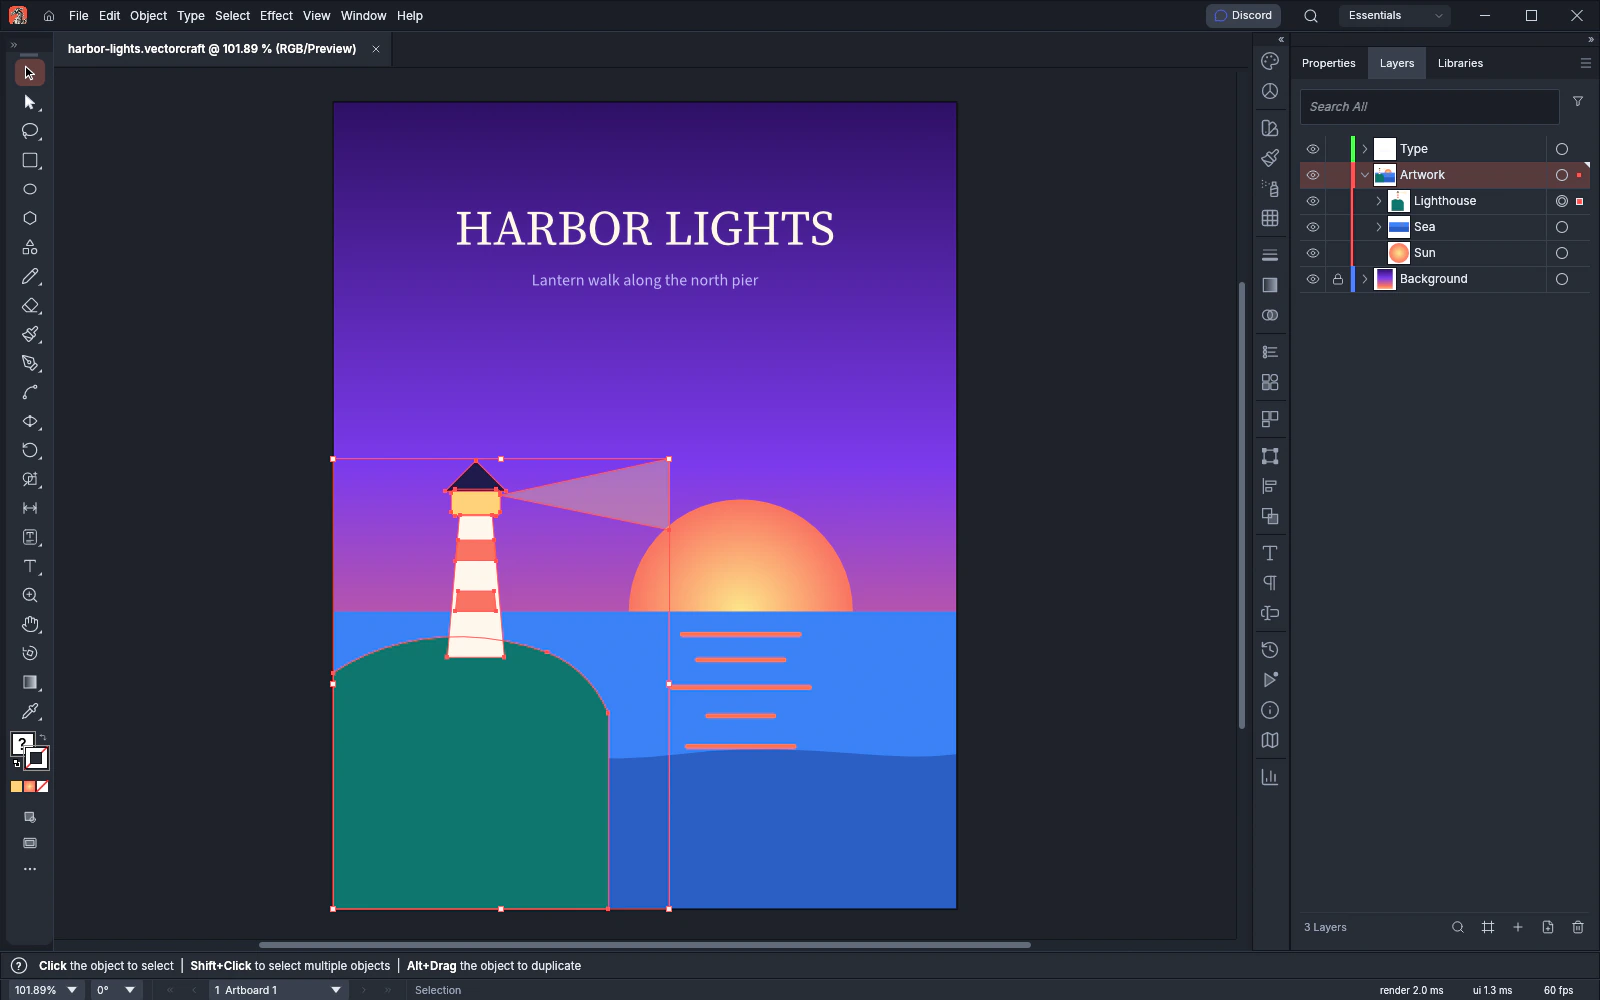
- Click Create New Layer at the bottom of the panel, or press Ctrl+L (Cmd+L on macOS). The new layer goes directly above the current layer. Ctrl-click (Cmd-click on macOS) the button to put the new layer above every other layer, or Alt-click (Option-click on macOS) it to set the layer’s options first.
- Click a layer’s row to make it the current layer. New art you draw goes into the current layer.
- To add a layer inside another one, click Create New Sublayer.
- Drag a row up or down to change the stacking order, or drop it on another layer to move it there. To move the selected art, drag the small selection square in its row onto another layer.
- Click the eye column of a row to hide or show it, and click the lock column next to it to lock or unlock it.
- To find a selected object in the list, click Locate Object. The panel opens the layers around the object and scrolls to its row.
The other buttons at the bottom of the panel are Delete Selection, which deletes the highlighted rows with everything in them, and Make/Release Clipping Mask. Make/Release Clipping Mask makes the top object of the layer clip the rest of the layer, and a second click releases it.
To send selected art to the current layer from the canvas, choose Object → Arrange → Send to Current Layer.
Find a layer or object
Section titled “Find a layer or object”In a document with many layers, the search field and the filter at the top of the Layers panel shorten the list.
- Type part of a name into the Search All field. The panel keeps the rows whose names contain that text, together with the layers and groups that hold them, and shows those rows open.
- To list only some kinds of rows, click Filter at the right of the search field. Under By Object, select Paths, Shapes, Text, Images, Effects, Groups, Linked Files or Guides. Under By Layer, select Locked or Hidden. A row stays when it matches the search text, one of the kinds you selected and one of the states you selected. A section with nothing selected keeps every row. The Filter button stays highlighted while a filter is on.
- To see every row again, clear the search field and click Clear All in the filter list.
The search and the filter change only what the panel lists. They do not change the document, the rows you opened or the selection.
You can also choose Locate Object from the panel menu to find the row of an object you selected on the canvas. When the search, the filter or Show Layers Only hides that row, the panel cannot show it and does not open any rows. To have the panel find each object you select on the canvas, turn on Locate Selected Objects in Layers Panel Options, described below.
Set layer options
Section titled “Set layer options”Double-click a layer’s thumbnail, or the empty part of its row, to open Layer Options. Double-clicking the name itself lets you rename the layer in place. You can also choose Options for Selection… from the panel menu.
| Option | What it does |
|---|---|
| Name | Sets the name shown in the Layers panel. |
| Color | Sets the layer’s color from a list of presets, or from Custom for any color. |
| Template | Makes the layer a template layer. A template layer is locked, its images are dimmed to 50%, and it is left out of printing and export. Turning Template off unlocks the layer and stops the dimming. |
| Show | Shows or hides the layer. |
| Preview | Draws the layer’s art in full. With Preview off, the layer’s art is drawn in outline. |
| Dim Images to | Dims the layer’s placed images on the canvas to the percentage you enter. |
| Lock | Locks the layer, so its art cannot be selected. |
| Includes the layer when the document prints. |
Lock and Print cannot be changed while Template is on. When you open Layer Options for a group or an object instead of a layer, the dialog shows only the name, Show and Lock.
Change how the Layers panel looks
Section titled “Change how the Layers panel looks”Choose Panel Options… from the Layers panel menu to open Layers Panel Options, set the options, and click OK. The panel keeps these settings for every document.
| Option | What it does |
|---|---|
| Show Layers Only | Lists layers and sublayers only, without the groups and objects inside them. Off by default. |
| Locate Selected Objects | When you select an object on the canvas or with a command, the panel opens the layers around it and scrolls to its row without highlighting the row. Off by default. |
| Row Size | Sets the height of each row: Small (20 pt), Medium (26 pt) or Large (40 pt). Choose Other to enter a height from 12 to 100 pt. Medium is the default. |
| Thumbnails | Layers, Group and Object show or hide the thumbnail on each kind of row. All three are on by default. |
Trace over a template layer
Section titled “Trace over a template layer”- Choose File → Place… (Ctrl+Shift+P, or Cmd+Shift+P on macOS) and pick the sketch or photo you want to draw over.
- Turn on Template in the Place dialog, then place the file. The image goes onto a new locked template layer directly below the current layer. The new layer is named Template followed by the file name.
- Click the layer above the template to make it current, and draw over the image.
- Choose View → Hide Template (Ctrl+Shift+W, or Cmd+Shift+W on macOS) to see your drawing without the image. The same menu item, now named Show Template, shows the template again.
Use the Layers panel menu
Section titled “Use the Layers panel menu”The panel menu holds commands that work on whole layers. Most of them act on the highlighted rows, or on the current layer when no row is highlighted.
- Merge Selected moves the contents of two or more highlighted rows into the row you highlighted last.
- Flatten Artwork moves the art of every visible top-level layer into one layer.
- Collect in New Layer moves the highlighted rows, or the selected objects, into a new layer.
- Release to Layers (Sequence) puts each object of a layer or group into a sublayer of its own. Release to Layers (Build) does the same, but each new sublayer also holds copies of the objects below it.
- Reverse Order reverses the stacking order of the highlighted rows.
- Template turns the highlighted layers into template layers, or back into ordinary layers.
- Hide Others, Outline Others and Lock Others act on every top-level layer except the ones that hold the highlighted rows, or the current layer when no row is highlighted. When every other layer is already hidden, in outline or locked, the menu shows Show All Layers, Preview All Layers or Unlock All Layers in that item’s place, and the command shows, previews or unlocks every layer.
Make and place symbols
Section titled “Make and place symbols”A symbol is art stored once in the document. Each copy of it on the canvas is an instance, and every instance changes when you edit the symbol. Open the panel with Window → Symbols (Ctrl+Shift+F11, or Cmd+Shift+F11 on macOS).
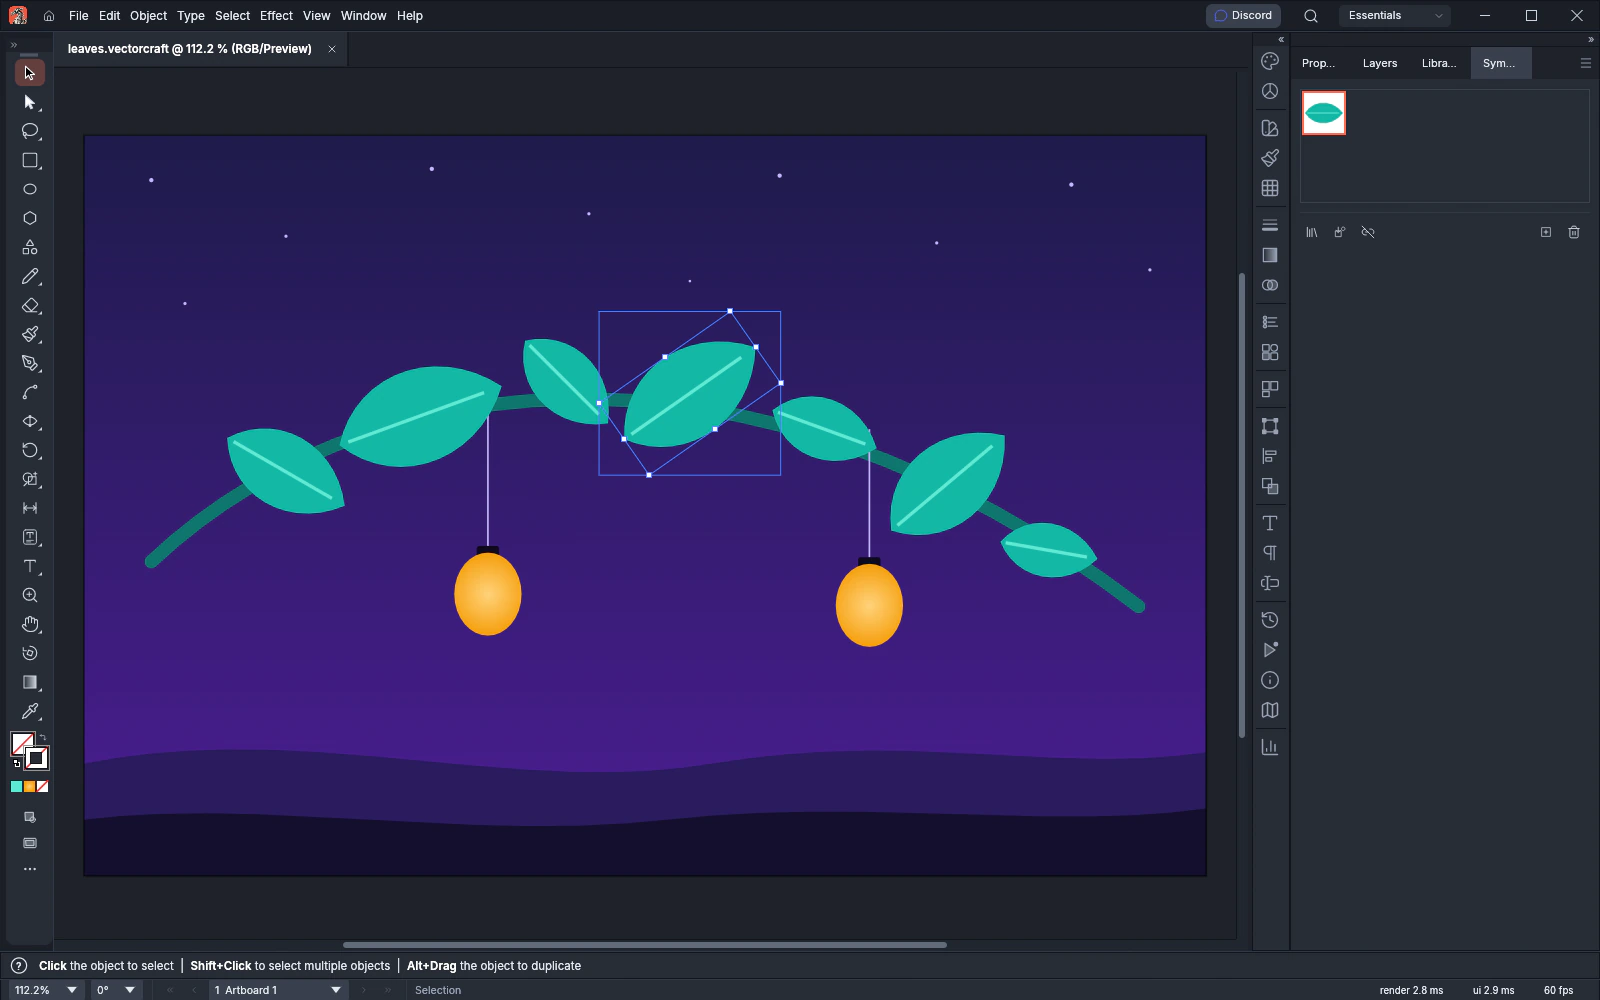
- Select the art you want to reuse.
- Click New Symbol at the bottom of the Symbols panel, or press F8. In Symbol Options, enter a name and click OK. The art is saved as a symbol, and the selection on the canvas becomes its first instance. You can also drag selected art onto the panel. Alt-click (Option-click on macOS) New Symbol to skip Symbol Options and make a dynamic symbol under the next free name, such as New Symbol 2.
- To place another instance, drag the symbol from the panel onto the canvas. The instance is centered where you drop it. Place Symbol Instance places one at the center of the artboard.
- Move, scale and rotate instances like any other object.
| Action | Where |
|---|---|
| New Symbol | Symbols panel button, New Symbol… in the panel menu, or F8 |
| Place Symbol Instance | Symbols panel button or panel menu, or drag a symbol onto the canvas |
| Edit Symbol | Double-click an instance on the canvas or the symbol in the panel, or choose Edit Symbol in the panel menu |
| Redefine Symbol | Panel menu: replaces the symbol’s art with the selected art |
| Duplicate Symbol | Panel menu: adds a copy of the symbol chosen in the panel, named after it with copy at the end |
| Delete Symbol | Symbols panel button or panel menu: deletes the symbol chosen in the panel. VectorCraft asks before it deletes a symbol that has no instances; Alt-click (Option-click on macOS) the button to delete it without asking. For a symbol with instances, click Expand Instances to turn them into ordinary art, or Delete Instances to remove them. |
| Symbol Options… | Panel menu: opens Symbol Options for the symbol chosen in the panel |
| Replace Symbol | Panel menu, or the Replace menu on the Control bar while instances are selected |
| Break Link to Symbol | Symbols panel button or panel menu: turns the selected instances into plain art |
| Reset Symbol Instance | Panel menu: removes the appearance changes made to the selected instances of a dynamic symbol |
| Select All Instances | Panel menu: selects every instance of the symbol chosen in the panel |
| Select All Unused | Panel menu: selects the symbols that have no instances. Delete Symbol then deletes all of them after one question. |
| Thumbnail View, List View | Panel menu: shows the symbols as thumbnails or as a list |
Set symbol options
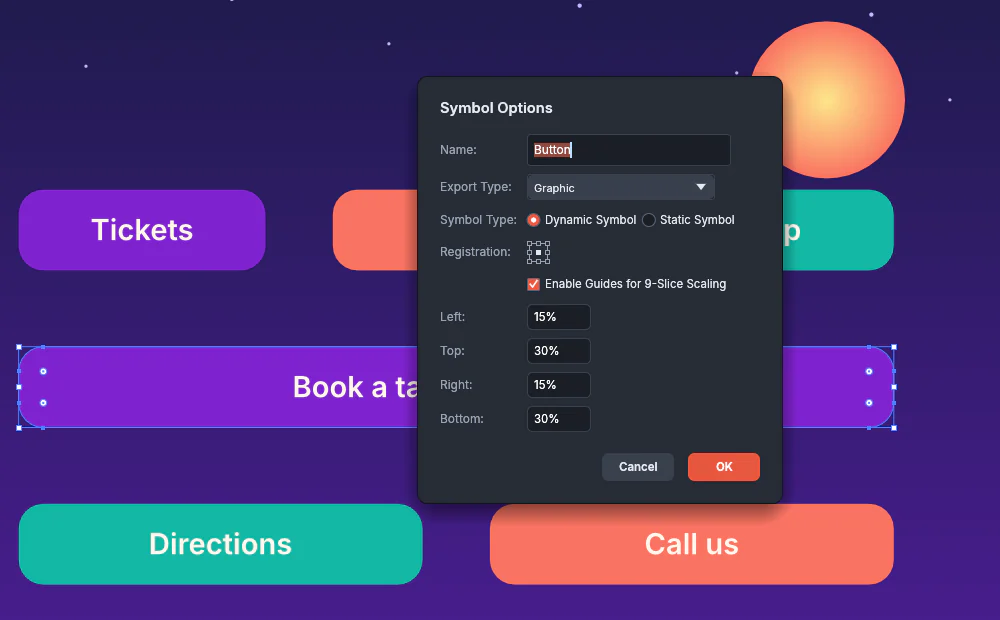
Section titled “Set symbol options”Symbol Options opens when you make a new symbol. To change the options of an existing symbol, click it in the Symbols panel and choose Symbol Options… from the panel menu.
| Option | What it does |
|---|---|
| Name | Sets the symbol’s name. A new symbol starts with the next free name, such as New Symbol or New Symbol 2. The name cannot be empty. |
| Export Type | Marks the symbol as a Movie Clip or a Graphic. A new symbol is a Movie Clip. |
| Symbol Type | Dynamic Symbol lets each instance change the appearance of parts of the art and stay linked to the symbol. Static Symbol turns this off. A new symbol is dynamic. |
| Registration | Sets the registration point to one of nine points on the art’s bounding box. A new symbol uses the center. |
| Enable Guides for 9-Slice Scaling | Adds two horizontal and two vertical guides that cut the symbol into nine parts. When you scale an instance, the corners keep their size, the top and bottom parts stretch only in width, the left and right parts stretch only in height, and the center stretches both ways. |
| Left, Top, Right, Bottom | Set how far each guide sits from its own edge, as a percentage of the symbol’s size, from 0 to 100. Each guide starts at 25%. |
To move the 9-slice guides by hand, open the symbol in symbol editing mode. The guides show as dotted lines with any tool. With the Selection Tool, drag a guide to move it. A guide stays inside the art’s bounding box and stops before the guide opposite it. Press Esc during the drag to put the guide back.
Edit a symbol
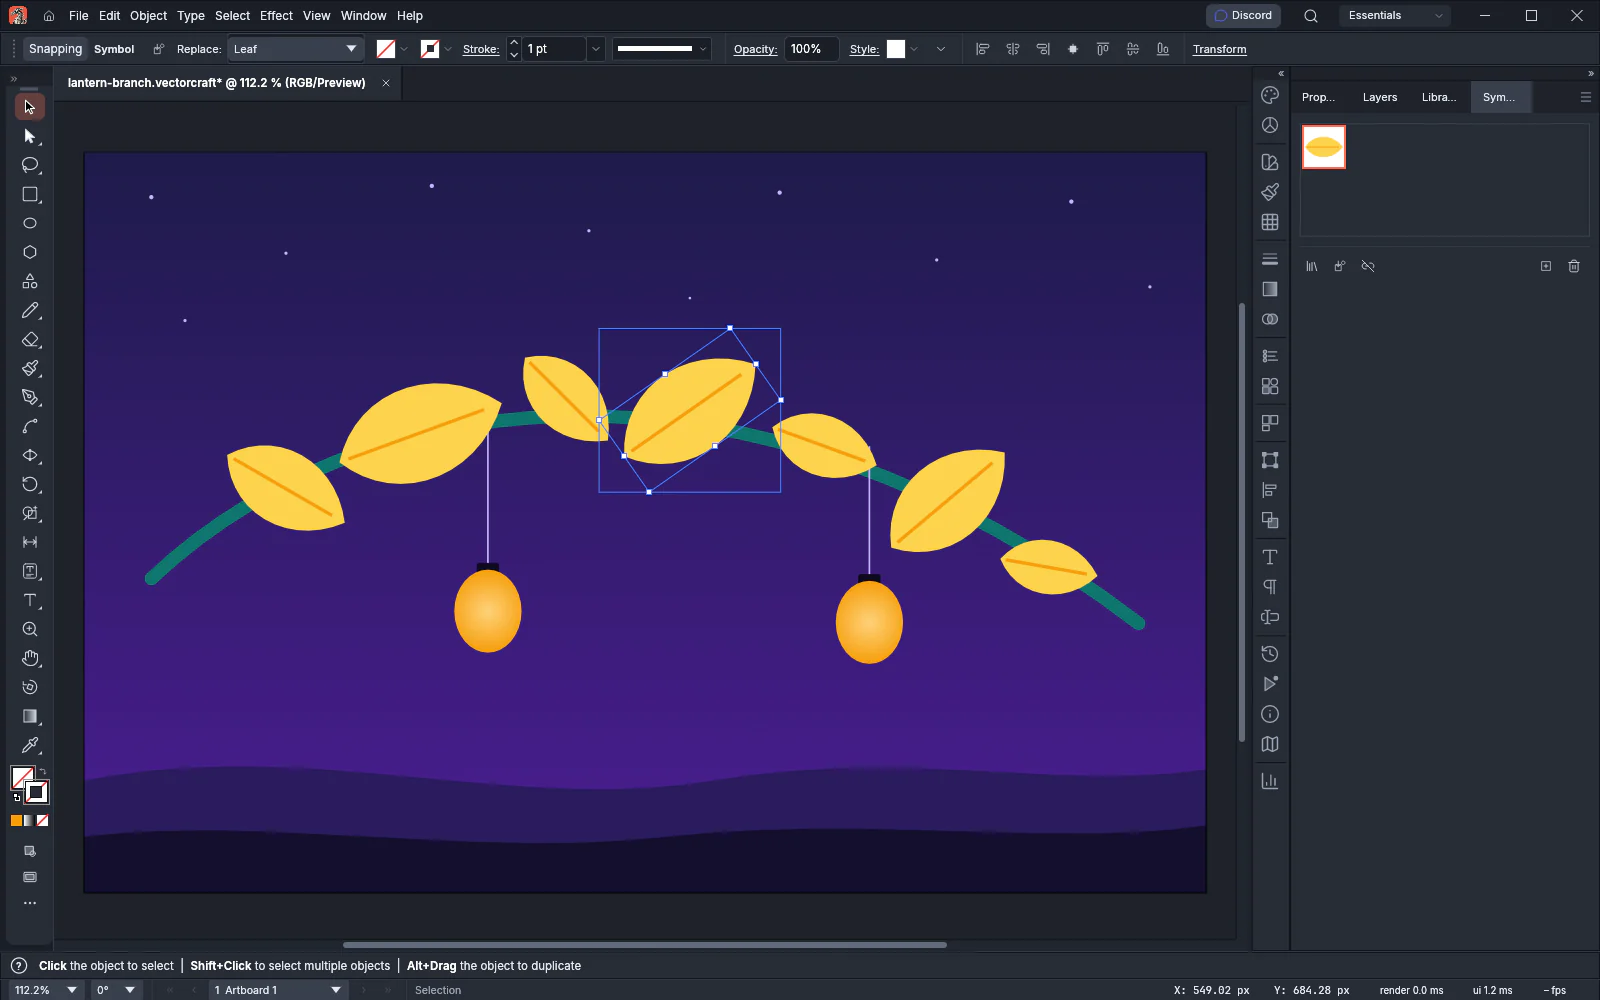
Section titled “Edit a symbol”- Double-click an instance on the canvas with the Selection Tool, or double-click the symbol in the Symbols panel. VectorCraft opens the symbol’s art in symbol editing mode.
- Change the art. Each change appears in every instance of the symbol.
- Click Exit Symbol Editing Mode on the Control bar to return to the document.
Load and save symbol libraries
Section titled “Load and save symbol libraries”A symbol library is a set of symbols that you can add to any document. VectorCraft includes the Basic Shapes library, and you can save your own.
To use a library:
- Choose Window → Symbol Libraries, then Basic Shapes or one of your libraries under User Defined. To use the symbols of another VectorCraft document, choose Other Library… and pick the file. You can also open a library with Open Symbol Library in the Symbols panel menu. The library opens in a panel of its own.
- Click a symbol in the library panel to add it to the document’s Symbols panel. Or drag the symbol onto the canvas to add it and place an instance where you drop it.
To save the document’s symbols as a library:
- Choose Save Symbol Library… from the Symbols panel menu, or choose Window → Symbol Libraries → Save Symbols….
- In Save Symbol Library, enter a Name. It starts as the document’s name.
- Under Save To, choose User Defined Libraries to list the library under Window → Symbol Libraries → User Defined, or A File… to save a
.vectorcraftfile in a folder you choose. - To save only the symbol you clicked in the Symbols panel, turn on Selected Symbols Only. The number after the option shows how many symbols it saves.
- Click OK.
Spray and adjust symbols
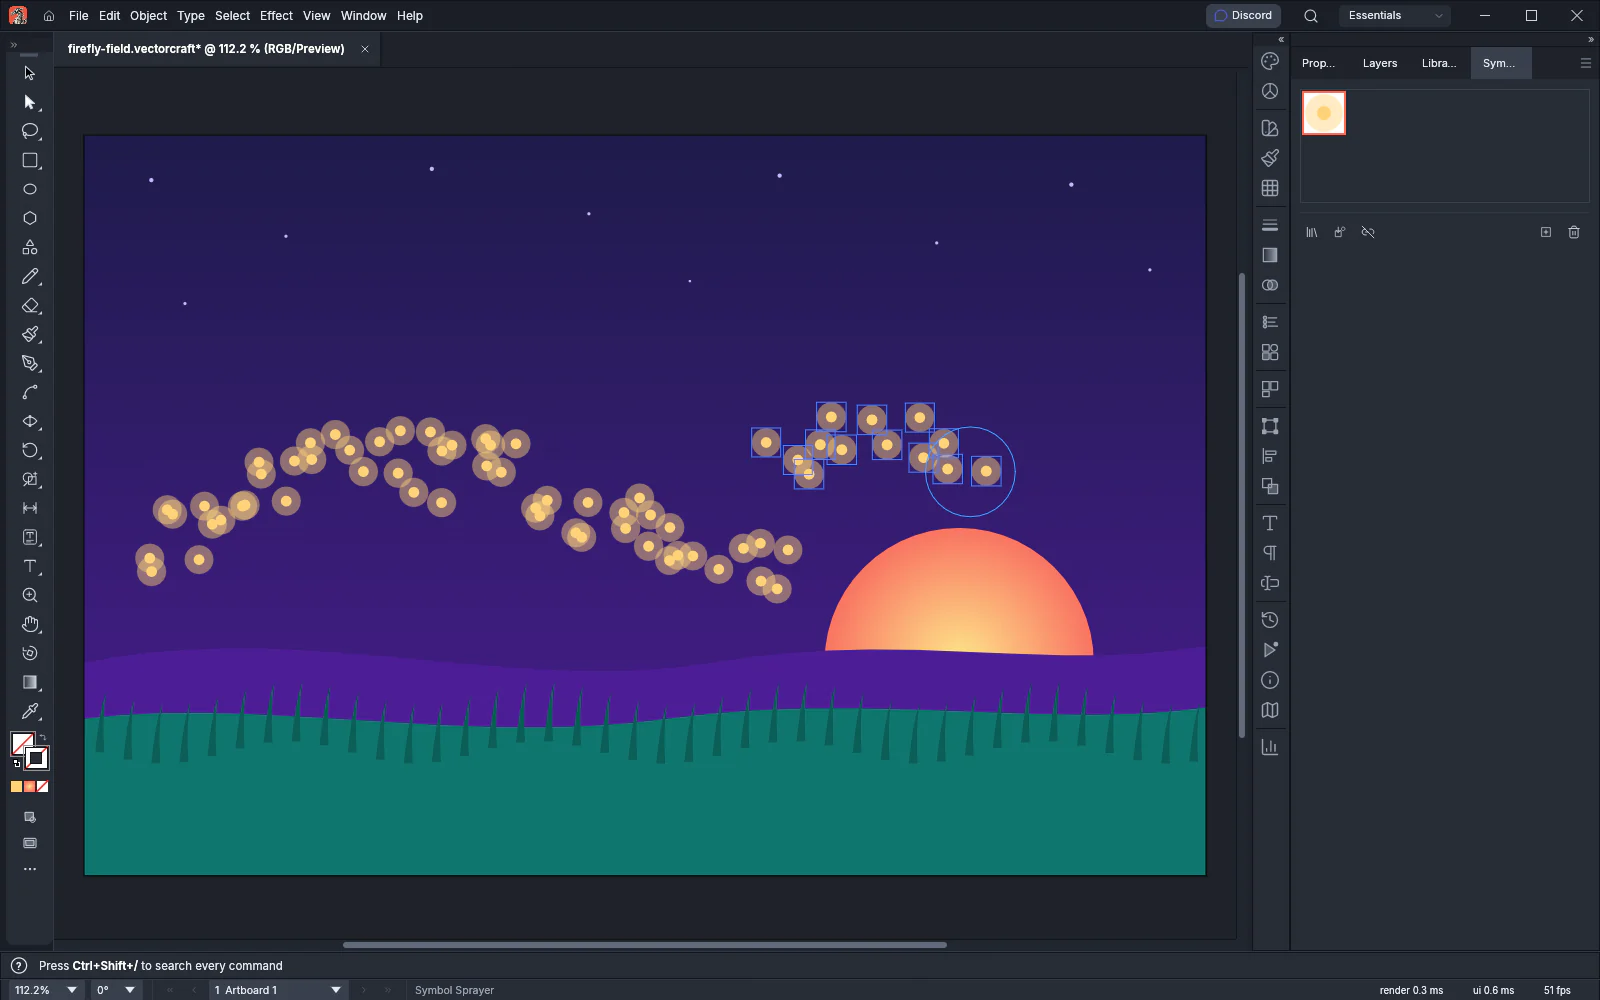
Section titled “Spray and adjust symbols”The Symbol Sprayer Tool (Shift+S) paints many instances of the symbol chosen in the Symbols panel as you drag, and removes instances of that symbol when you Alt-drag (Option-drag on macOS). The other symbolism tools are in the same tool group and change the instances under the brush.
- In the Symbols panel, click the symbol you want to spray.
- Select the Symbol Sprayer Tool (Shift+S).
- Drag across the canvas. Instances appear inside the brush circle as you drag, and the whole drag is one undo step. The instances go into a new group named Symbol Set.
- To add instances to a set you already sprayed, select the set with the Selection Tool, switch back to the Symbol Sprayer Tool, and drag again.
- To remove instances of the chosen symbol, Alt-drag (Option-drag on macOS) over them. With a set selected, the tool removes instances from that set only.
| Tool | What it does when you drag | With Alt (Option on macOS) |
|---|---|---|
| Symbol Shifter Tool | Moves instances in the direction you drag. | |
| Symbol Scruncher Tool | Pulls instances toward the pointer. | Pushes them apart. |
| Symbol Sizer Tool | Makes instances larger. | Makes them smaller. |
| Symbol Spinner Tool | Rotates instances in the direction you drag. | Rotates them the other way. |
| Symbol Stainer Tool | Tints instances with the current fill color. | Removes the tint. |
| Symbol Screener Tool | Makes instances more transparent. | Makes them more opaque. |
| Symbol Styler Tool | Applies a graphic style to instances. | Removes the style. |
Double-click any symbolism tool to open Symbolism Tools Options, where Diameter, Intensity and Symbol Set Density set the brush that all eight tools share. VectorCraft keeps the brush when you switch tools and saves it with your preferences.
| Option | What it does |
|---|---|
| Diameter | Sets the width of the brush circle, in the document’s units. The default is 80 pt. |
| Intensity | Sets how strongly the Shifter, Scruncher, Sizer, Spinner, Stainer, Screener and Styler tools change the instances, from 1 to 10. The default is 5. |
| Symbol Set Density | Sets how closely the Symbol Sprayer Tool packs the instances it adds, from 1 to 10. The default is 5. |
While a symbolism tool is active, press [ or ] to make the brush smaller or larger, and Shift+[ or Shift+] to lower or raise Intensity.
Keyboard shortcuts
Section titled “Keyboard shortcuts”| Action | Windows and Linux | macOS |
|---|---|---|
| Layers panel | F7 | F7 |
| Create a new layer | Ctrl+L | Cmd+L |
| Symbols panel | Ctrl+Shift+F11 | Cmd+Shift+F11 |
| New symbol from the selection | F8 | F8 |
| Place a file | Ctrl+Shift+P | Cmd+Shift+P |
| Hide or show template layers | Ctrl+Shift+W | Cmd+Shift+W |
| Symbol Sprayer Tool | Shift+S | Shift+S |
| Smaller or larger symbolism brush | [ or ] | [ or ] |
| Lower or raise symbolism Intensity | Shift+[ or Shift+] | Shift+[ or Shift+] |
Edit → Keyboard Shortcuts… changes every shortcut in this table except the bracket keys.