Measure and dimension
This guide covers measuring artwork and adding dimensions to technical drawings: the Measure tool, the Info panel, the Dimension tool and its options, the Measure & Inspect tool and Anchor Inspector panel from the Path Precision Tools plug-in, and the Document Info panel.
| Command or tool | Windows and Linux | macOS |
|---|---|---|
| Window → Info | Ctrl+F8 | Cmd+F8 |
| Edit → Keyboard Shortcuts… | Ctrl+Alt+Shift+K | Cmd+Option+Shift+K |
The Measure tool shares the Eyedropper tool’s group in the Tools panel. The Dimension tool has its own place, below the Shape Builder tool’s group. The Measure tool, the Dimension tool and the Measure & Inspect tool have no keys. To give a tool a key, use Edit → Keyboard Shortcuts….
The Measure tool, the Info panel, the Measure & Inspect tool and Document Info show lengths in the document’s units. To change them, choose File → Document Setup… and set Units. Dimensions have their own units, described in Set units, precision and style.
Measure a distance with the Measure tool
Section titled “Measure a distance with the Measure tool”- Choose the Measure tool from the Eyedropper tool’s group.
- Drag from the first point to the second. The start and end snap in the same way as the points of a drawing tool. Hold Shift to keep the line on 45° steps, counted from the Constrain Angle. The Constrain Angle is set in Edit → Preferences… → General on Windows and Linux, and in VectorCraft → Settings → General… on macOS.
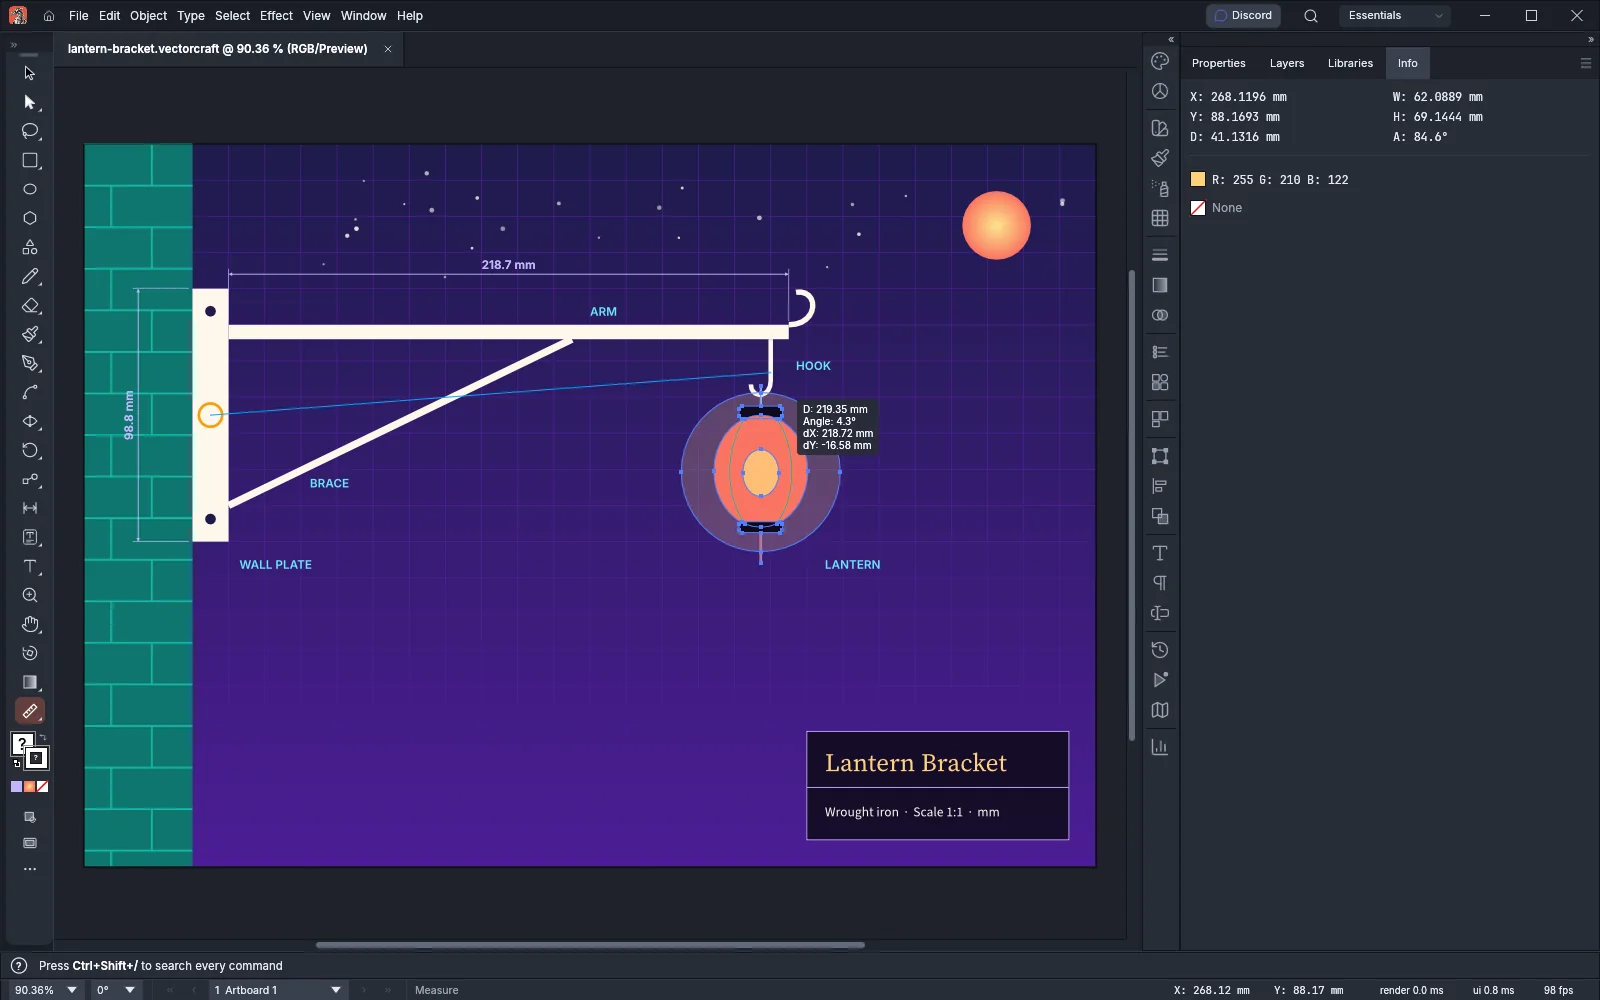
- Read the result beside the end of the line. D is the distance, Angle is the direction counterclockwise from horizontal, and dX and dY are the horizontal and vertical offsets.
The line and the readout stay on the canvas until your next drag. The Measure tool does not change the document. Press Esc during a drag to cancel it and bring back the previous result.
The readout shows only while Measurement Labels is on. Measurement Labels is in Edit → Preferences… → Smart Guides (Ctrl+K) on Windows and Linux, and in VectorCraft → Settings → Smart Guides… (Cmd+K) on macOS. It is on by default. With it off, the tool still draws the line.
Read positions and sizes in the Info panel
Section titled “Read positions and sizes in the Info panel”Choose Window → Info (Ctrl+F8, or Cmd+F8 on macOS). In the Essentials workspace, the panel opens in a group with History, Actions and Navigator. You can drag its tab into the dock beside Properties, Layers and Libraries.
| Readout | What it shows |
|---|---|
| X, Y | The pointer’s position, measured from the rulers’ zero point |
| W, H | The width and height of the selection |
| D, A | The pointer’s distance and angle from the center of the selection. They show only when something is selected |
| Fill and stroke | The selection’s fill and stroke, with their values in the color’s own mode: R, G and B; C, M, Y and K percentages; K for gray; or L, a and b |
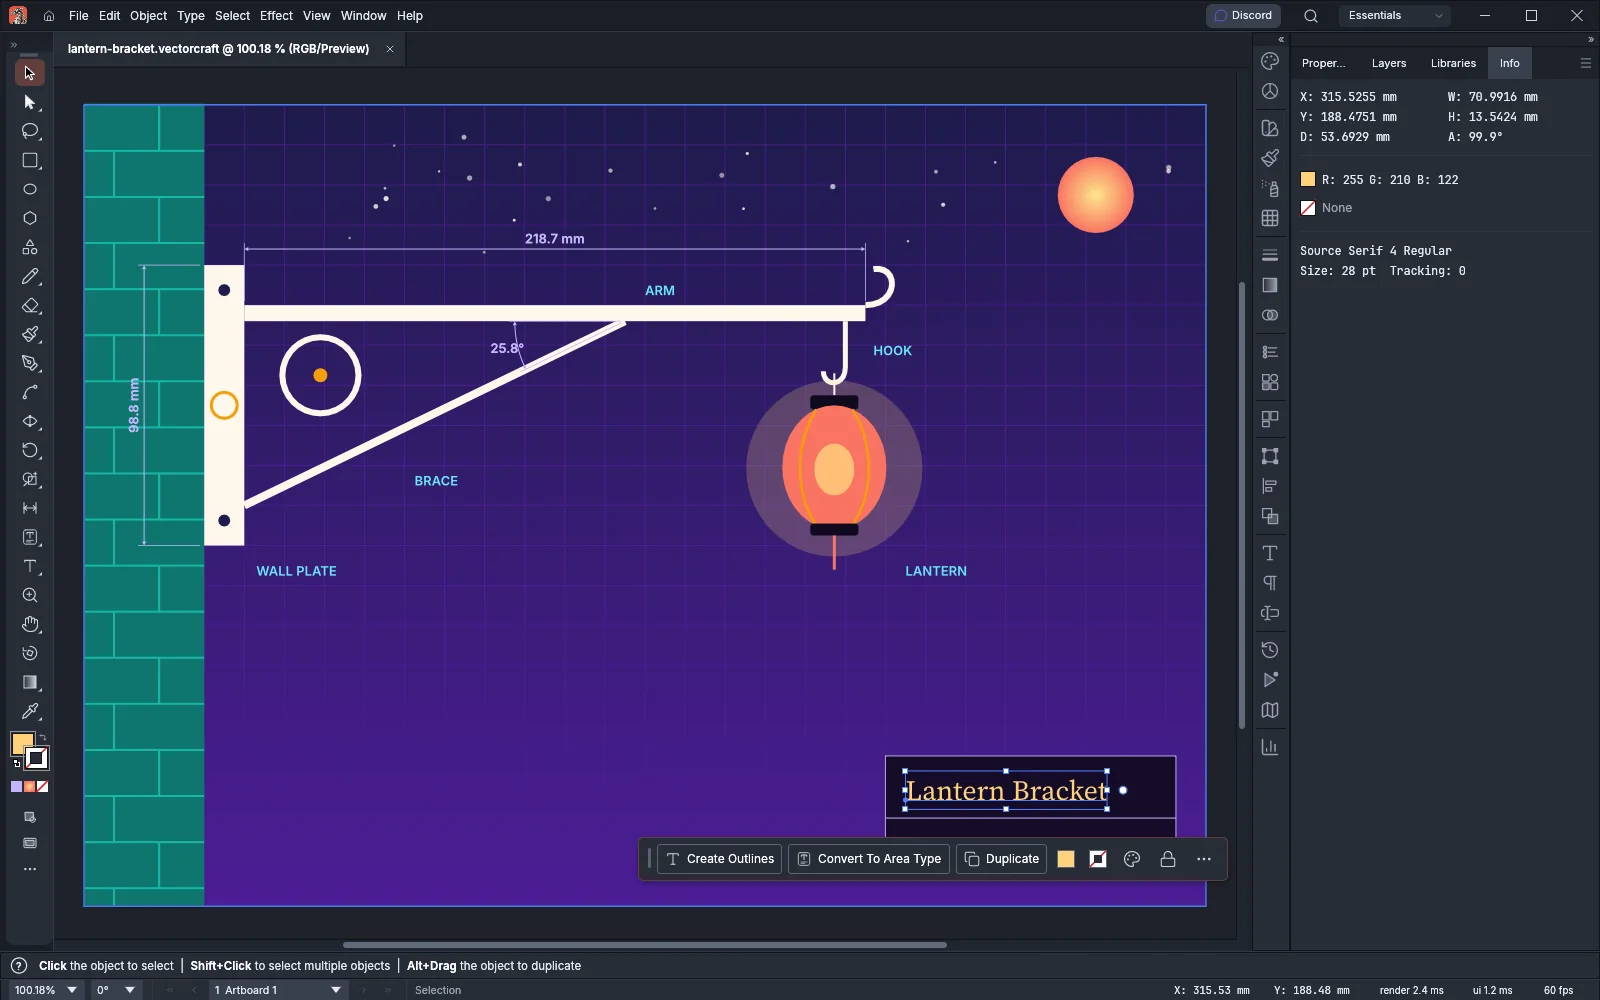
| Type | With a type object selected, its font and style, size and tracking |
The Info panel does not show the Measure tool’s result, which appears only beside the Measure line.
Choose Hide Options from the panel menu to hide D and A, and Show Options to show them again.
Add a linear dimension
Section titled “Add a linear dimension”The Dimension tool draws dimensions that are linked to the art they measure. Each dimension is a group of ordinary paths and type. The Layers panel lists it under its value, for example Dimension · 218.7 mm.
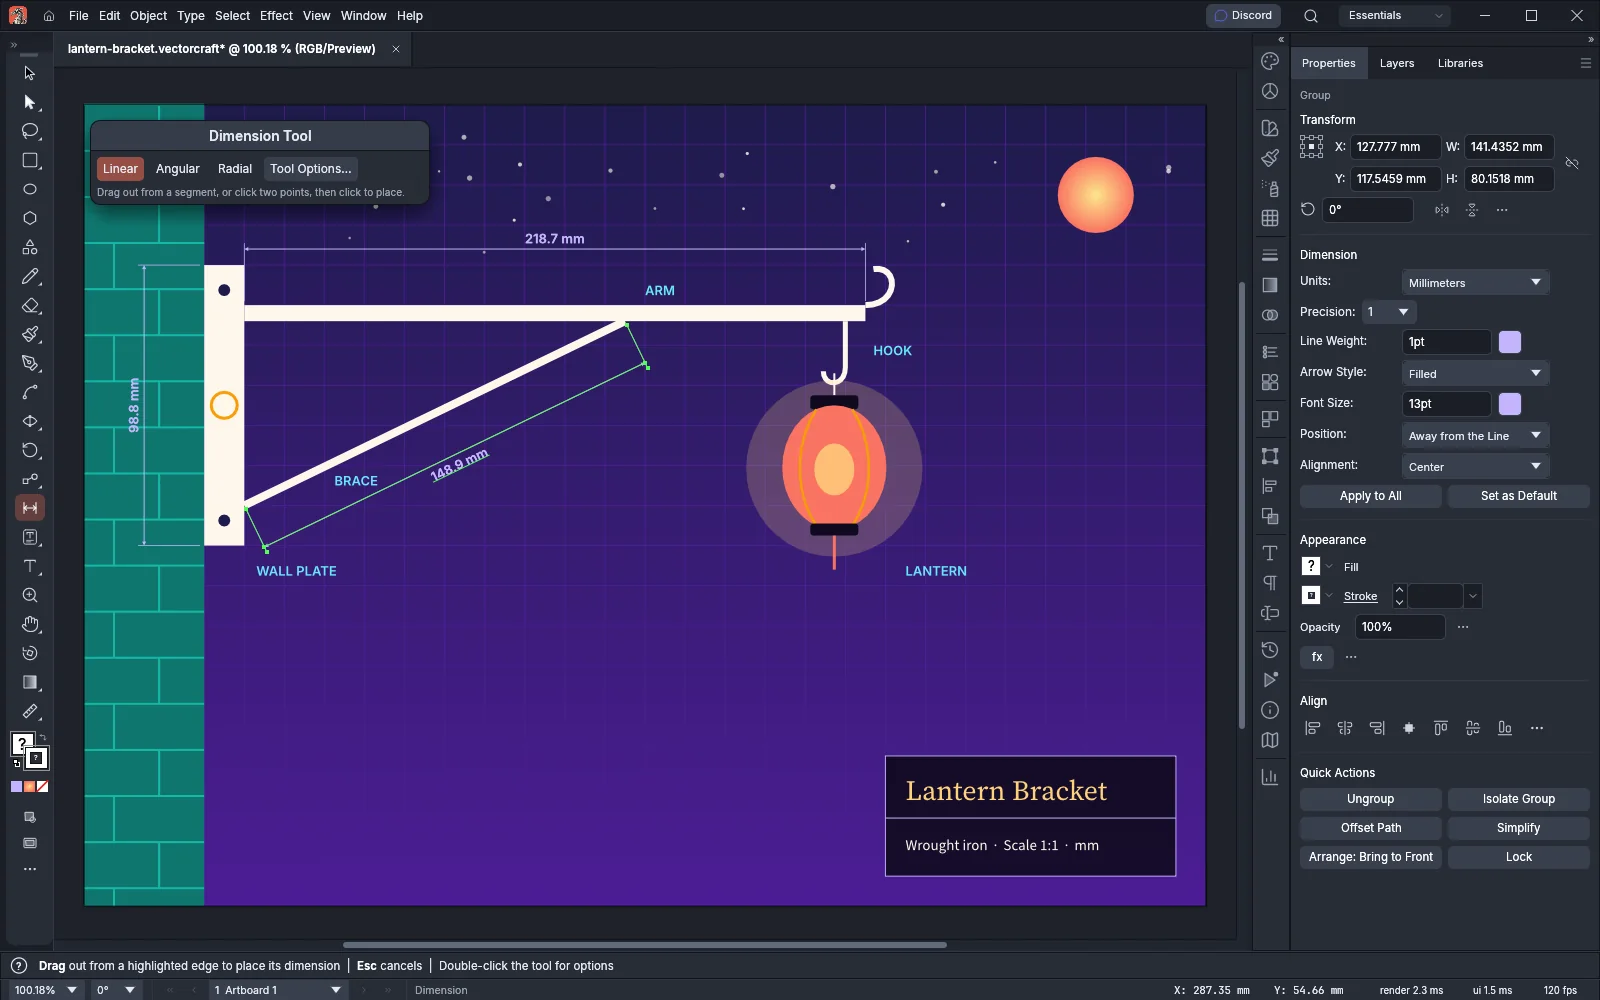
- Choose the Dimension tool. The Dimension Tool bar opens over the canvas with Linear, Angular, Radial and Tool Options…, and a hint for the kind that is chosen. Click Linear.
- Point at a segment. The tool highlights it and marks its ends. With Measurement Labels on, it also shows the segment’s length.
- Drag out from the segment, away from the art, and release where you want the dimension line.
To measure between any two points instead, click the first point and then the second. Move the pointer to place the dimension, and click. Hold Shift as you click the second point to keep it on a 45° step from the first. Smart Guides show where each click lands. A point you click on an anchor point is linked to that anchor point.
The new dimension is selected after you place it. Press Esc to cancel a dimension you have started. VectorCraft removes the unfinished dimension from the canvas.
Linked dimensions follow the art:
- When you move or reshape the art, its dimensions update their positions and values.
- When you move a dimension by itself, it moves to its new distance from the art and stays linked.
- When you delete the art, VectorCraft removes the dimensions linked to it in the same undo step. It does the same when you add or remove anchor points on a measured path, or open or close it. A circle’s dimensions are kept when its anchor points change.
- A dimension you copy and paste, or duplicate, keeps its value but is no longer linked.
Dimension angles and radii
Section titled “Dimension angles and radii”To dimension an angle:
- Click Angular in the Dimension Tool bar.
- Point at a corner, where two segments of a path meet at an anchor point. The tool highlights both segments.
- Drag out from the corner, and release to place the arc and its value.
You can also click two straight lines, which may belong to different paths, then move the pointer and click to place the dimension. Angles are labeled in degrees.
To dimension a circle or an arc:
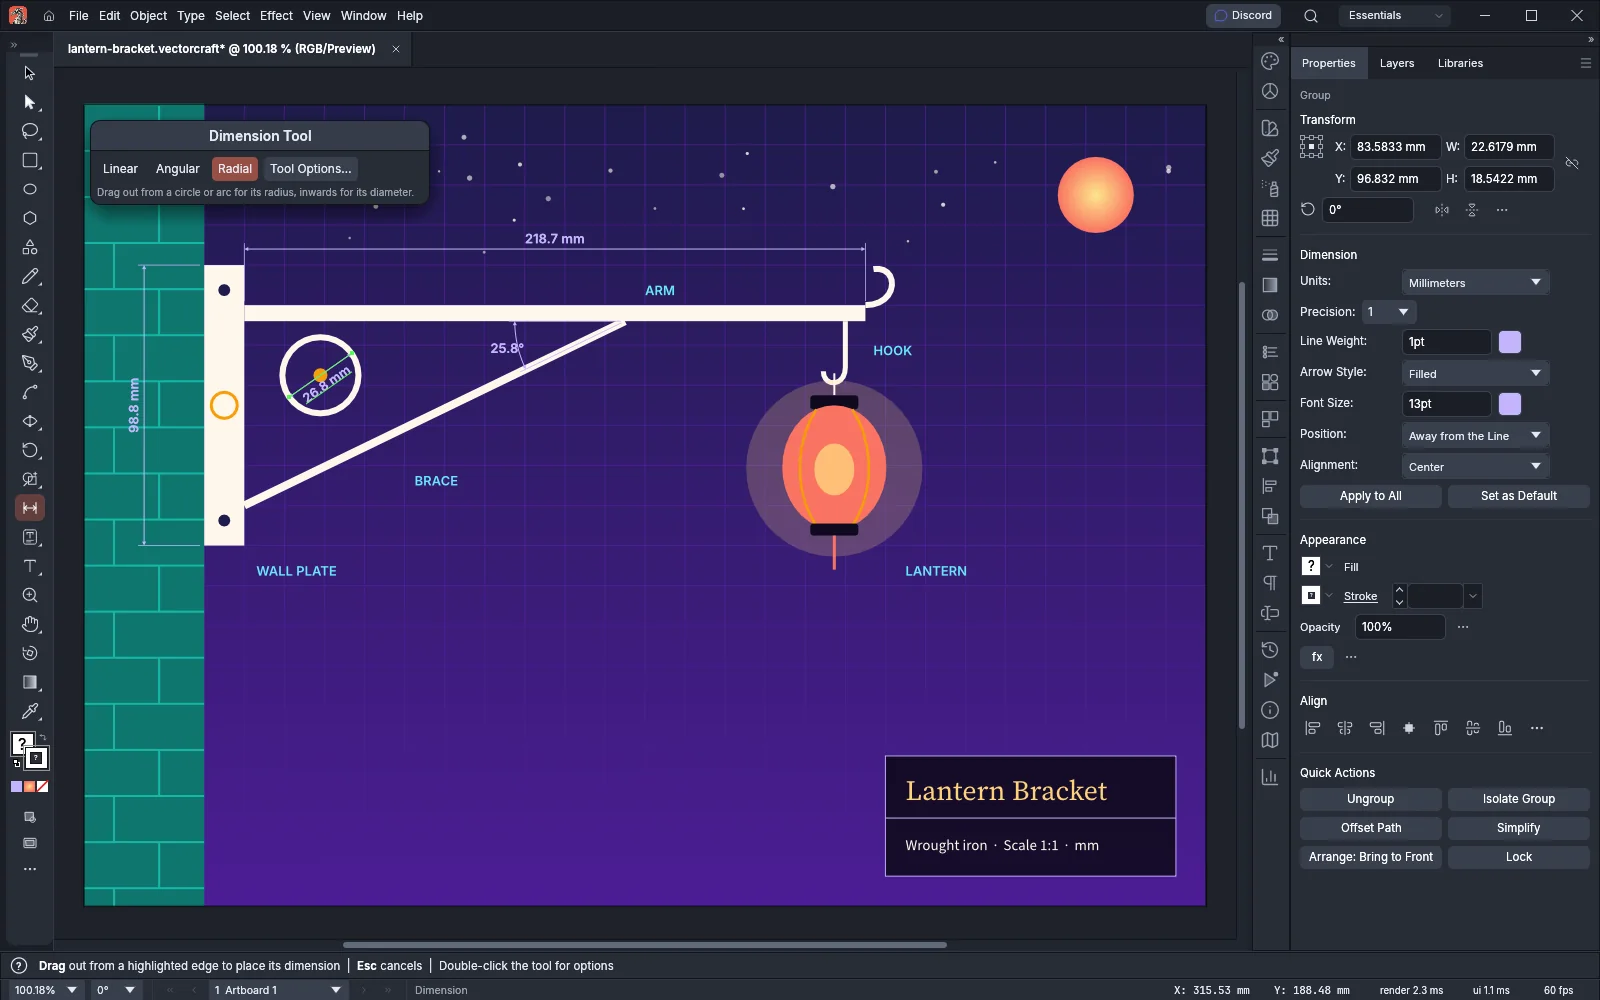
- Click Radial in the Dimension Tool bar.
- Point at a circle, or at a segment that is a perfect arc. The tool marks the center and shows a dashed radius toward the pointer.
- Drag outward, beyond the circle, and release to place a radius dimension. Drag inward, inside the circle, to place a diameter dimension instead.
A click on a circle or an arc places its radius dimension at once.
Set units, precision and style
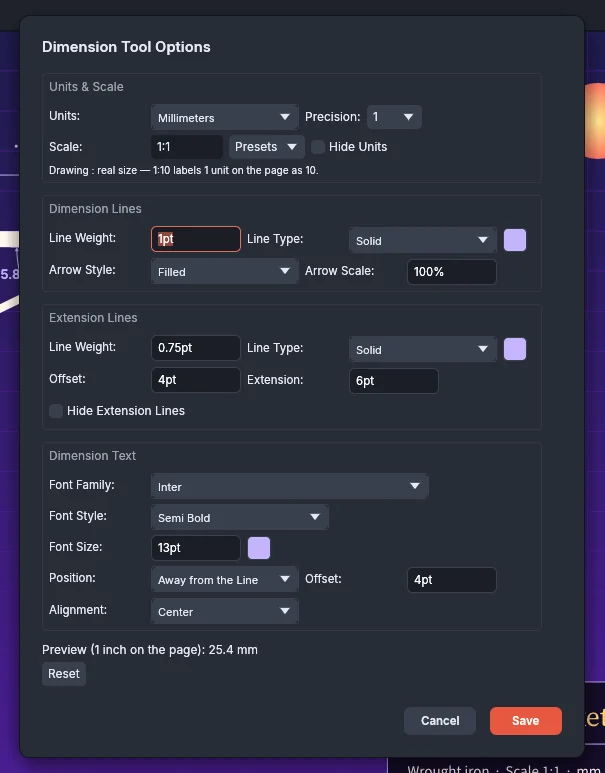
Section titled “Set units, precision and style”Double-click the Dimension tool, or click Tool Options… in the Dimension Tool bar, to open Dimension Tool Options. Save sets the style of the dimensions you draw next. Dimensions you already placed keep their style. Reset restores the defaults, and the line under the options shows the label that 1 inch on the page would get. VectorCraft keeps the tool’s kind and style with its preferences.
| Option | Default | What it does |
|---|---|---|
| Units | Points | Inches, Millimeters, Points, Picas, Pixels, Centimeters, Meters, Feet or Yards |
| Precision | 2 | Sets the number of decimal places, from 0 to 6 |
| Scale | 1:1 | Sets the drawing size to the real size. At 1:10, 1 unit on the page is labeled 10. Type a ratio from 1:1000000 to 1000000:1, or choose one from Presets, from 1:200 to 10:1 |
| Hide Units | Off | Leaves the unit off the label |
| Line Weight, Line Type (Dimension Lines) | 0.5 pt, Solid | Sets the dimension line’s weight, from 0.1 pt to 100 pt, and type: Solid, Dashed or Dotted. The color button beside them sets its color, black by default |
| Arrow Style | Filled | Filled, Open, Tick or None |
| Arrow Scale | 100% | Sizes the arrowheads, from 1% to 1000% |
| Line Weight, Line Type (Extension Lines) | 0.5 pt, Solid | Set the extension lines’ weight, type and color in the same way |
| Offset (Extension Lines) | 4 pt | Sets the gap between the art and the start of each extension line, from 0 pt to 10000 pt |
| Extension | 6 pt | Sets how far the extension lines run past the dimension line, from 0 pt to 10000 pt |
| Hide Extension Lines | Off | Draws the dimension without extension lines |
| Font Family, Font Style | Source Sans 3, Regular | Set the font of the value |
| Font Size | 12 pt | Sets the size of the value, from 1 pt to 1000 pt. The color button beside it sets its color, black by default |
| Position | Away from the Line | Away from the Line puts the value on the far side of the dimension line from the art. Between Line and Object puts it between the two |
| Offset (Dimension Text) | 4 pt | Sets the gap between the dimension line and the value, from 0 pt to 10000 pt |
| Alignment | Center | Places the value at the Left, Center or Right of the dimension line |
To change dimensions you already placed, select one dimension on its own and use the Dimension section of the Properties panel. It has Units, Precision, Line Weight and the line color, Arrow Style, Font Size and the text color, Position and Alignment. A change applies to the selected dimension.
- Apply to All gives every dimension in the document the selected dimension’s style, its scale included, in one undo step.
- Set as Default makes the selected dimension’s style the style of new dimensions.
The Properties panel does not show the scale. Set it in Dimension Tool Options.
Inspect anchor points and objects
Section titled “Inspect anchor points and objects”The Path Precision Tools plug-in adds the Measure & Inspect tool and the Anchor Inspector panel. Choose them from Object → Plug-ins → Path Precision Tools. To keep the Measure & Inspect tool in the Tools panel, add it from the All Tools drawer, as Cut, join and refine paths describes.
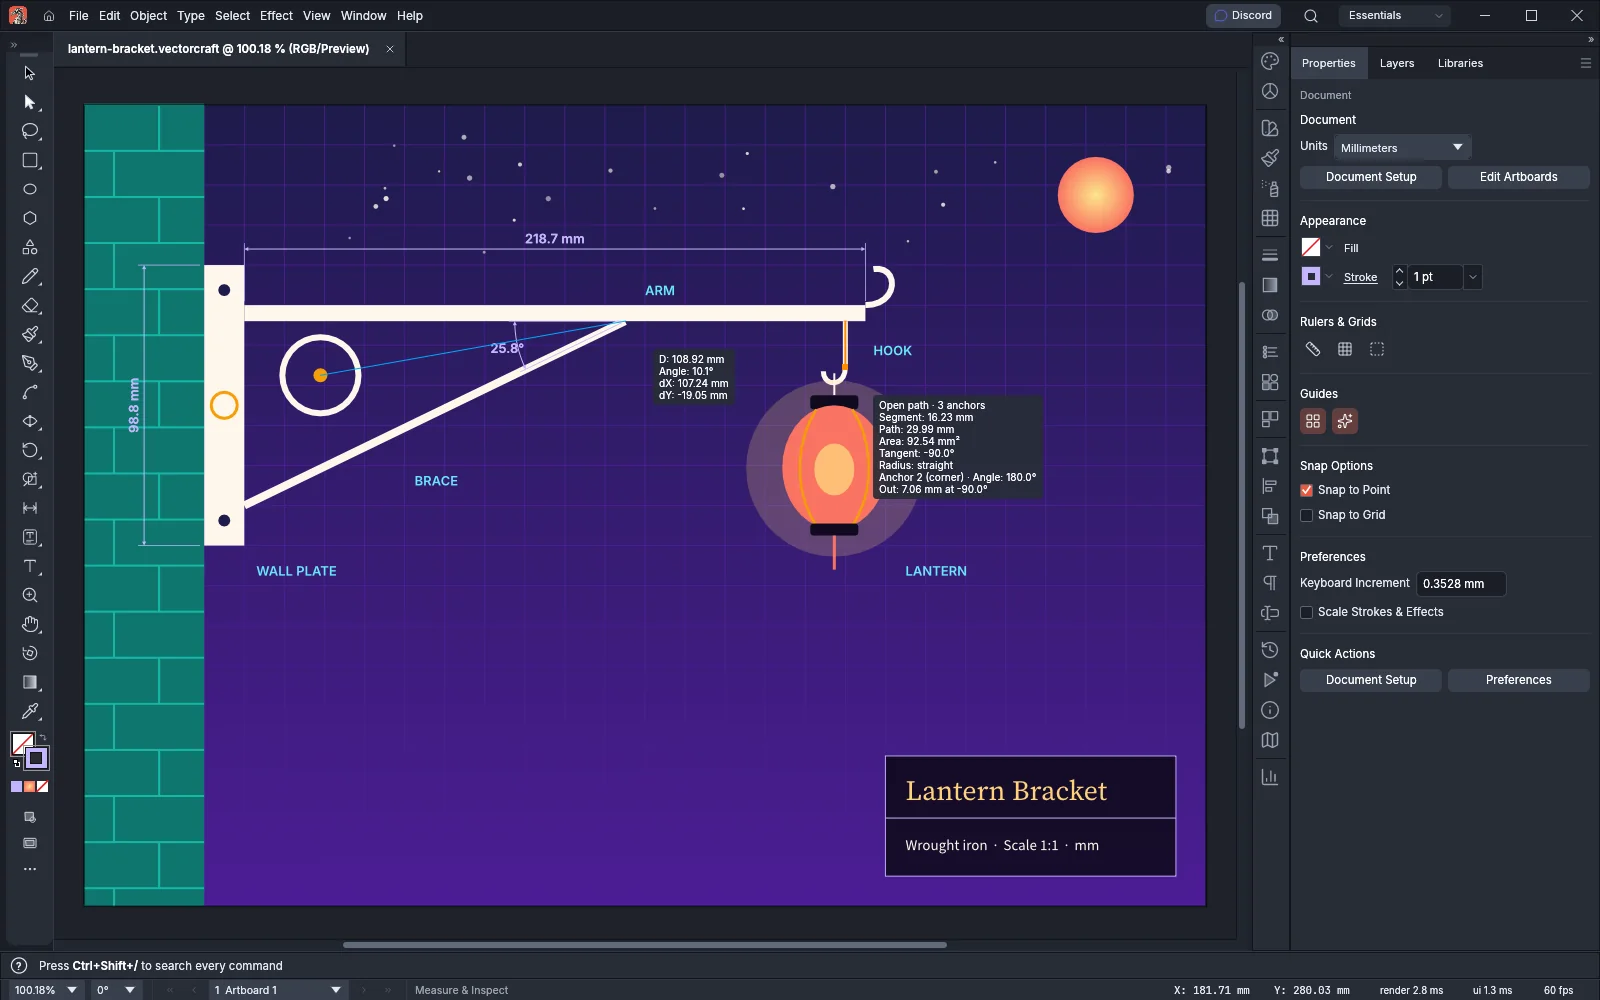
The Measure & Inspect Tool measures a drag as the Measure tool does, with D, Angle, dX and dY, Shift for 45° steps and Esc to cancel. The result stays until your next drag. Point at a path’s outline without clicking to read the path at that spot:
| Readout | What it shows |
|---|---|
| Open path or Closed path | Whether the path is closed, and its number of anchor points |
| Segment, Path | The length of the segment under the pointer, and of the whole path |
| Area | The area the path encloses, in square units |
| Tangent | The direction the path runs at the pointer, in degrees |
| Radius | The radius of curvature at the pointer, or straight on a straight segment |
| Anchor | Over an anchor point: its number, whether it is smooth or a corner, and the angle the path makes there (90° at a square’s corner, 180° where the path runs straight on), or open end at the end of an open path |
| In, Out | Over an anchor point: the length and direction of each of its handles |
Readouts use the document’s units. The tool does not draw anything into the document.
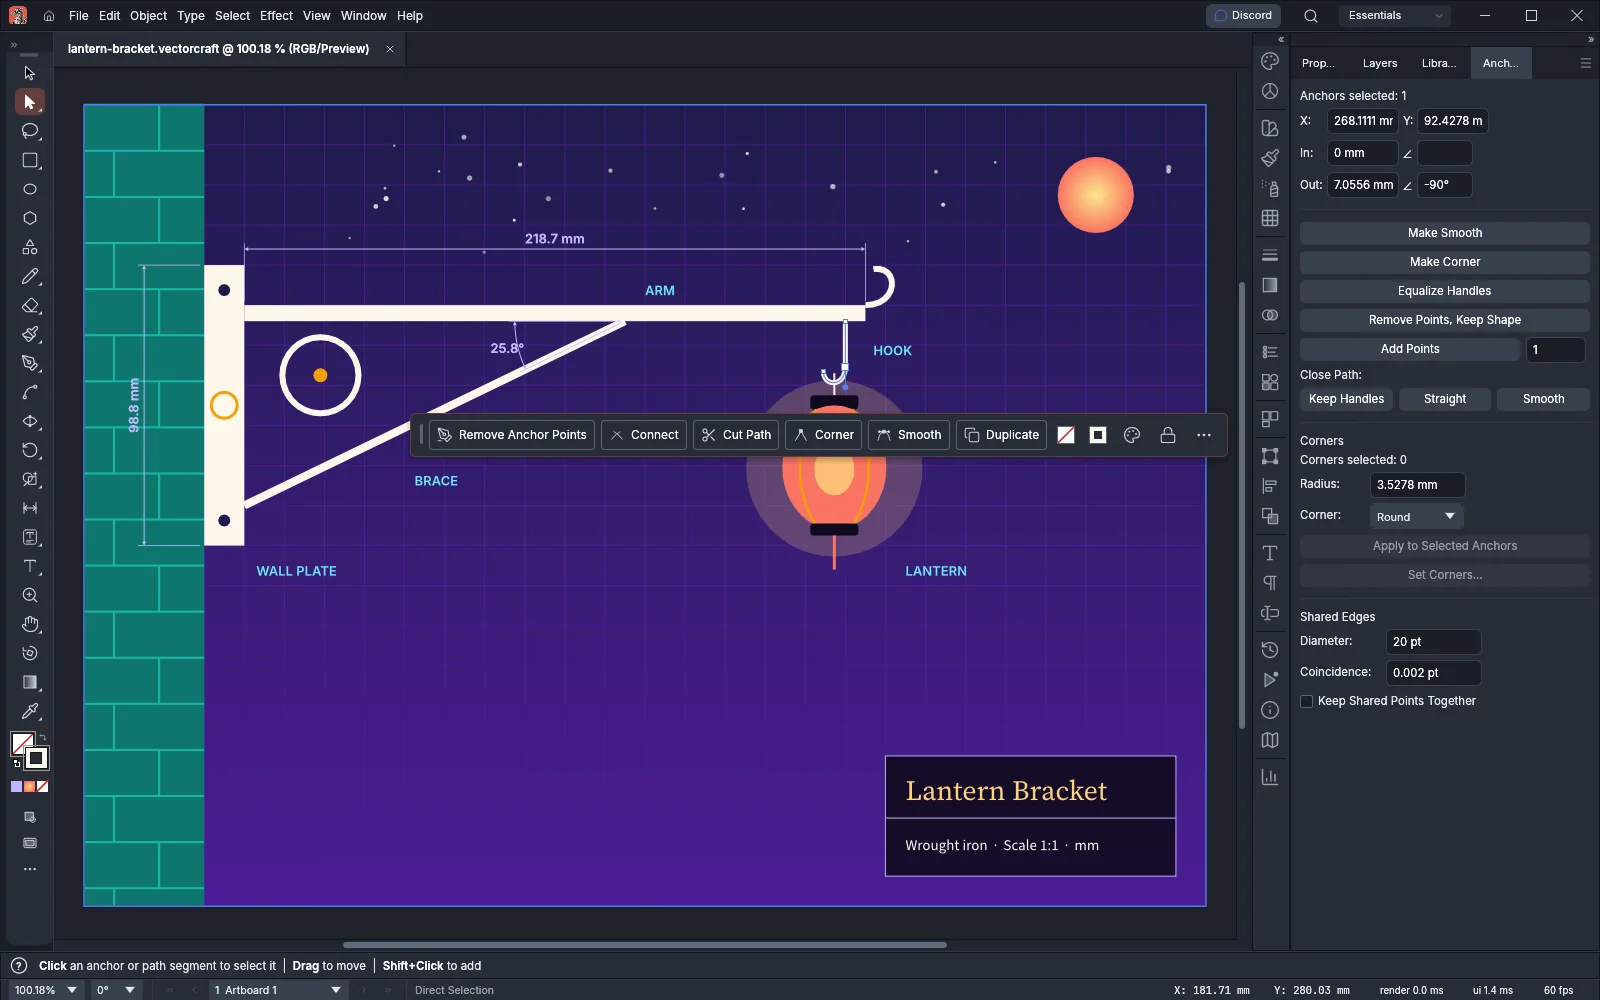
The Anchor Inspector panel edits anchor points with typed values. Select anchor points with the Direct Selection tool (A). The panel shows how many are selected, and the X and Y position of the first one. In and Out set the length and angle of its handles. The panel also has Make Smooth, Make Corner, Equalize Handles, Remove Points, Keep Shape, Add Points and Close Path. Cut, join and refine paths describes these.
List what a document holds with Document Info
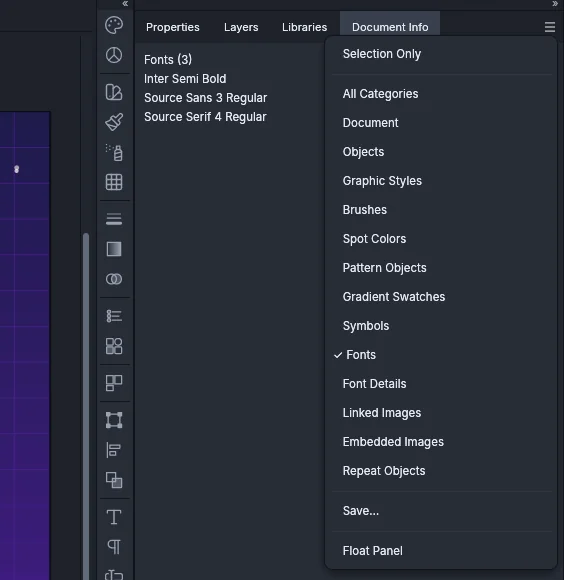
Section titled “List what a document holds with Document Info”Choose Window → Document Info. The panel lists the document in these categories:
| Category | What it lists |
|---|---|
| Document | The name, color mode, units, the number of artboards and each one’s size, the raster effects resolution, and the numbers of swatches, character styles, paragraph styles and pattern swatches |
| Objects | The number of objects of each kind, such as paths, compound paths, groups, clipping masks, text objects, images and gradient objects, and Path Length, the total length of the paths |
| Graphic Styles, Brushes, Spot Colors, Pattern Objects, Gradient Swatches, Symbols | The name of each one, with the count in the heading |
| Fonts | The fonts the document’s type uses |
| Font Details | Each font’s file and whether its license allows embedding. A missing font shows which font is drawn in its place |
| Linked Images, Embedded Images | Each image’s name and size in pixels, and for a linked image, its file |
| Repeat Objects | Each Repeat object’s name, kind and number of instances |
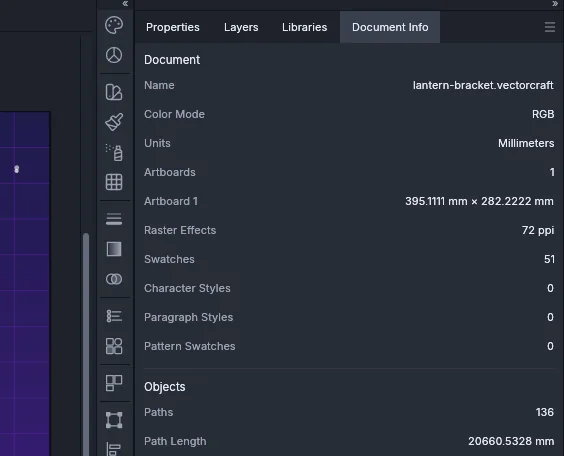
The panel menu changes what the list shows:
- Selection Only lists only what the selected objects hold.
- Choose a category to show it alone, or All Categories to show every category.
- Save… writes the categories the panel shows to a text file named after the document, such as
lantern-bracket Info.txt. File → Package… writes the same report.