
Combine and cut shapes
This page shows how to make new shapes from shapes that overlap. You combine and cut them with the Pathfinder panel or the Shape Builder tool, punch holes with compound paths, show art only inside a shape with a clipping mask, and color the regions of overlapping paths with Live Paint.
Use the Pathfinder panel
Section titled “Use the Pathfinder panel”Window → Pathfinder (Ctrl+Shift+F9, or Cmd+Shift+F9 on macOS) opens the Pathfinder panel. Its top row, Shape Modes, has Unite, Minus Front, Intersect and Exclude, followed by an Expand button. Its bottom row, Pathfinders, has Divide, Trim, Merge, Crop, Outline and Minus Back.
- Draw two or more shapes so that they overlap.
- Select them. A group selected on its own counts as the shapes inside it.
- Click an operation in the Pathfinder panel.
Divide and Outline work on a single object. Every other operation needs two or more objects, or a group, and its button stays dimmed until the selection has them. The following image shows the same teal square and coral circle after each of the ten Pathfinder operations.
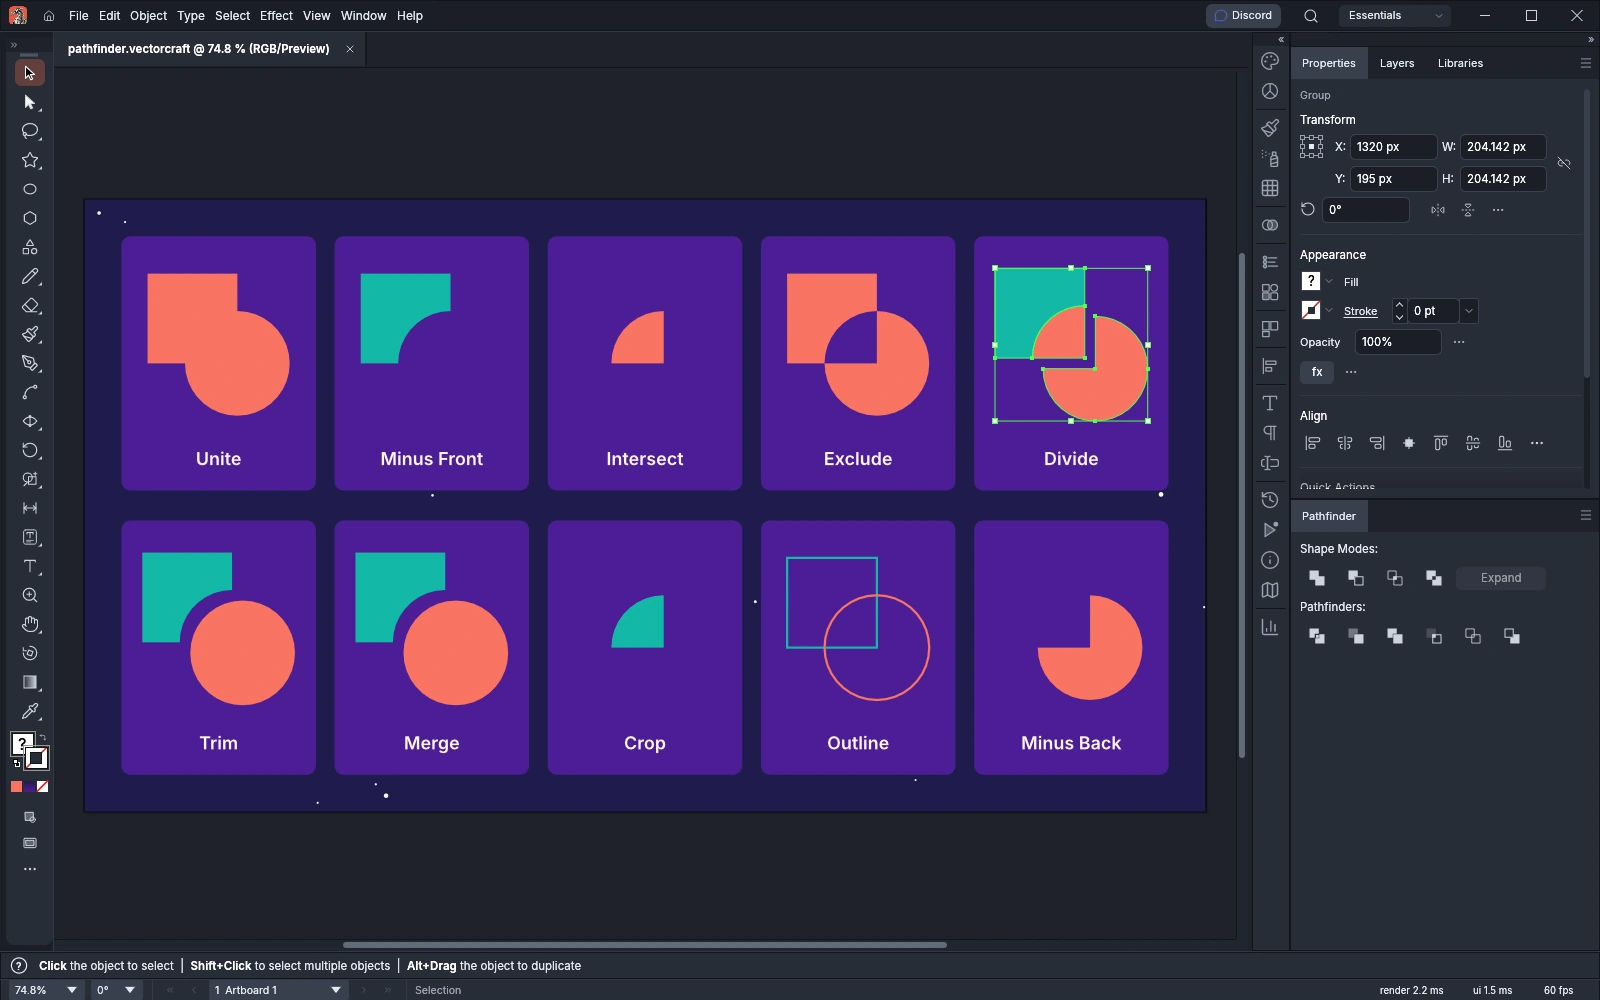
The operations treat the selection as a stack, from the back-most object to the front-most one.
| Operation | Group | Result |
|---|---|---|
| Unite | Shape Modes | One shape that covers every selected shape. It takes the paint of the front-most shape. |
| Minus Front | Shape Modes | The back-most shape with every shape in front of it cut away. It keeps the back-most shape’s paint. |
| Intersect | Shape Modes | Only the area that all the shapes cover. It takes the paint of the front-most shape. |
| Exclude | Shape Modes | The areas covered by an odd number of shapes. Where two shapes overlap, a hole appears. |
| Divide | Pathfinders | A separate piece for every region. Each piece takes the paint of the front-most shape that covers it. |
| Trim | Pathfinders | The hidden parts of each shape are removed, and so are the strokes. Each shape that is still visible stays a separate object. |
| Merge | Pathfinders | Trim, and then the visible parts that touch or overlap and have the same fill are joined. |
| Crop | Pathfinders | The parts of the lower shapes that lie inside the front-most shape. The front-most shape and the strokes are removed. |
| Outline | Pathfinders | The edges of every region as open paths, split where the shapes cross, each stroked in its shape’s former fill color. |
| Minus Back | Pathfinders | The front-most shape with every shape behind it cut away. It keeps the front-most shape’s paint. |
Use the Pathfinder panel menu
Section titled “Use the Pathfinder panel menu”Click the menu button at the top right of the Pathfinder panel to open the panel menu. The panel menu has more commands:
| Command | What it does |
|---|---|
| Trap… | Adds overprinting traps where selected objects of different solid colors meet. It needs two or more objects, and it opens the Trap dialog for the trap’s settings. |
| Repeat Pathfinder (Ctrl+4, or Cmd+4 on macOS) | Runs the last operation again on the current selection. After an operation it is named after that operation, for example Repeat Minus Front. It uses the current Pathfinder options, and it stays dimmed until an operation has run. Trap and the compound shape commands do not change which operation it repeats. |
| Pathfinder Options… | Sets Precision, Remove Redundant Points and Divide and Outline Will Remove Unpainted Artwork. See Set Pathfinder options. |
| Make Compound Shape | Makes a compound shape from two or more selected objects. |
| Release Compound Shape | Turns the selected compound shape back into its members, as they were before you made it, and selects them. |
| Expand Compound Shape | Turns the selected compound shape into one path, or one compound path, of the area it shows, painted as it looks. |
A compound shape shows the combined area of its members, and each member stays a separate object that you can still edit. To make one:
- Select two or more objects.
- Alt-click (Option-click on macOS) a Shape Mode button to make a compound shape instead of a permanent result, or choose Make Compound Shape from the panel menu. Each member takes the mode of the button you clicked. Make Compound Shape gives every member the Unite mode.
- To change the mode of a member, select the member with the Direct Selection tool or in the Layers panel and click a Shape Mode button. The button of the selected member’s mode is highlighted.
- When you are done, click the Expand button next to the Shape Modes, or choose Expand Compound Shape. The compound shape becomes a final shape.
The compound shape takes the paint of its top-most member. When every member has the Minus Front mode, it takes the paint of the back-most member.
To make a plain click on a Shape Mode button make a compound shape, turn on Object → Plug-ins → Compound Shapes → Shape Mode Buttons Make Compound Shapes. An Alt-click (Option-click on macOS) then applies the permanent result. The setting is off by default. Use the built-in plug-ins describes the Compound Shapes plug-in.
Set Pathfinder options
Section titled “Set Pathfinder options”The Pathfinder options change how closely the results follow the original paths and what Divide and Outline keep. VectorCraft saves them with its preferences, and every later Pathfinder operation uses them, Repeat Pathfinder included.
- Choose Pathfinder Options… from the Pathfinder panel menu.
- Change the options.
- Click OK.
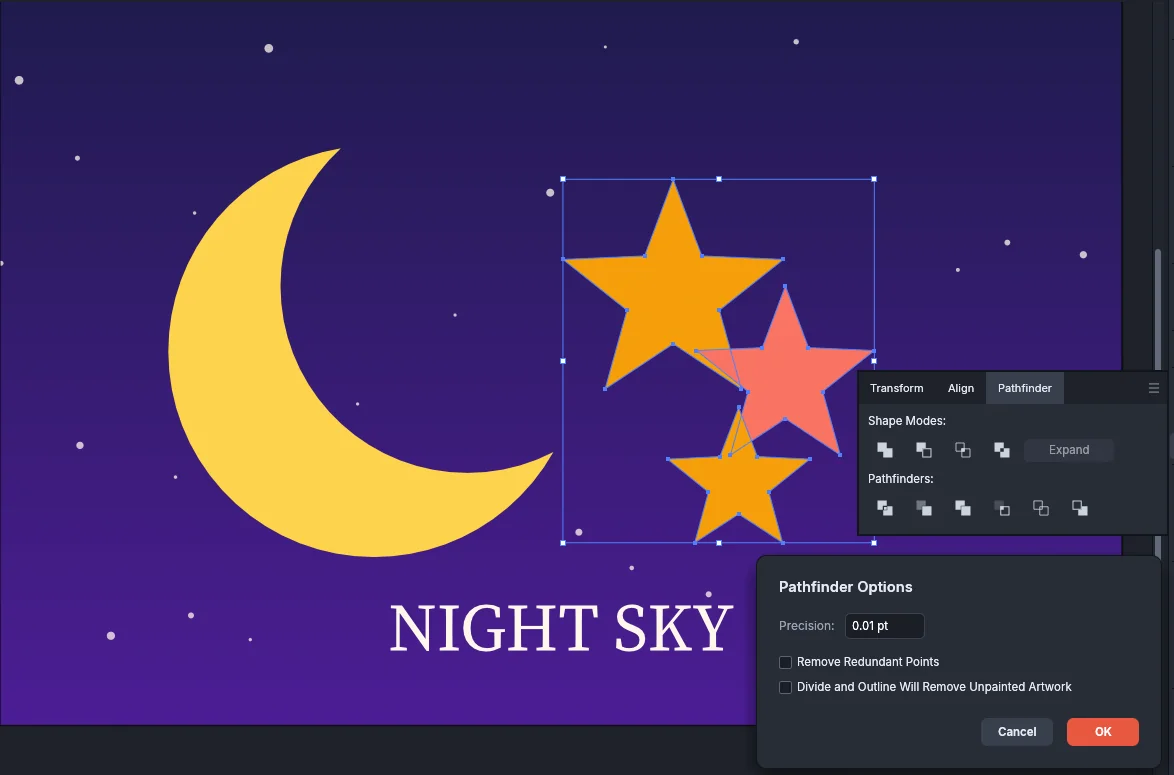
| Option | Default | What it does |
|---|---|---|
| Precision | 0.01 pt | How closely the results follow the paths, from 0.001 to 10 pt. The result’s curves are refit to within this distance, and pieces thinner than it are dropped. |
| Remove Redundant Points | Off | Removes the anchor points that do not change a result’s shape, to within the Precision. |
| Divide and Outline Will Remove Unpainted Artwork | Off | Divide and Outline leave out the pieces of objects that have no fill. |
Build shapes with the Shape Builder tool
Section titled “Build shapes with the Shape Builder tool”The Shape Builder tool (Shift+M) merges and deletes the regions that overlapping shapes make, directly on the canvas.
- Select the overlapping shapes.
- Choose the Shape Builder tool. The region under the pointer is highlighted with a hatch pattern.
- Drag across the regions you want to join. When you release the mouse button, they become one shape.
- To delete regions, hold Alt (Option on macOS) and click or drag over them. The pointer shows a minus sign, and the regions to be deleted are highlighted in red.
If you hold Shift when you press the mouse button, the drag draws a rectangle instead of a line. The regions the rectangle reaches are merged, or deleted if you also hold Alt (Option on macOS). Press Escape during a drag to cancel it.
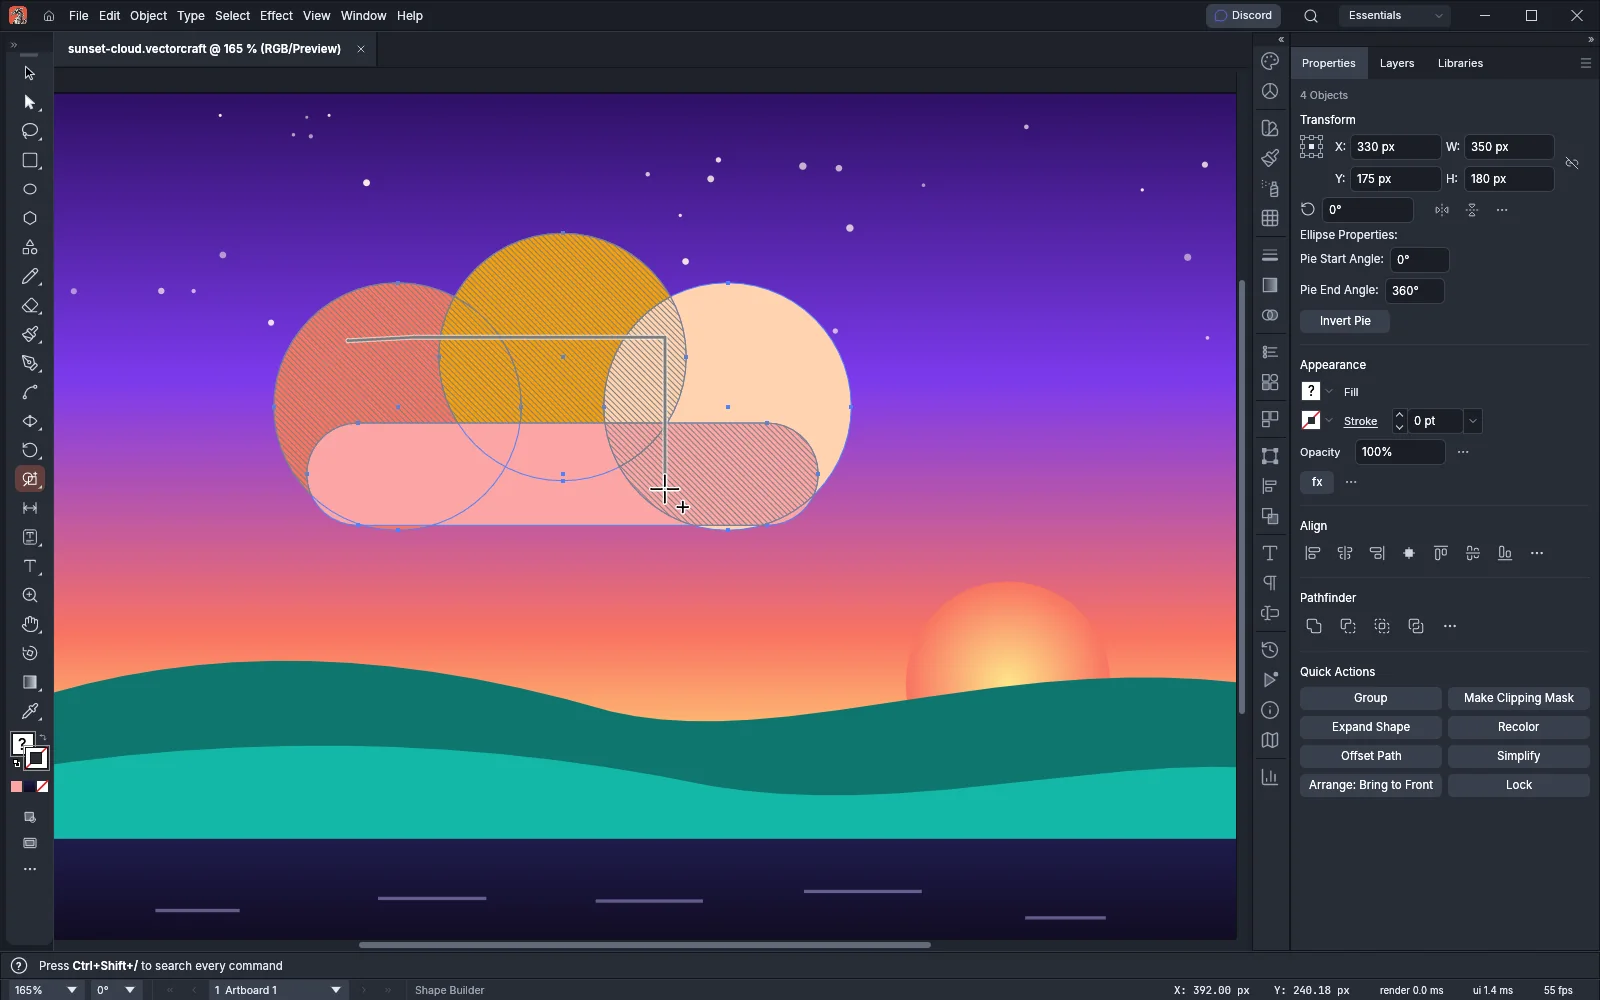
Double-click the tool to open Shape Builder Tool Options. These options change how it works. They stay set when you switch tools, and VectorCraft saves them with its preferences.
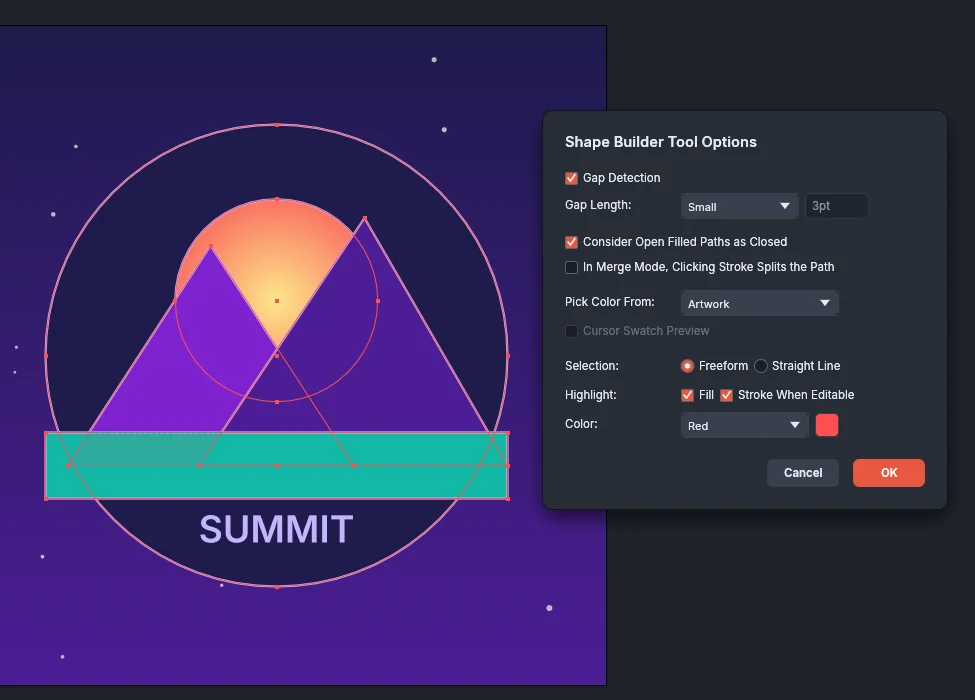
| Option | Default | What it does |
|---|---|---|
| Gap Detection | Off | Closes small gaps between paths when the tool finds regions. Gap Length sets the largest gap it closes. |
| Gap Length | Small | The largest gap that Gap Detection closes: Small (3 pt), Medium (6 pt), Large (12 pt) or Custom, which takes a length from 0 to 72 pt. You can set it only while Gap Detection is on. |
| Consider Open Filled Paths as Closed | On | An open path that has a fill bounds a region as if an invisible edge closed it. When it is off, the open path cuts the regions it crosses, as a line does. |
| In Merge Mode, Clicking Stroke Splits the Path | Off | A click on a stroke splits that path where the pointer is. The pointer shows scissors over a stroke it can split. |
| Pick Color From | Artwork | With Artwork, a merged shape takes the look of the object where the drag starts. With Color Swatches, it takes the current fill, and the Left and Right arrow keys step the current fill through the document’s color swatches. |
| Cursor Swatch Preview | Off | With Color Swatches, shows the current fill and the swatches before and after it as small chips above the pointer. You can turn it on only when Pick Color From is Color Swatches. |
| Selection | Freeform | With Freeform, a drag touches the regions the pointer passes over. With Straight Line, it touches the regions that the straight line from where the drag started to the pointer crosses. |
| Highlight → Fill | On | Shades the regions under the pointer or touched by the drag. |
| Highlight → Stroke When Editable | On | With In Merge Mode, Clicking Stroke Splits the Path on, draws the part of the stroke that a click would split off in the highlight color. |
| Color | Red | The color of the stroke highlight. Pick a layer color from the list, or click the color button for any other color. You can change it only while Stroke When Editable is on. |
Make a compound path
Section titled “Make a compound path”A compound path joins several paths into one object with one paint. Where a path in front overlaps the back-most path, it cuts a hole.
- Draw the outer shape, and then draw the shapes for the holes in front of it.
- Select all of them.
- Choose Object → Compound Path → Make (Ctrl+8, or Cmd+8 on macOS).
The compound path takes the paint of the back-most path. To split it into separate paths again, choose Object → Compound Path → Release (Ctrl+Alt+Shift+8, or Cmd+Option+Shift+8 on macOS). Each released path keeps the compound path’s paint. Release also splits a single path that is made of several separate parts into one path for each part.
Clip art with a clipping mask
Section titled “Clip art with a clipping mask”A clipping mask shows the objects under it only where they fall inside its shape.
- Place the shape for the mask on top of the art you want to clip. The mask can be a path, a compound path or text.
- Select the mask and the art.
- Choose Object → Clipping Mask → Make (Ctrl+7, or Cmd+7 on macOS).
The top-most selected object becomes the clipping path, and it loses its own fill and stroke. The result is a clip group.
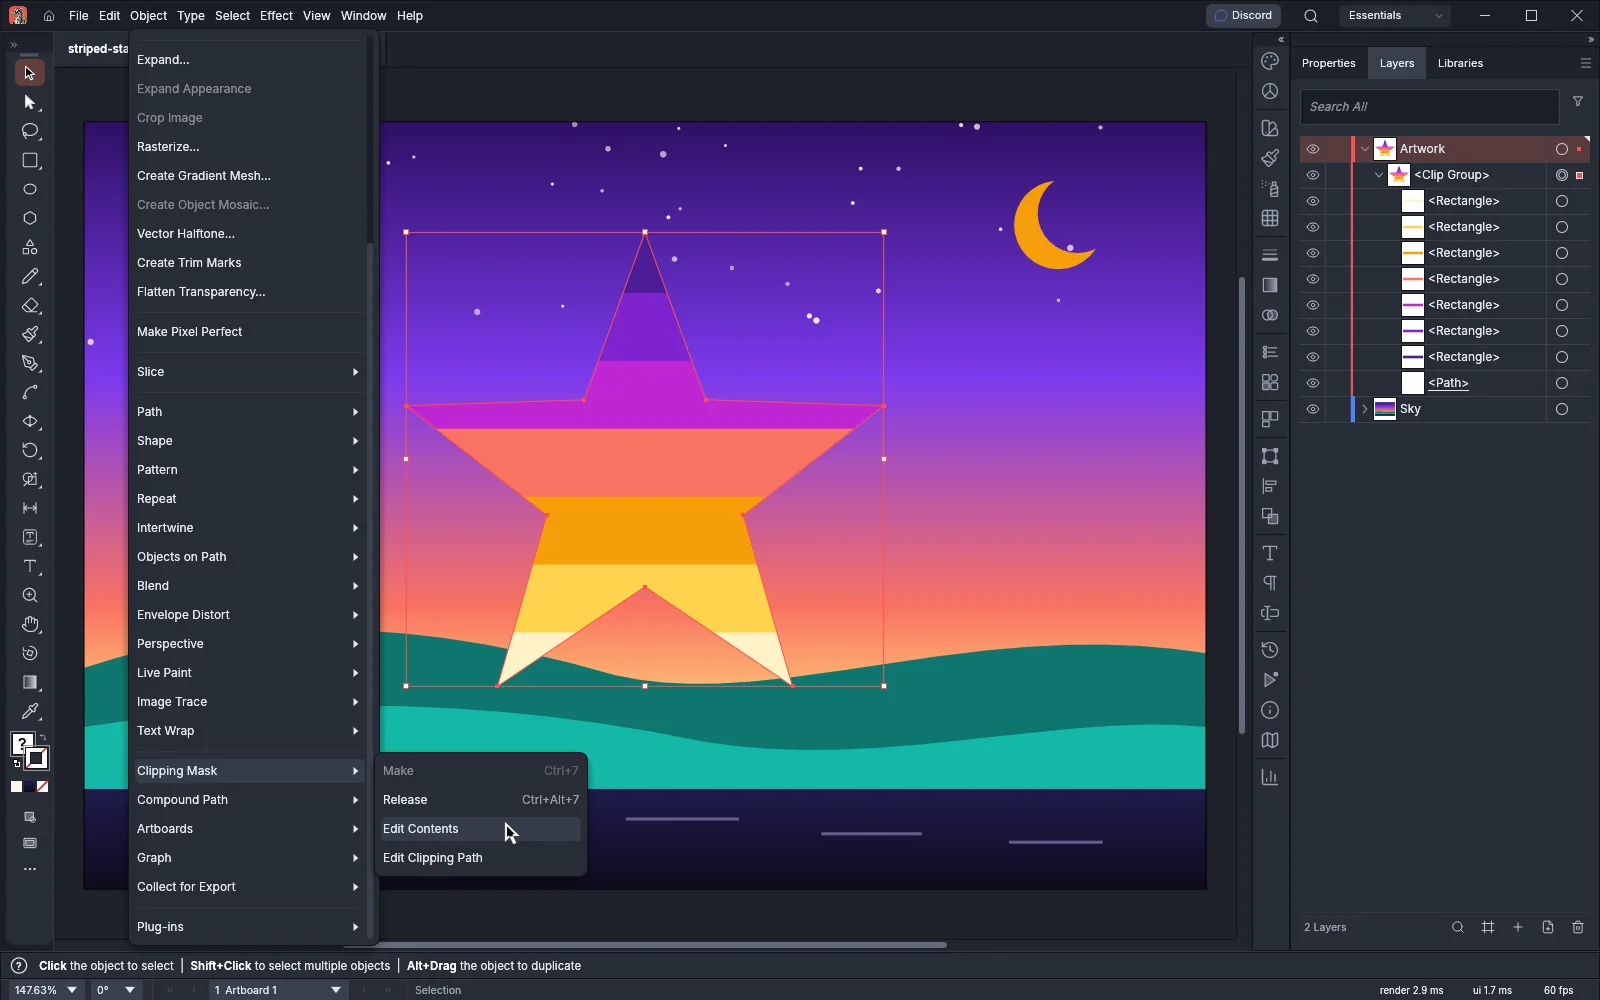
To work with a clip group, select it and use the other commands in Object → Clipping Mask:
- Edit Contents selects the clipped art, so you can move or restyle it inside the mask.
- Edit Clipping Path selects the clipping path, so you can reshape it.
- Release (Ctrl+Alt+7, or Cmd+Option+7 on macOS) turns the clip group into an ordinary group. The clipping path stays in the group. It has no fill or stroke unless you painted it after you made the mask.
With several clip groups selected, each command works on all of them.
Color regions with Live Paint
Section titled “Color regions with Live Paint”Live Paint treats overlapping paths as a set of regions, called faces, and the path segments between crossings, called edges. You can fill each face and stroke each edge on its own.
- Select the paths.
- Choose Object → Live Paint → Make (Ctrl+Alt+X, or Cmd+Option+X on macOS). Each face starts with the fill of the front-most path that covers it.
- Choose the Live Paint Bucket (K) and pick a fill color.
- Click a face to fill it with the current fill. Shift-click near an edge to paint it with the current stroke.
With the Live Paint Bucket, Alt-click (Option-click on macOS) copies the fill or stroke under the pointer into the current paint, and Alt+Shift-click (Option+Shift-click on macOS) copies only the color under the pointer.
The Live Paint Selection tool (Shift+L) selects faces and edges. Click a face to select it, Shift-click a face to add it to the selection or remove it, and Alt-click (Option-click on macOS) to select an edge. Drag to select every face and edge the marquee touches. If you hold Shift when you start the drag, the faces and edges the marquee touches are added to the selection, or removed if they are already selected.
The Object → Live Paint menu also has Merge, which adds other selected paths to a Live Paint group, Release, which gives back the original paths, Gap Options…, and Expand, which turns the Live Paint group into an ordinary group of its painted faces and edges.
To add paths to a Live Paint group:
- Select the Live Paint group and the paths you want to add. You can also add compound paths, groups of paths and other Live Paint groups.
- Choose Object → Live Paint → Merge.
The paths join the bottom-most selected Live Paint group, which keeps its paint, its name and its other settings. Make does the same when the selection already holds a Live Paint group.
Double-click the Live Paint Bucket to open Live Paint Bucket Options. The options stay set when you switch tools, and VectorCraft saves them with its preferences.
| Option | Default | What it does |
|---|---|---|
| Paint Fills | On | A click fills the face under the pointer with the current fill. |
| Paint Strokes | Off | Lets the bucket paint edges with a plain click. With Paint Strokes on and Paint Fills off, a click paints the edge nearest the pointer and Shift-click fills the face. With both on, a click paints an edge within 4 pixels of the pointer and otherwise fills the face, and Shift-click fills the face. With both off, a click paints nothing. |
| Highlight | On | Outlines the face or edge under the pointer. |
| Color | A custom red (the list shows Custom) | The highlight color. Pick a layer color from the list, or click the color button for any other color. You can change it only while Highlight is on. |
| Width | 4 px | The width of a face’s outline on screen, from 1 to 20 pixels. An edge’s outline is half as wide. You can change it only while Highlight is on. |
Double-click the Live Paint Selection tool to open Live Paint Selection Tool Options. These options are also kept when you switch tools and saved with the preferences.
| Option | Default | What it does |
|---|---|---|
| Select Fills | On | A click selects the face under the pointer. When it is off, a click selects the edge nearest the pointer, and a marquee selects no faces. |
| Select Strokes | On | Alt-click (Option-click on macOS) selects an edge. When it is off, Alt-click selects the face under the pointer, and a marquee selects no edges. |
| Color | A custom red (the list shows Custom) | The color of the highlight on the face or edge under the pointer. Pick a layer color from the list, or click the color button for any other color. |
| Width | 4 px | The width of the highlight on screen, from 1 to 20 pixels. |
With both Select Fills and Select Strokes off, a click or a marquee selects no face or edge.
Close gaps in Live Paint
Section titled “Close gaps in Live Paint”When the paths of a Live Paint group do not meet, the area between them stays open and is not a face you can fill on its own. Gap Options makes paint stop at small gaps, or closes them with paths.
- Select the Live Paint group.
- Choose View → Show Live Paint Gaps. Each gap of the selected groups shows as a short line in the group’s Gap Preview Color, and the menu item changes to Hide Live Paint Gaps.
- Choose Object → Live Paint → Gap Options…. The dialog opens with the options of the first selected Live Paint group.
- Turn on Gap Detection and choose a size in Paint Stops At.
- Turn on Preview to apply the options to the groups while the dialog is open, and to show the gaps it finds in the preview color.
- Click OK. The change is one step in the undo history. Cancel puts the groups back as they were.
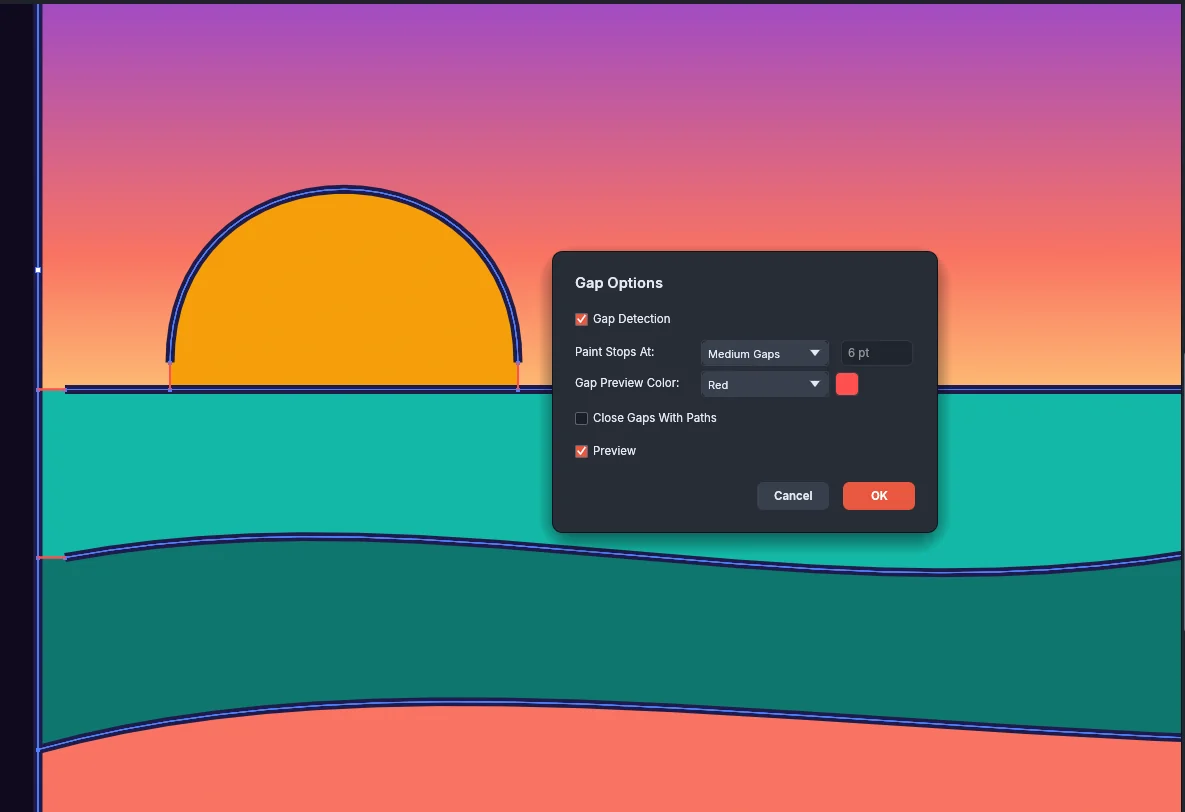
| Option | Default | What it does |
|---|---|---|
| Gap Detection | Off | Treats gaps up to the size in Paint Stops At as closed. Paint stops at them, and the area they close becomes a face you can fill. |
| Paint Stops At | Small Gaps | The largest gap that Gap Detection closes: Small Gaps (3 pt), Medium Gaps (6 pt), Large Gaps (12 pt) or Custom, which takes a size of more than 0 and up to 72 pt in the field next to it. |
| Gap Preview Color | Red | The color of the gap lines that the preview and View → Show Live Paint Gaps draw. Pick a layer color from the list, or click the color button for any other color. |
| Close Gaps With Paths | Off | Adds an unpainted path across each gap up to the chosen size to the group’s paths, so the gap stays closed without Gap Detection. |
| Preview | Off | Applies the options while the dialog is open and draws the gaps it finds. |
Each Live Paint group keeps its own gap options. A new group starts with Gap Detection off, Small Gaps and Red.
Shortcuts
Section titled “Shortcuts”| Command | Windows and Linux | macOS |
|---|---|---|
| Pathfinder panel | Ctrl+Shift+F9 | Cmd+Shift+F9 |
| Repeat Pathfinder | Ctrl+4 | Cmd+4 |
| Make a compound shape from a Shape Mode button | Alt-click | Option-click |
| Shape Builder tool | Shift+M | Shift+M |
| Delete regions with the Shape Builder tool | Alt-click or Alt-drag | Option-click or Option-drag |
| Make Compound Path | Ctrl+8 | Cmd+8 |
| Release Compound Path | Ctrl+Alt+Shift+8 | Cmd+Option+Shift+8 |
| Make Clipping Mask | Ctrl+7 | Cmd+7 |
| Release Clipping Mask | Ctrl+Alt+7 | Cmd+Option+7 |
| Make Live Paint | Ctrl+Alt+X | Cmd+Option+X |
| Live Paint Bucket | K | K |
| Paint an edge with the Live Paint Bucket | Shift-click | Shift-click |
| Copy paint with the Live Paint Bucket | Alt-click | Option-click |
| Live Paint Selection tool | Shift+L | Shift+L |
| Select an edge with the Live Paint Selection tool | Alt-click | Option-click |
Edit → Keyboard Shortcuts… changes them.