
Draw and edit paths
On this page you draw paths with the Pen, Curvature and Pencil tools and then change their shape. You move anchor points and handles with the Direct Selection tool, cut paths with the Scissors and Knife, and use the commands in the Object → Path menu. You can also draw with a pen tablet or on a touch screen.
How a path is built
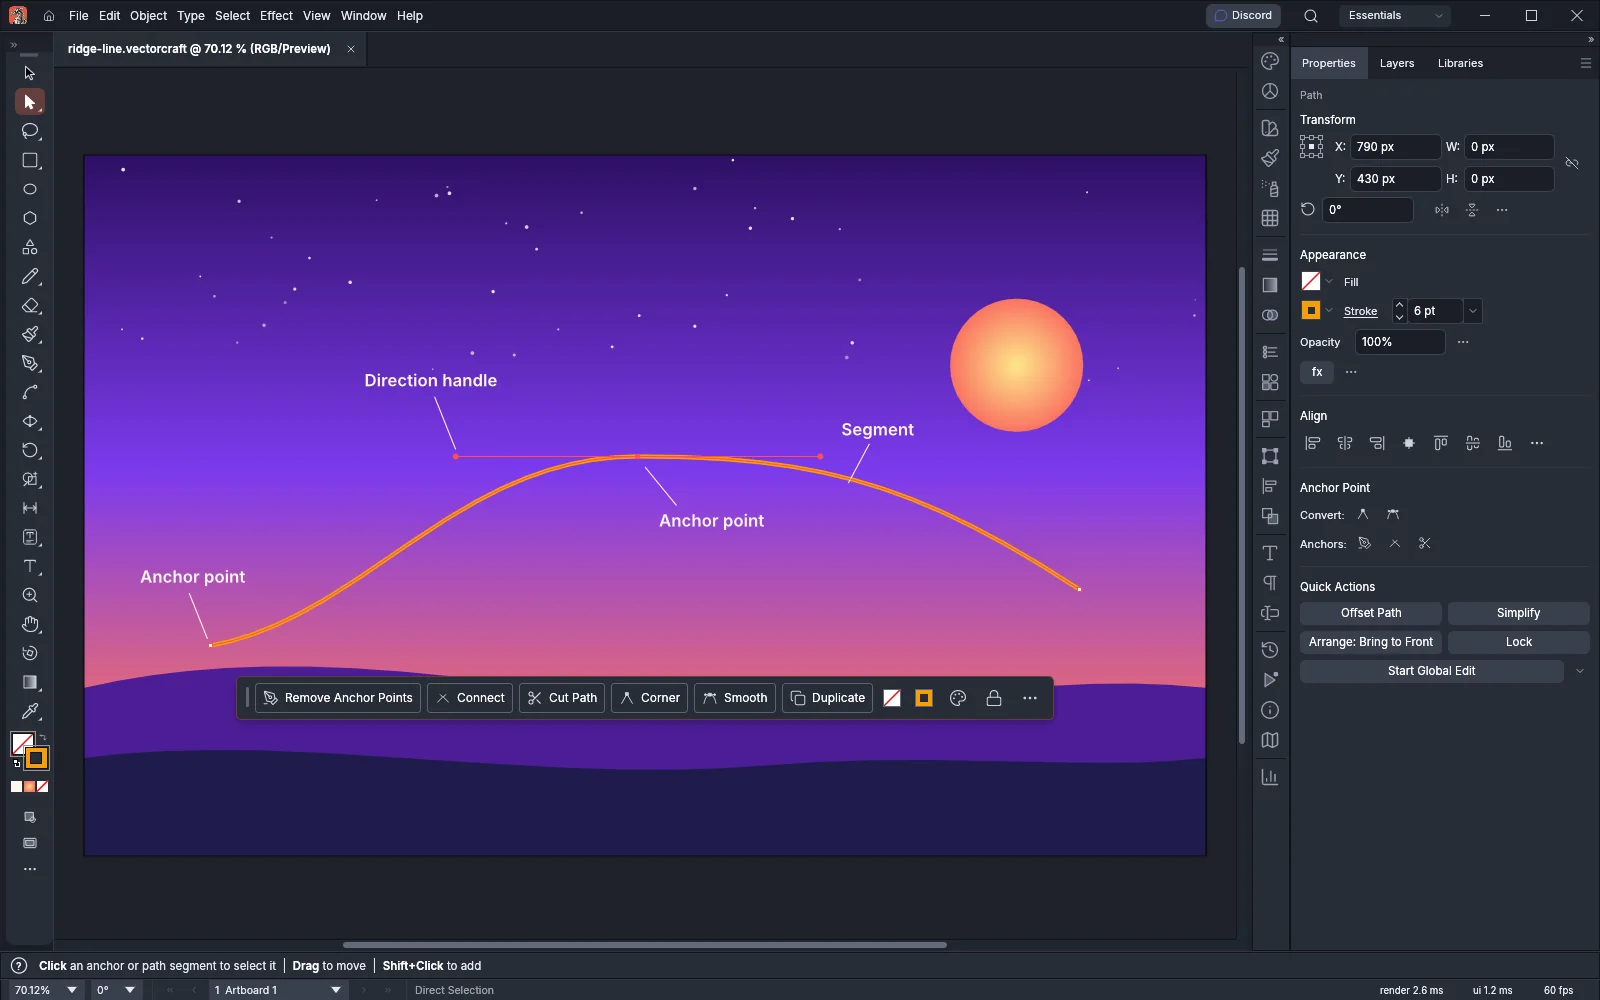
Section titled “How a path is built”A path is a line made of segments. Each segment runs between two anchor points. A curved segment also has direction handles at its anchor points, and the length and angle of each handle set the shape of the curve.
A smooth anchor point has two handles that stay in line, so the path passes through it without a bend. A corner anchor point has no handles, or handles that move on their own, so the path changes direction there. The following image shows a path with a smooth anchor point in the middle and a corner anchor point at each end.
Path tools
Section titled “Path tools”| Tool | Key | What it does |
|---|---|---|
| Pen | P | Places a corner anchor point where you click and a smooth anchor point where you drag |
| Add Anchor Point | + | Adds an anchor point where you click a segment, without changing the shape |
| Delete Anchor Point | - | Removes the anchor point you click and refits the curve around it |
| Anchor Point | Shift+C | Switches anchor points between smooth and corner, and moves one handle on its own |
| Curvature | Shift+~ | Draws a path that curves through each point you click |
| Pencil | N | Draws a path where you drag |
| Smooth | None | Smooths the selected paths where you drag along them |
| Path Eraser | None | Erases the parts of the selected paths that you drag over |
| Direct Selection | A | Selects and moves anchor points, segments and handles |
| Scissors | C | Splits a path where you click it |
The Add Anchor Point, Delete Anchor Point and Anchor Point tools are in the Pen tool’s group in the Tools panel. The Smooth and Path Eraser tools share a group with the Pencil, and the Scissors and Knife are in the Eraser tool’s group. You can change these keys in Edit → Keyboard Shortcuts….
Draw with the Pen tool
Section titled “Draw with the Pen tool”- Press P to choose the Pen tool.
- Click to place a corner anchor point. Click again somewhere else to draw a straight segment to it.
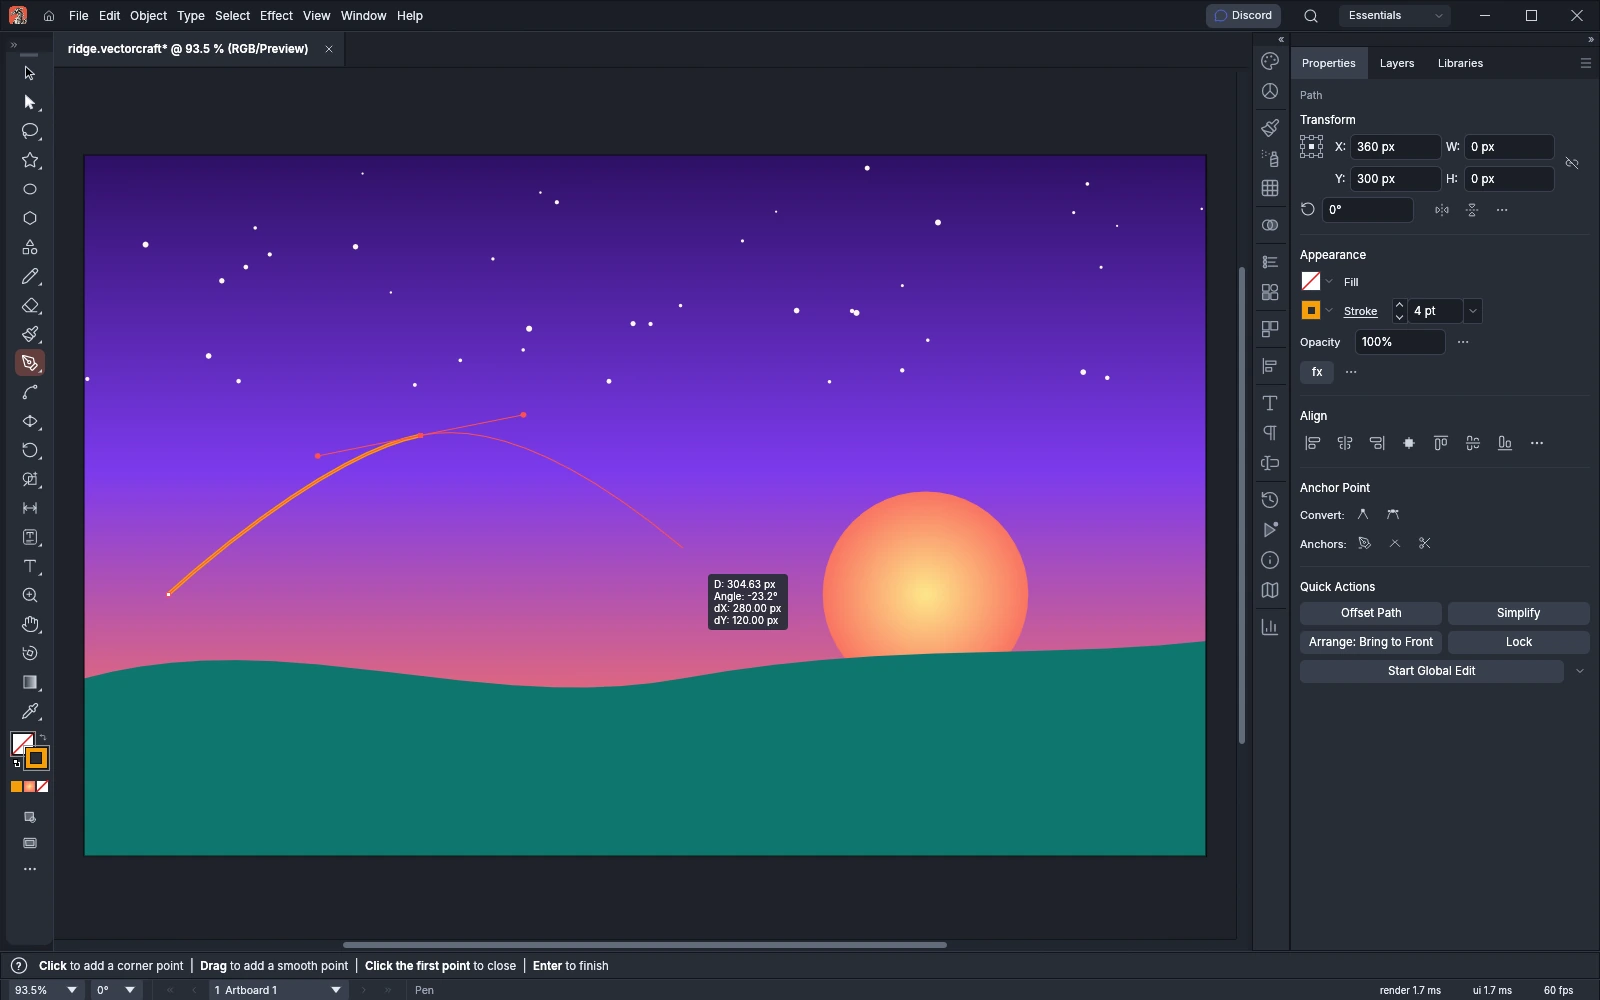
- To place a smooth anchor point, press and drag. The drag pulls out its two handles and curves the segment.
- Hold Alt (Option on macOS) while you drag to break the handles. The incoming handle stays where it was and only the outgoing handle follows the pointer.
- Hold Shift to keep the handle at 45° steps.
- Hold Space to move the anchor point together with its handles.
- To close the path, click the first anchor point. To leave the path open, press Enter or Esc.
- To add to an open path later, click one of its ends with the Pen tool and keep drawing.
While you draw, a preview of the next segment follows the pointer. When you click the last anchor point you placed, the Pen tool removes its outgoing handle, so the next segment leaves that point as a corner.
Draw with the Curvature tool
Section titled “Draw with the Curvature tool”The Curvature tool places points, and the path curves smoothly through all of them.
- Press Shift+~ to choose the Curvature tool.
- Click to place each point. The curve updates as you add points.
- To make a point a corner, Alt-click (Option-click on macOS) or double-click it. Do the same again to make it smooth.
- To move a point, drag it.
- To remove the point you last placed or moved, press Backspace or Delete.
- To close the path, click the first point. To leave the path open, press Esc or Enter.
The Curvature tool also edits any selected path, whichever tool drew it. Click a segment to add a smooth point without changing the shape, and drag a point to move it. Only the two segments at that point change.
Draw freehand with the Pencil tool
Section titled “Draw freehand with the Pencil tool”- Press N to choose the Pencil tool.
- Drag to draw. VectorCraft fits a path to your stroke when you release the mouse button.
- To close the path, end the stroke near its start, or hold Alt (Option on macOS) as you release.
To continue an open path, select it and start your stroke near one of its ends. To draw a straight line at 45° steps, hold Shift as you press.
Two more tools in the Pencil tool’s group change paths you have already drawn:
- Smooth smooths the selected paths along the part you drag over.
- Path Eraser erases the parts of the selected paths that you drag over.
Set the Pencil tool options
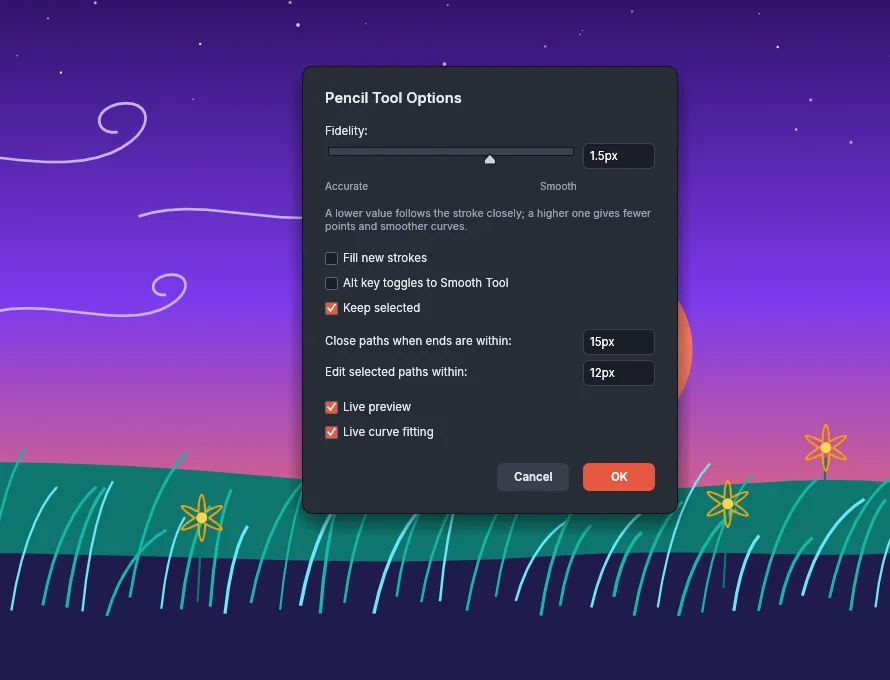
Section titled “Set the Pencil tool options”Double-click the Pencil tool in the Tools panel to open Pencil Tool Options. VectorCraft keeps the options when you switch tools and saves them with your preferences.
| Option | Default | What it does |
|---|---|---|
| Fidelity | 1.5 px | How closely the path follows your stroke. A lower value toward Accurate follows it closely, and a higher value toward Smooth gives fewer anchor points and smoother curves. The field takes 0.01 to 100 px, and the slider runs from 0.01 to 20 px. The value is in screen pixels and stays the same at any zoom |
| Fill new strokes | Off | Gives new Pencil paths the current fill |
| Alt key toggles to Smooth Tool | Off | While it is on, holding Alt (Option on macOS) with the Pencil smooths the selected paths instead of closing the path you draw |
| Keep selected | On | Keeps the path you drew or continued selected after you release the mouse button |
| Close paths when ends are within | 15 px | Closes the path when you end the stroke this close to its start, from 0 to 100 px. 0 turns it off |
| Edit selected paths within | 12 px | When you start a stroke this close to a selected path, from 0 to 100 px, the stroke continues the path from its end or redraws the part of the path where it ends. 0 turns it off |
| Live preview | On | Shows the stroke with its fill and stroke while you draw. When it is off, a thin line follows the pointer, and the path gets its fill and stroke when you release |
| Live curve fitting | On | Fits curves to the stroke while you draw. When it is off, the preview joins your points with straight lines, and the curves are fitted when you release |
Smooth and erase parts of a path
Section titled “Smooth and erase parts of a path”The Smooth and Path Eraser tools change only the paths that are selected.
- Select one or more paths.
- Choose the Smooth tool or the Path Eraser tool from the Pencil tool’s group in the Tools panel.
- Drag along the part of the path you want to change.
- The Smooth tool smooths the part of each selected path near your drag.
- The Path Eraser tool removes the parts of the selected paths under your drag.
Double-click the Smooth tool to open Smooth Tool Options. Its one option, Fidelity, defaults to 2.5 pt and takes 0.05 to 100 pt. A higher value smooths more.
With the Pencil tool, you can smooth without switching tools: turn on Alt key toggles to Smooth Tool in Pencil Tool Options, then hold Alt (Option on macOS) as you drag over a selected path.
Paint with the Paintbrush and Blob Brush
Section titled “Paint with the Paintbrush and Blob Brush”- The Paintbrush tool (B) draws a freehand path where you drag, like the Pencil. With a drawing tablet, it also records the pen pressure along the stroke.
- The Blob Brush tool (Shift+B) paints filled shapes instead of stroked paths. Press [ or ] while it is active to make its tip smaller or larger.
Edit anchor points with Direct Selection
Section titled “Edit anchor points with Direct Selection”- Press A to choose the Direct Selection tool.
- Click an anchor point to select it. Shift-click to add more anchor points to the selection, or to remove one.
- Drag a selected anchor point to move the selected anchor points. Hold Shift to keep the move at 45° steps.
- Click a segment to select that segment on its own.
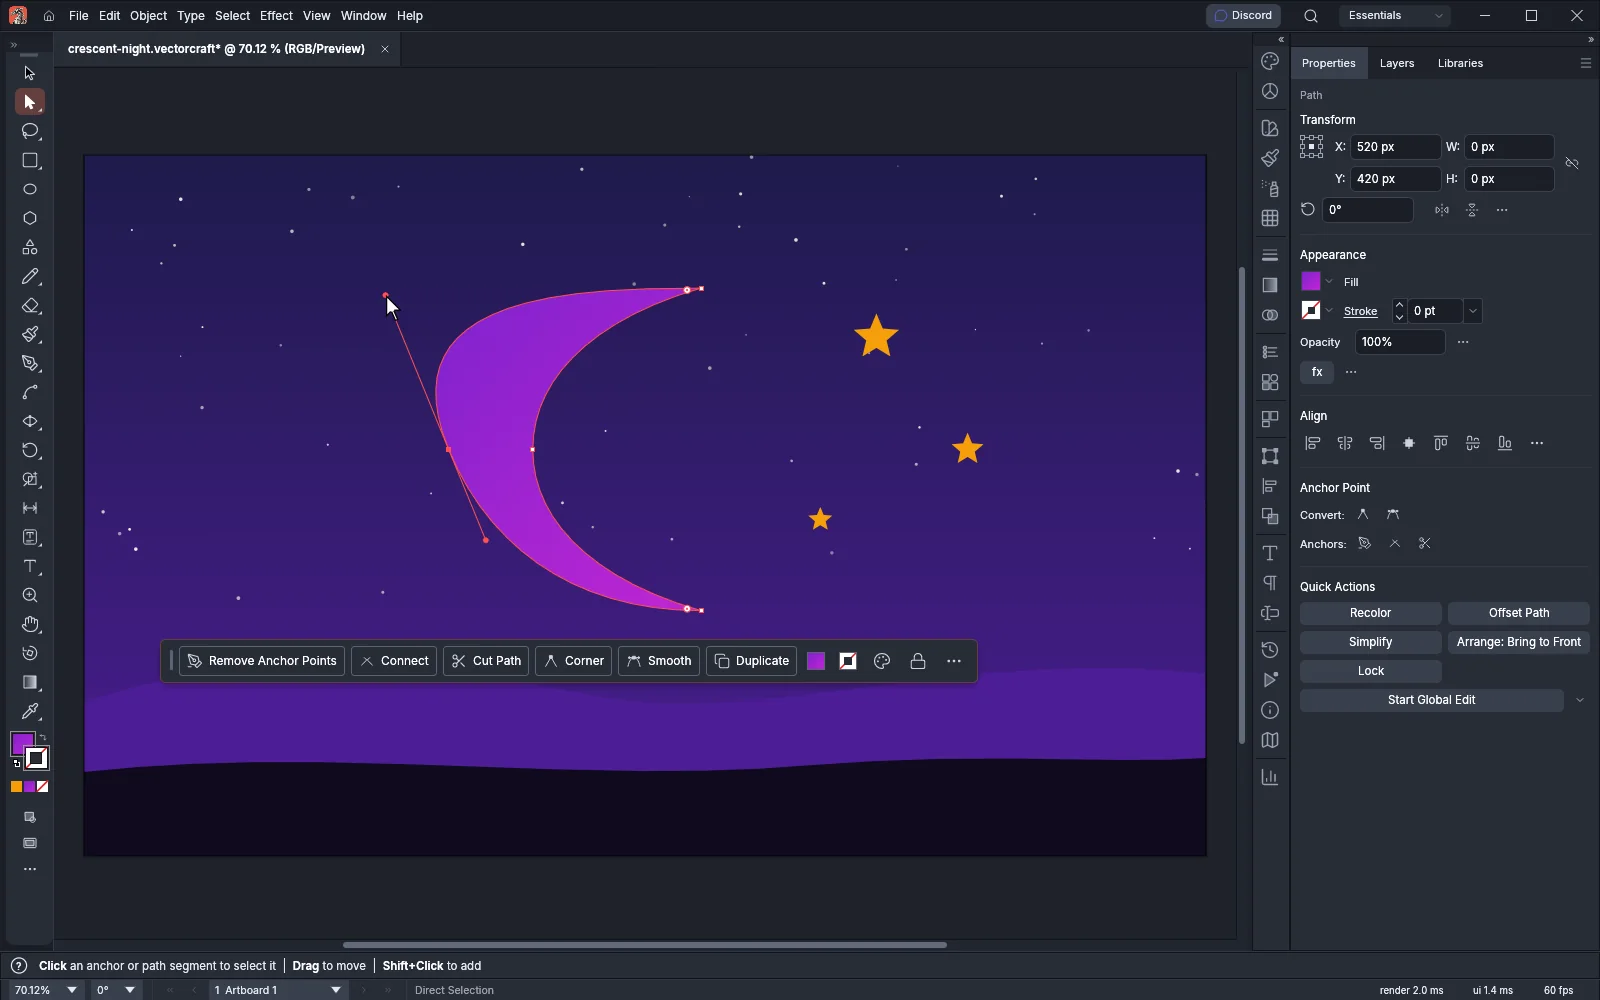
- Drag a direction handle to change the curve. Hold Shift to keep the handle at 45° steps around its anchor point, or hold Alt (Option on macOS) to move that handle on its own.
- To select several anchor points at once, drag a marquee around them.
The following screenshot shows the anchor points and handles of a crescent selected with the Direct Selection tool.
The Anchor Point tool (Shift+C) converts anchor points:
- Click a smooth anchor point to make it a corner.
- Drag an anchor point to pull out smooth handles.
- Drag a handle to move it on its own.
- Drag a segment to change its curve.
Add, delete and convert anchor points
Section titled “Add, delete and convert anchor points”- With the Add Anchor Point tool (+), click a segment to add an anchor point without changing the shape. Alt-click (Option-click on macOS) an anchor point to delete it instead.
- With the Delete Anchor Point tool (-), click an anchor point to remove it. VectorCraft refits the curve between the anchor points on either side. Alt-click (Option-click on macOS) a segment to add an anchor point instead.
- With the Anchor Point tool (Shift+C), click the end of a handle to retract that handle only. Hold Shift as you press an anchor point to move it with its handles.
When anchor points are selected, or a path is selected whole with the Direct Selection tool or another tool that edits anchor points, the Properties panel shows an Anchor Point section. The same buttons appear in the Control bar. The buttons are icons, and each name appears when you point at its button.
| Row | Button | What it does |
|---|---|---|
| Convert | Convert Selected Anchor Points to Corner | Converts the selected anchor points to corner points |
| Convert | Convert Selected Anchor Points to Smooth | Converts the selected anchor points to smooth points with handles in line |
| Anchors | Remove Anchor Points | Removes the selected anchor points without opening the path |
| Anchors | Connect Selected End Points | Joins the two selected end points with a segment, or closes an open path |
| Anchors | Cut Path at Selected Anchor Points | Splits the path at each selected anchor point |
The Anchors row appears only when individual anchor points are selected, not when the whole path is selected. The Contextual Task Bar under the selection offers the same actions: Connect (open paths only), Corner, Smooth, Simplify and Duplicate for a path selected whole, and Remove Anchor Points, Connect, Cut Path, Corner, Smooth and Duplicate for selected anchor points.
Select anchor points and paths from the Select menu
Section titled “Select anchor points and paths from the Select menu”| Command | What it selects |
|---|---|
| Select → Object → Direction Handles | Every anchor point of the selected paths, with all their direction handles showing. Select the paths first |
| Select → Object → Stray Points | Every path that has only one anchor point |
| Select → Object → Open Paths | Every path that is not closed |
To remove every stray point, choose Select → Object → Stray Points and press Delete, or use Object → Path → Clean Up…. For the rest of the Select menu, see Select artwork.
Cut paths
Section titled “Cut paths”- With the Scissors tool (C), click a path where you want to cut it. A closed path opens at that point, and an open path becomes two paths.
- With the Knife tool, drag across closed shapes to cut them along the drag. The Knife cuts the selected shapes, or every shape when nothing is selected. Hold Alt (Option on macOS) as you press to cut along a straight line, and hold Shift as well to keep that line at 45° steps.
Object → Path commands
Section titled “Object → Path commands”Select one or more paths, then choose a command from Object → Path. Clean Up… works on the whole document and does not need a selection.
| Command | Windows and Linux | macOS | What it does |
|---|---|---|---|
| Join | Ctrl+J | Cmd+J | Joins two or more open paths into one path, or closes a single open path |
| Average… | Ctrl+Alt+J | Cmd+Option+J | Moves the selected anchor points to their average position, horizontally, vertically or both |
| Average & Join… | Ctrl+Alt+Shift+J | Cmd+Option+Shift+J | Moves two open ends to the point between them and joins them there, as one step |
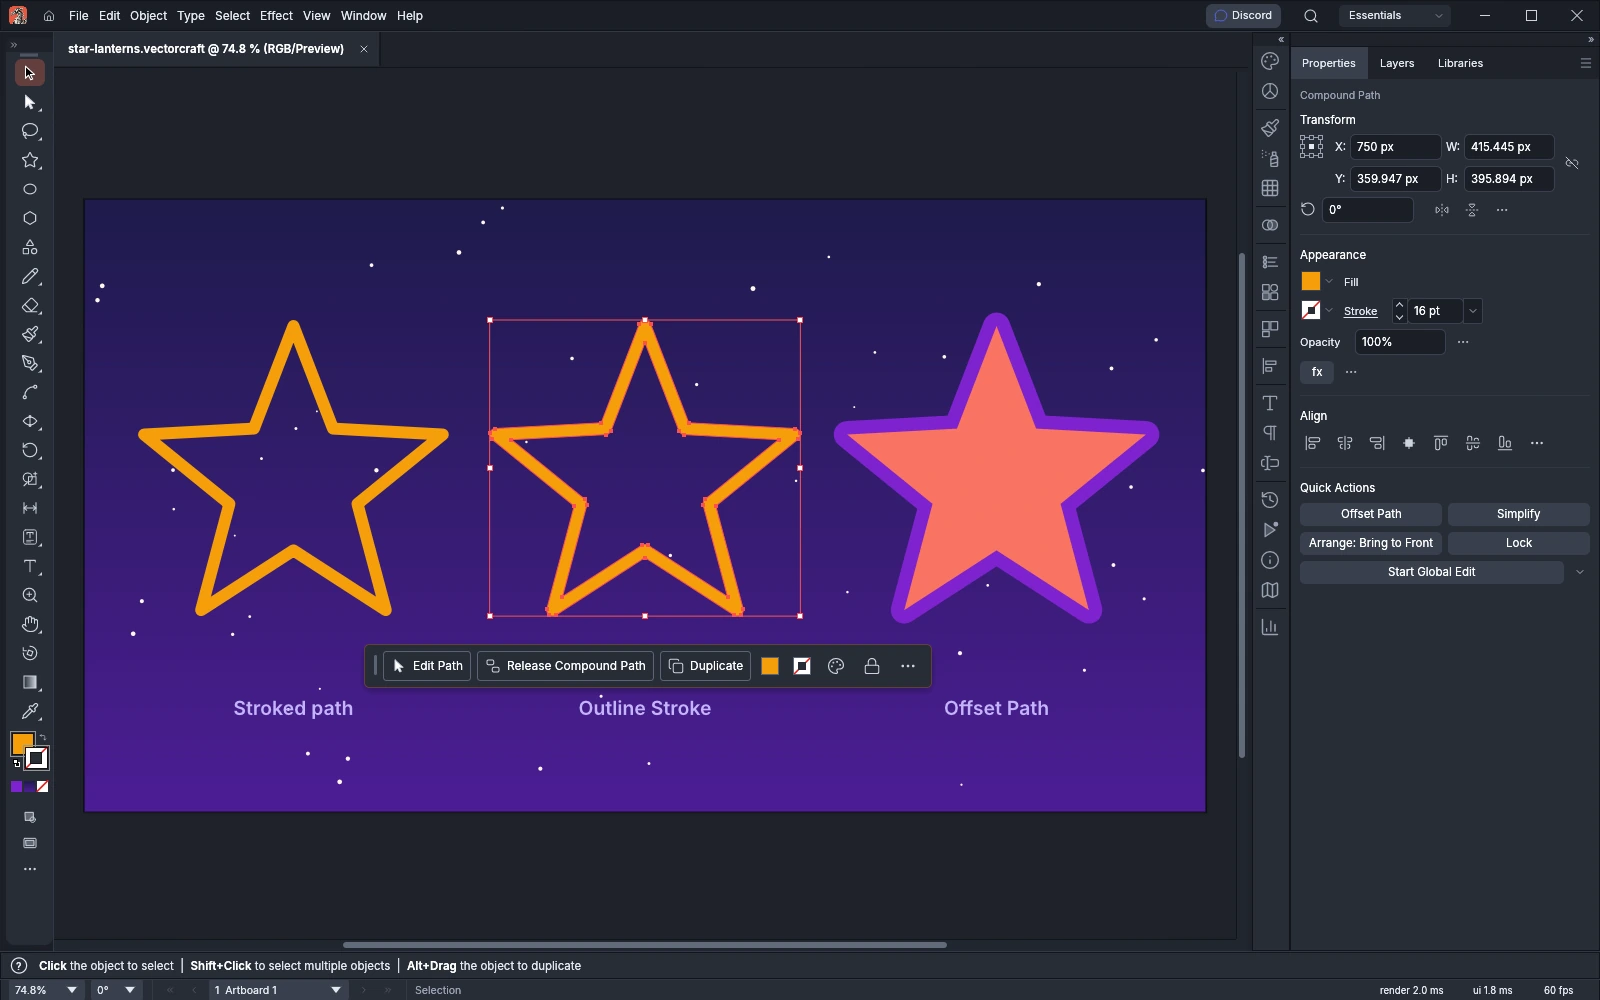
| Outline Stroke | Replaces a stroked path with a filled shape the size of the stroke | ||
| Offset Path… | Adds a new path a set distance outside the original, or inside it with a negative Offset, with Miter, Round or Bevel joins | ||
| Reverse Path Direction | Reverses the direction of the selected paths | ||
| Simplify… | Reduces the number of anchor points while keeping the shape close to the original | ||
| Smooth… | Smooths the selected paths by an amount you set with a slider | ||
| Add Anchor Points | Adds an anchor point halfway along each segment without changing the shape | ||
| Remove Anchor Points | Removes the anchor points you selected with Direct Selection, without opening the path | ||
| Divide Objects Below | Cuts the objects below with the selected path, and removes that path | ||
| Split Into Grid… | Replaces the selected paths with a grid of rectangles, with the rows, columns and gutters you set | ||
| Clean Up… | Deletes stray points, unpainted objects and empty text paths |
Offset Path… places the new path above the original. The dialog has Offset, Joins and Miter Limit fields. The following image shows, from left to right, a stroked path, the same path after Outline Stroke, and a path with a rounded offset path sent behind it.
Set path command options
Section titled “Set path command options”The commands whose names end in “…” open a dialog or a slider. Dialogs with a Preview checkbox show the result on the canvas while you change the values.
Average and Average & Join
Section titled “Average and Average & Join”| Option | Default | What it does |
|---|---|---|
| Axis (Average) | Both | Horizontal moves the selected anchor points to their average height, Vertical to their average horizontal position, and Both to one point |
| Points (Average & Join) | Corner | Makes the joined anchor point a Corner or a Smooth point. The dialog opens with your last choice |
Offset Path
Section titled “Offset Path”The dialog opens with the values you last confirmed, and with Preview as you left it.
| Option | Default | What it does |
|---|---|---|
| Offset | 10 pt | The distance of the new path from the original. A negative value places it inside |
| Joins | Miter | The shape of the new path’s corners: Miter, Round or Bevel |
| Miter Limit | 4 | How far a miter corner can reach before it is beveled, from 1 to 500 |
Simplify
Section titled “Simplify”Object → Path → Simplify… opens a slider under the selection. The canvas shows the simplified paths while the slider is open.
- Select the paths.
- Choose Object → Path → Simplify…. The slider starts at the Auto-Simplify setting for the selection.
- Drag the slider to the left for fewer anchor points, or to the right to stay closer to the original. Click Auto-Simplify (the wand button) to go back to the automatic setting.
- Press Enter or click outside the slider to keep the result as one undo step. Press Esc to put the paths back.
To set exact values, click More Options (the … button) on the slider. The Simplify dialog opens at the slider’s setting:
| Option | Default | What it does |
|---|---|---|
| Tolerance | Set by the slider | How far the simplified path can move from the original. A higher value removes more anchor points |
| Corner Point Angle Threshold | 150° | From 0° to 180°. An anchor point whose corner is sharper than this angle stays a corner, so a higher value keeps more corners |
| Convert to Straight Lines | Off | Replaces the curves with straight segments |
| Show Original Path | Off | Shows the original path on the canvas while Preview is on |
| Open this dialog with these settings next time | Off | When it is on, Simplify… opens this dialog with these values instead of the slider |
| Preview | On | Shows the result on the canvas. The dialog also shows the number of anchor points before and after |
Smooth
Section titled “Smooth”Object → Path → Smooth… opens a slider under the selection, as Simplify does. Drag it to the left for less smoothing or to the right for more. Auto-Smooth sets it to the middle of its range, where the slider starts. Press Enter or click outside the slider to keep the result, or press Esc to put the paths back.
Split Into Grid
Section titled “Split Into Grid”The dialog opens with a 2 by 2 grid the size of the selection.
| Option | Default | What it does |
|---|---|---|
| Rows and Columns | 2 | The number of rows and columns, from 1 to 500 |
| Height and Width | Set by the totals | The size of each row and column. Typing a value changes the total |
| Gutter | 12 pt | The space between rows, and between columns |
| Total | The selection’s height and width | The size of the whole grid |
| Add Guides | Off | Adds ruler guides along the edges of the rows and columns |
Clean Up
Section titled “Clean Up”Object → Path → Clean Up… deletes the kinds of objects you leave turned on, in the whole document.
| Option | Default | What it deletes |
|---|---|---|
| Empty Text Paths | On | Type objects that hold no text, or only spaces |
| Stray Points | On | Paths that have only one anchor point |
| Unpainted Objects | On | Paths and compound paths with no fill and no stroke. Clipping paths and guides are kept |
Draw with a pen tablet or touch screen
Section titled “Draw with a pen tablet or touch screen”VectorCraft reads a drawing tablet’s pen on Windows, macOS and Linux, and in the web version. Where the pen reports them, VectorCraft reads its pressure, its tilt and the rotation of its barrel.
- The Paintbrush records the pressure, tilt and rotation along each stroke. Brushes whose options use Pressure, Tilt, Bearing or Rotation change along the stroke. See Paint with brushes and variable widths.
- The Blob Brush and the Eraser change their tip size with pressure when their Size is set to Pressure in the tool options.
- The warp tools use pressure as the intensity when Use Pressure Pen is on.
- Turn the pen over to its eraser end to choose the Eraser tool. Turn it back to the tip to return to the tool you used before. In the web version, the tool changes when the pen touches the screen.
On a touch screen, you can use your fingers on the canvas:
- Tap with two fingers to undo, or with three fingers to redo. A tap counts only when you lift all the fingers within half a second and move them no more than about 16 points.
- Pinch to zoom and drag two fingers to pan.
In the web version, once you use a pen, your fingers only zoom, pan and tap for the rest of the session. A finger or a resting palm then does not draw.
Two settings on the Devices page of Edit → Preferences… control touch input:
| Setting | Default | What it does |
|---|---|---|
| Enable Touch Workspace | On | Switches to the Touch workspace on a touch screen, and back to your workspace when no touch screen is in use |
| Enable Touch Gestures | On | Turns the two-finger and three-finger taps on or off |
If a pen does nothing on Linux, see Troubleshooting.