
Work with styles and long text
This guide covers the tools for menus, brochures and other documents with a lot of text: paragraph and character styles, OpenType features and glyphs, tab stops, text wrap, find and replace, special spaces and breaks, vertical type, hyphenation and justification, and the Type Tools plug-in. Add and style type covers making type and setting its font, size and alignment.
Save formatting as paragraph and character styles
Section titled “Save formatting as paragraph and character styles”A style is a named set of attributes. When you change a style, every paragraph or character that uses it changes too. VectorCraft has two kinds:
| Kind | What it holds | Panel |
|---|---|---|
| Paragraph style | Paragraph attributes: alignment, indents, space before and after, tab stops, lists, hyphenation, justification and the composer | Window → Type → Paragraph Styles |
| Character style | Character attributes: font, size, leading, kerning, tracking, case, position, color and OpenType features | Window → Type → Character Styles |
A paragraph style does not hold a font or a color. To give headings or dish names their own font and color, save those as a character style and use it together with the paragraph style.
Each panel lists the Normal style first, as [Normal Paragraph Style] or [Normal Character Style]. The style of the selected text is highlighted.
To make a paragraph style:
- Format one paragraph with the Paragraph panel and the Tabs panel.
- Choose the Type tool (T) and click in that paragraph.
- In the Paragraph Styles panel, click Create New Paragraph Style at the bottom of the panel. The new style is named Paragraph Style 1, Paragraph Style 2 and so on. To name it as you make it, Alt-click the button (Option-click on macOS). New Paragraph Style… in the panel menu makes the style with the next default name, the same as a plain click on the button.
To make a character style, select the characters with the Type tool, then do the same in the Character Styles panel. A new style takes the attributes of the first selected character. Alt-click Create New Character Style (Option-click on macOS) to name it as you make it. New Character Style… in the panel menu gives it the next default name, Character Style 1, Character Style 2 and so on.
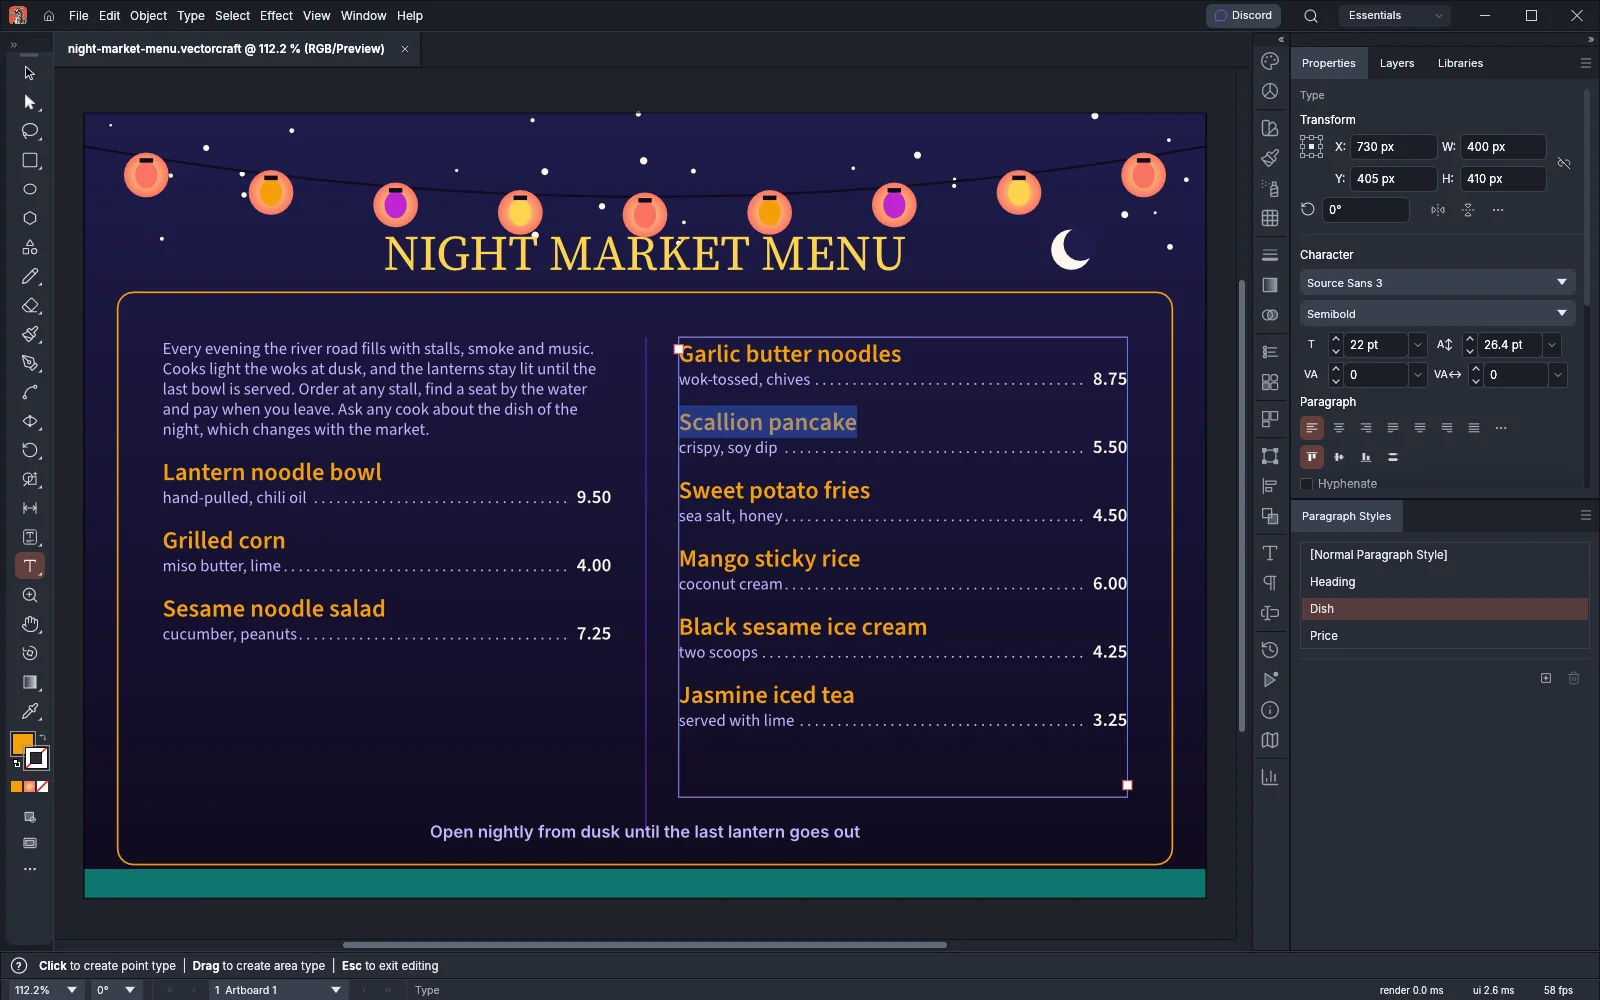
The following screenshot shows a two-column menu card with the dish name Scallion pancake selected with the Type tool. The Paragraph Styles panel lists the Normal style and the Heading, Dish and Price styles, with Dish highlighted.
Apply and update a style
Section titled “Apply and update a style”- Select type objects with the Selection tool, or select text with the Type tool. A paragraph style applies to every paragraph that the selection touches.
- Click the style in the Paragraph Styles or Character Styles panel.
When the selected text differs from its style, a plus sign follows the style’s name, for example Dish+. To apply a style and remove those local changes, Alt-click the style (Option-click on macOS), or click it and choose Clear Overrides from the panel menu.
To change a style and every paragraph that uses it:
- Change the formatting of one paragraph that uses the style.
- With the caret in that paragraph, select the style in the panel and choose Redefine Paragraph Style from the panel menu. Text that has its own overrides keeps them.
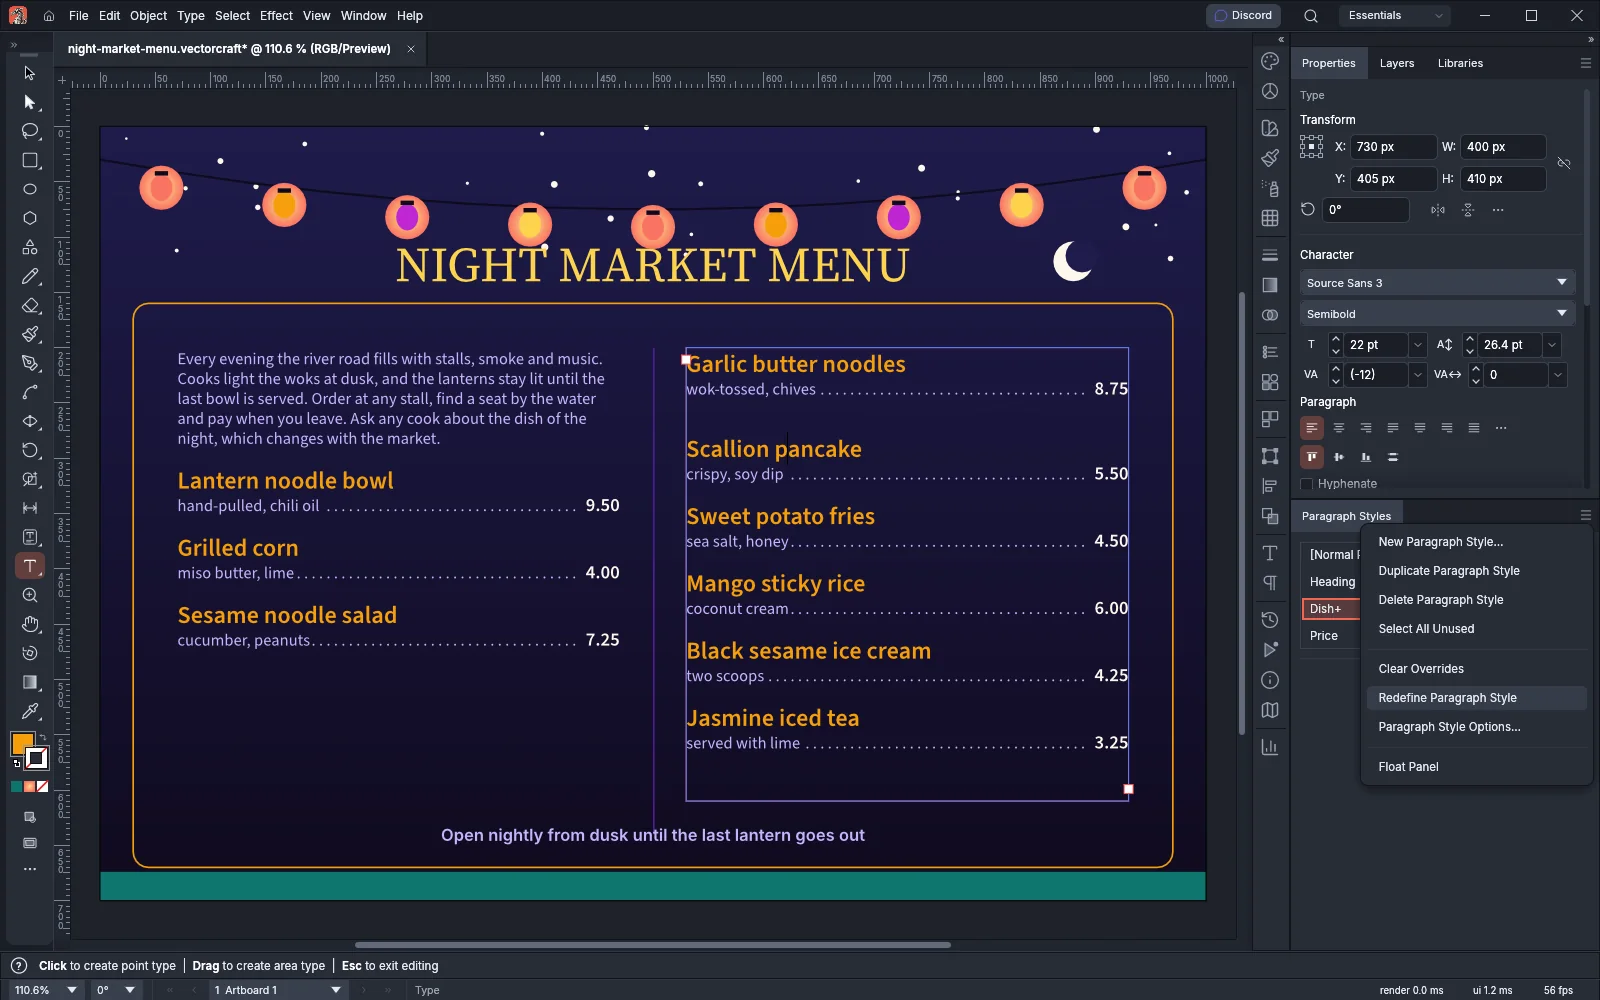
The panel menu holds these commands:
| Command | What it does |
|---|---|
| New Paragraph Style… or New Character Style… | Makes a style from the selected text |
| Duplicate Paragraph Style or Duplicate Character Style | Copies the highlighted styles |
| Delete Paragraph Style or Delete Character Style | Deletes the highlighted styles; the text keeps its look. The Normal style cannot be deleted |
| Select All Unused | Highlights the styles that no text uses |
| Clear Overrides | Removes the local changes from the selected text |
| Redefine Paragraph Style or Redefine Character Style | Takes the selected text’s attributes into the style |
| Paragraph Style Options… | Renames the style |
| Character Style Options… | Edits the style in five sections: General, Basic Character Formats, Advanced Character Formats, Character Color and OpenType Features |
Shift-click a style to highlight a range of styles, or Ctrl-click (Cmd-click on macOS) to add one. Highlighting a style this way does not apply it to the text. You can also drag a style onto the Create New button to duplicate it, or onto the trash button to delete it.
Use OpenType features and glyphs
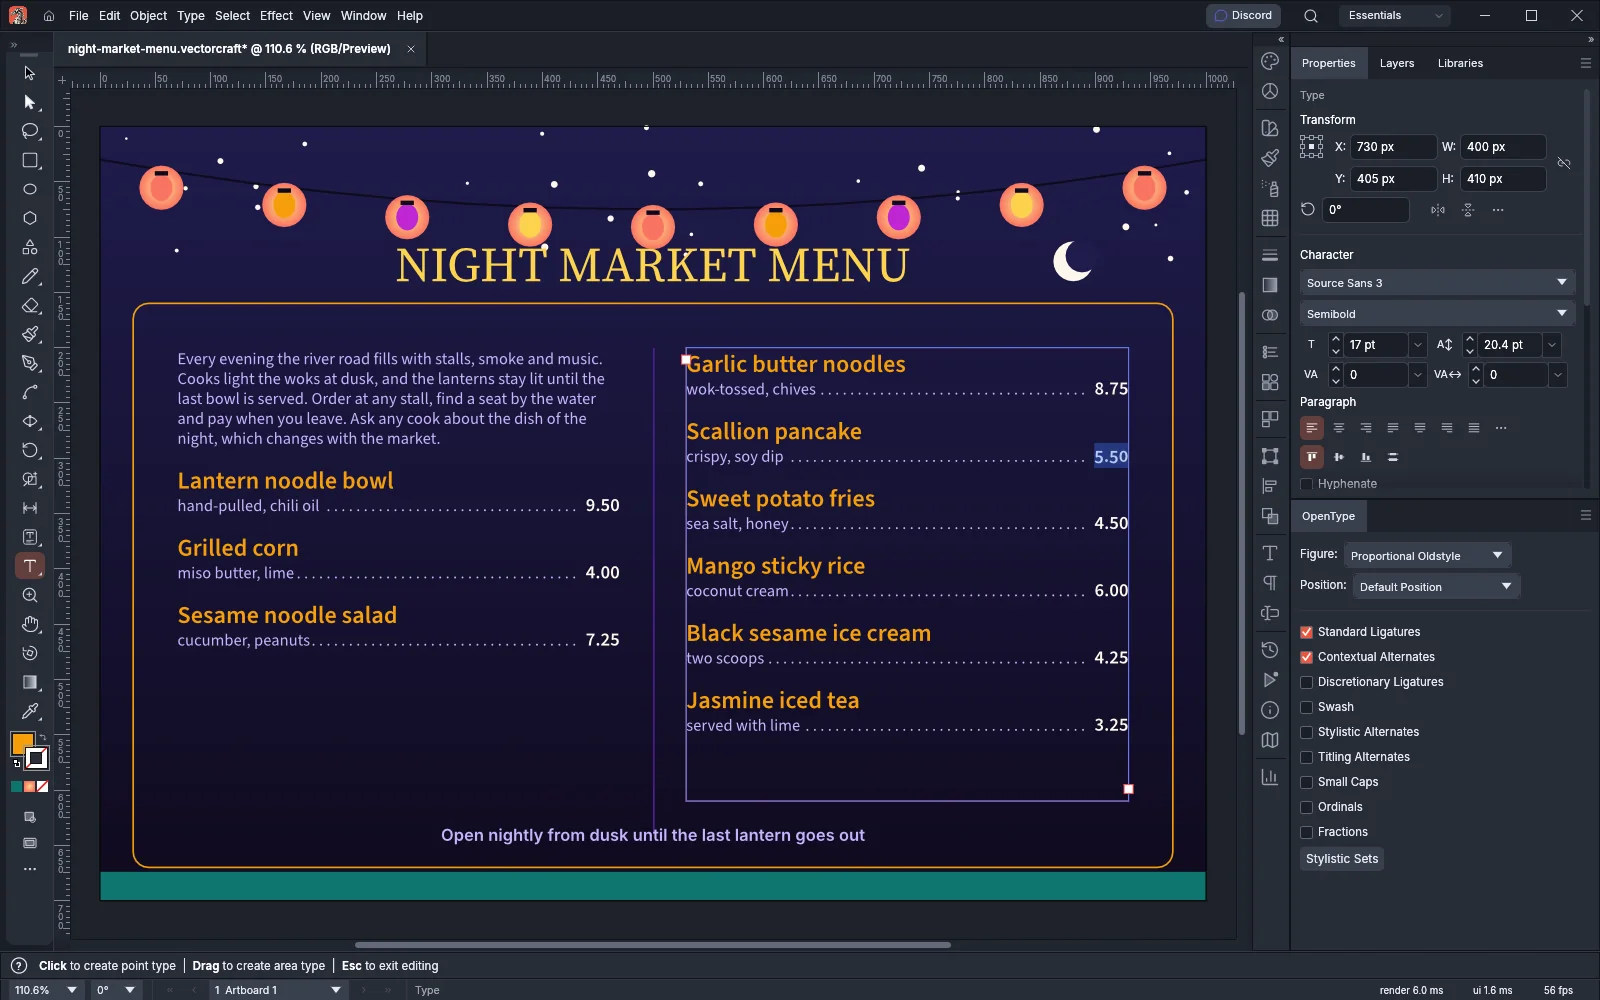
Section titled “Use OpenType features and glyphs”The OpenType panel (Window → Type → OpenType; Ctrl+Alt+Shift+T, or Cmd+Option+Shift+T on macOS) turns on the extra features of an OpenType font for the selected text. A feature changes the text only when the font has it.
| Control | Choices |
|---|---|
| Figure | Default Figure, Tabular Lining, Proportional Lining, Proportional Oldstyle, Tabular Oldstyle |
| Position | Default Position, Superscript, Subscript, Numerator, Denominator |
| Check boxes | Standard Ligatures, Contextual Alternates, Discretionary Ligatures, Swash, Stylistic Alternates, Titling Alternates, Small Caps, Ordinals, Fractions |
| Stylistic Sets | The numbered sets the font has. You can turn on more than one |
Tracked text does not use ligatures, and the panel shows “Ligatures are off while the text is tracked.” Reset OpenType Features in the panel menu turns every feature back to the default.
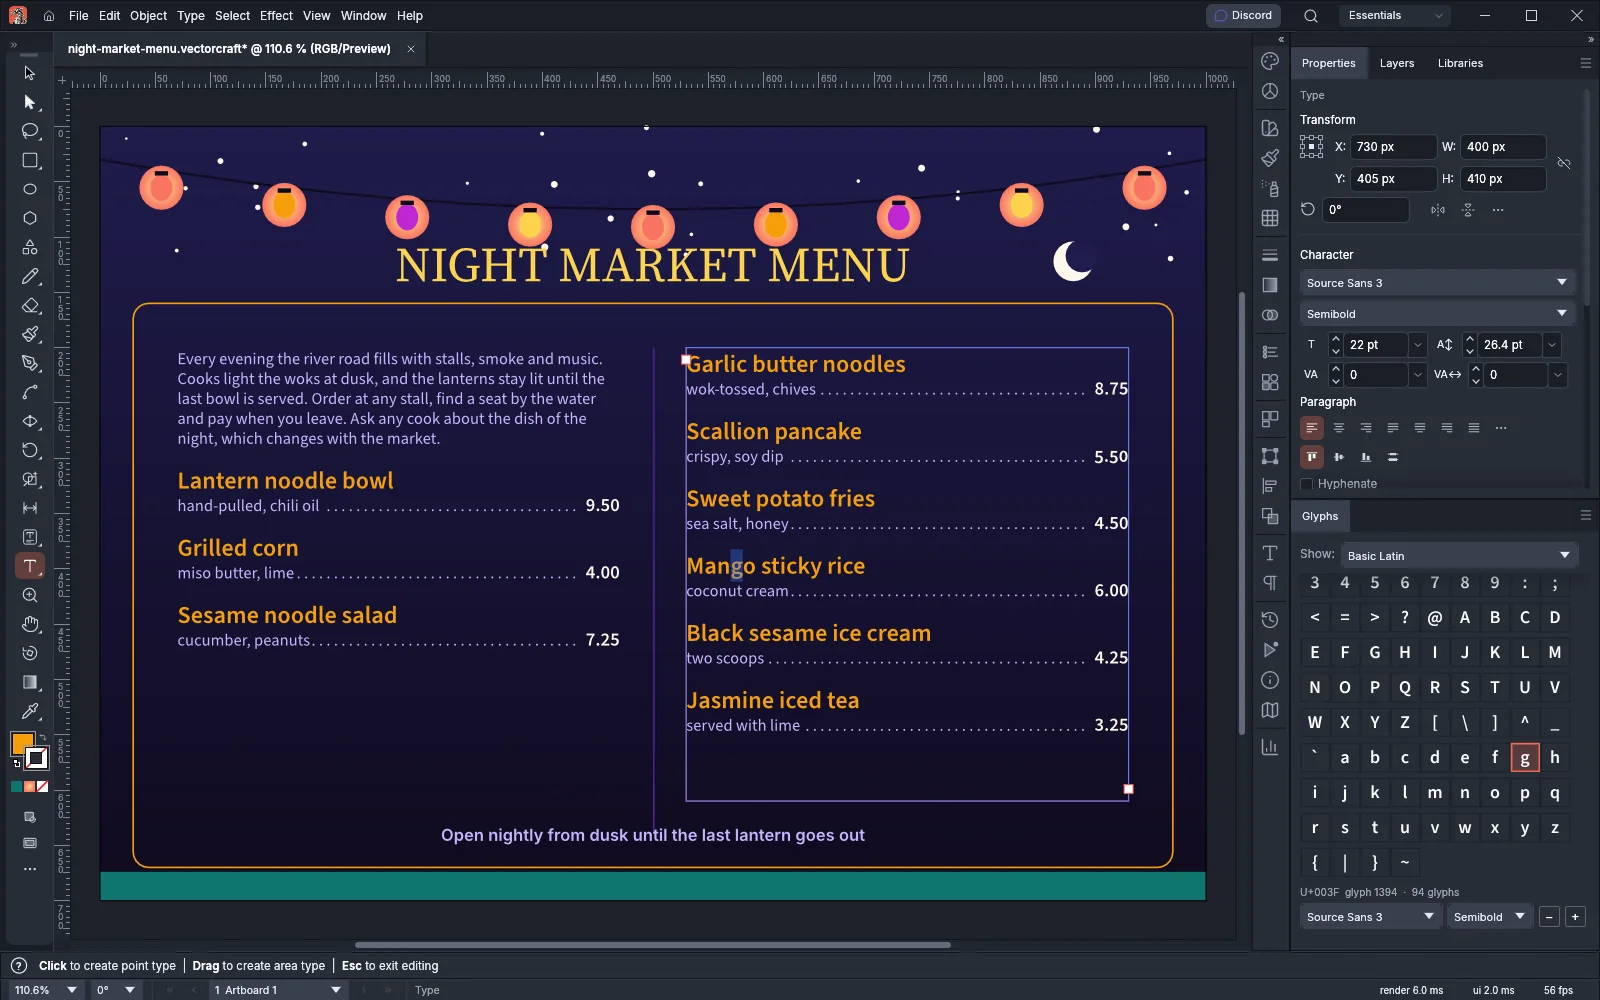
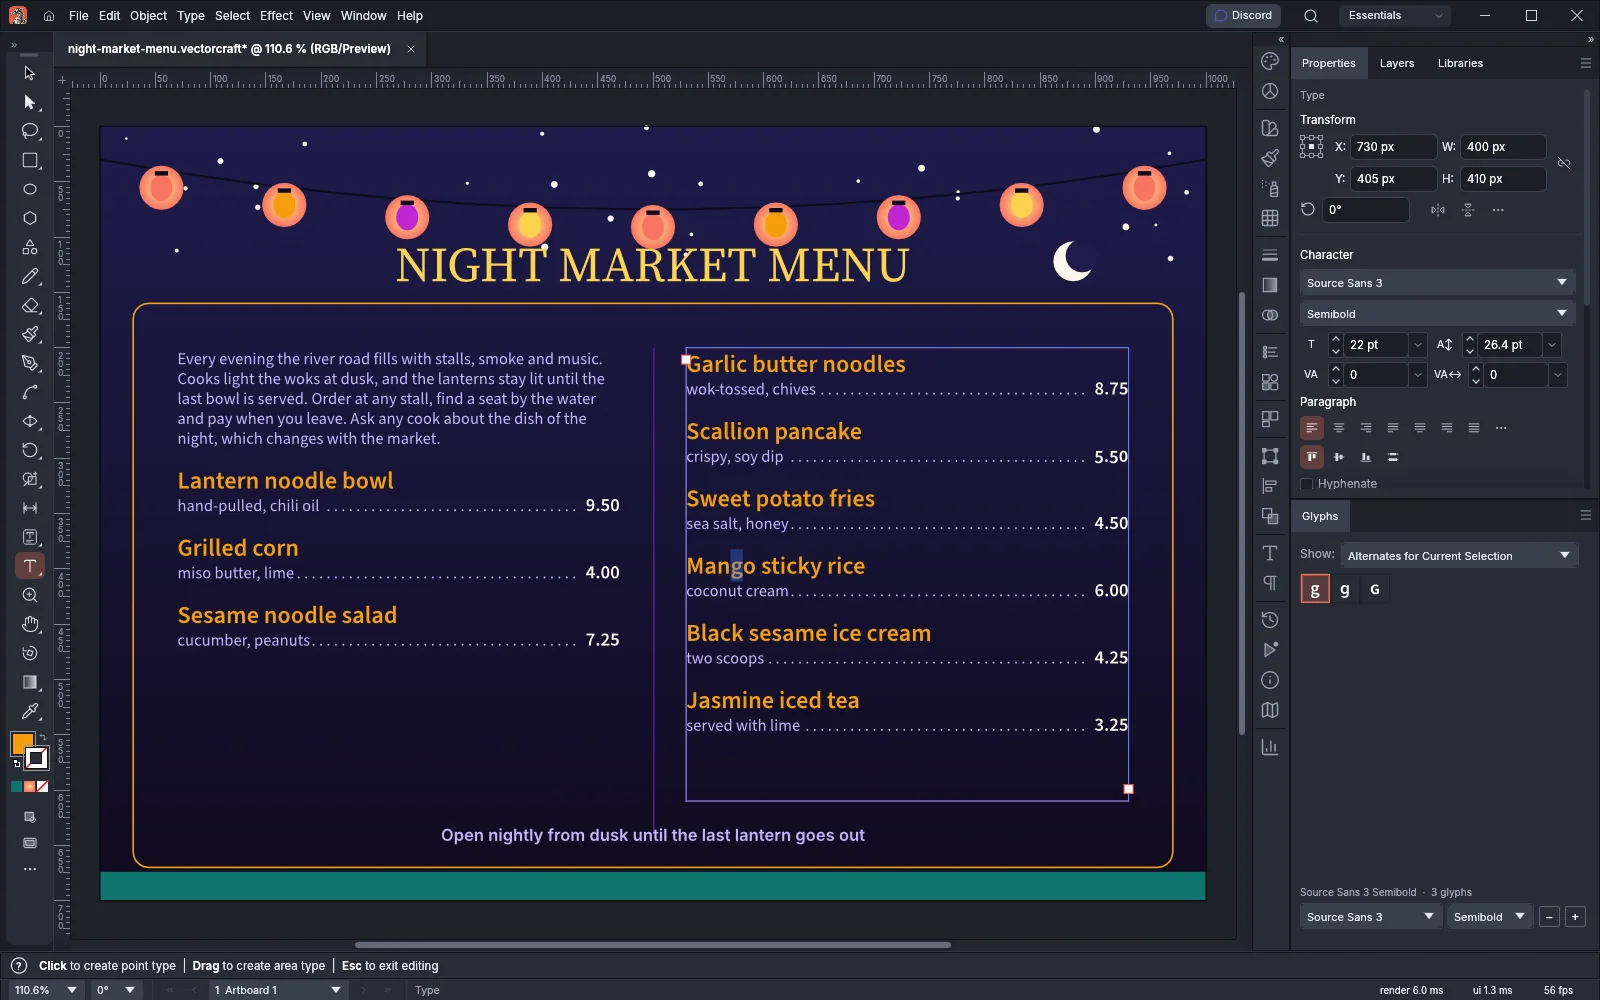
The Glyphs panel (Type → Glyphs or Window → Type → Glyphs) shows every character in the font of the selected text.
- With the Type tool, click where the character should go.
- In the Glyphs panel, pick a group of characters from Show: Entire Font, Basic Latin, Latin-1 Supplement, Latin Extended, Punctuation, Currency & Symbols or Greek & Cyrillic.
- Double-click the character. It goes in at the caret. With type objects selected instead, it goes at the end of their text.
To swap a letter for an alternate form, select the letter with the Type tool and choose Alternates for Current Selection from Show. Double-click an alternate to replace the letter. The − and + buttons make the previews smaller or larger, and Use the Selected Text’s Font in the panel menu returns the panel to the font of the selected text after you browse another font.
Set tab stops
Section titled “Set tab stops”Tab stops line up text after a tab character, for example prices at the right edge of a menu column.
- Select a type object, or click in a paragraph with the Type tool.
- Choose Window → Type → Tabs (Ctrl+Shift+T, or Cmd+Shift+T on macOS).
- Click the ruler to add a stop. Drag a stop to move it, or drag it off the ruler to delete it.
- With the stop selected, click an alignment button: Left-Justified Tab, Center-Justified Tab, Right-Justified Tab or Decimal-Justified Tab.
- Type the exact position in X, and the characters that fill the gap before the stop in Leader, for example a period and a space. A leader repeats up to eight characters.
- For a decimal tab, type the character to line up on in Align On. The default is a period.
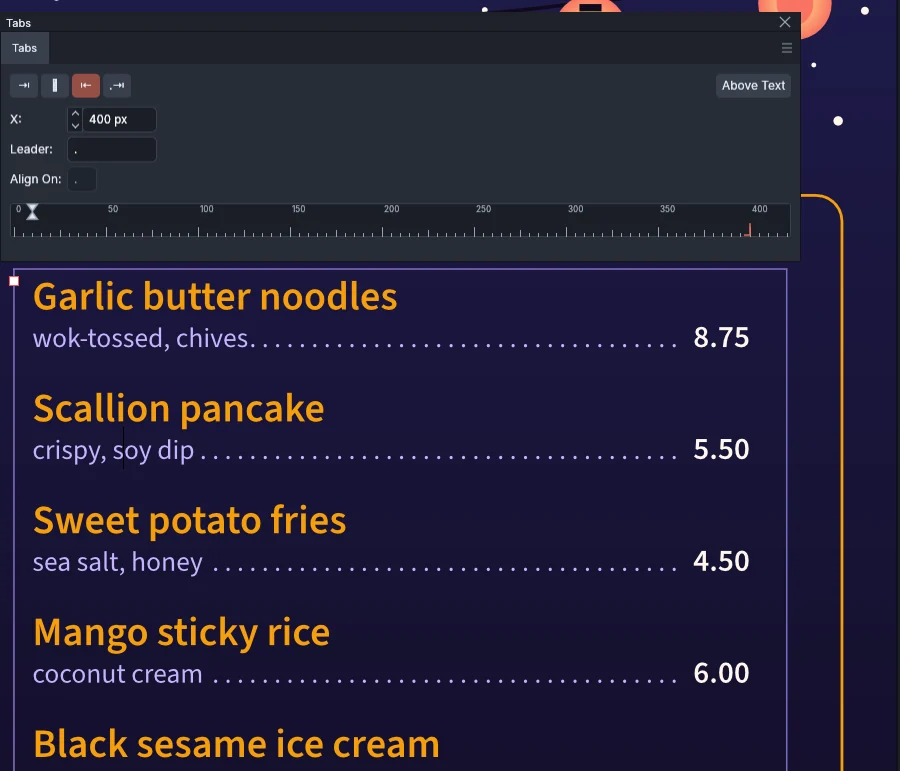
Stops are measured from the left edge of the text, or of the frame for area type. A stop lands on the nearest whole point. Hold Shift while you drag, or turn on Snap to Unit in the panel menu, to land on the ruler’s ticks. Ctrl-drag a stop (Cmd-drag on macOS) to move every stop by the same distance. The ruler’s indent markers set First-line Left Indent and Left Indent.
The panel menu also holds Clear All Tabs, Delete Tab and Repeat Tab. The Above Text button moves the panel so that it floats just above the selected text. In vertical type, the position field is Y, and the left and right stops are named Top-Justified Tab and Bottom-Justified Tab.
Wrap text around an object
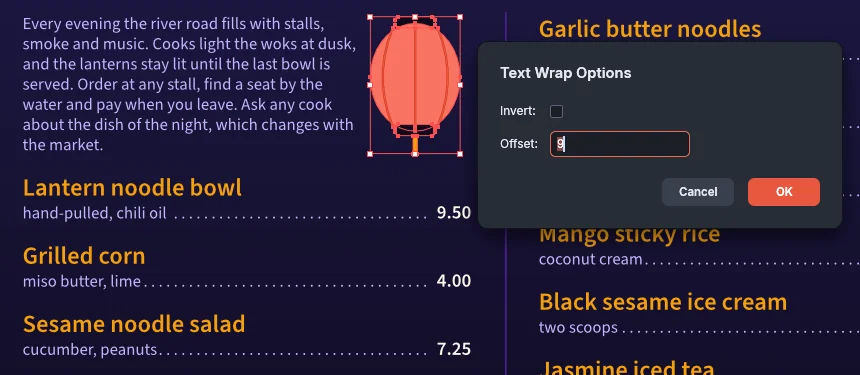
Section titled “Wrap text around an object”Text wrap makes area type flow around an object, such as an illustration placed inside a column.
- Put the object on the same layer as the area type, above it in the stacking order.
- Select the object and choose Object → Text Wrap → Make. Area type below the object in the stacking order flows around it, with a gap of 6 pt.
- To change the gap, choose Object → Text Wrap → Text Wrap Options…, set the options and click OK.
| Option | What it does | Default |
|---|---|---|
| Offset | The distance between the text and the object, from -1000 to 1000 pt | 6 pt |
| Invert | Flows the text inside the object’s shape instead of around it | Off |
To stop the wrap, select the object and choose Object → Text Wrap → Release. The object stays where it is.
Find and replace text
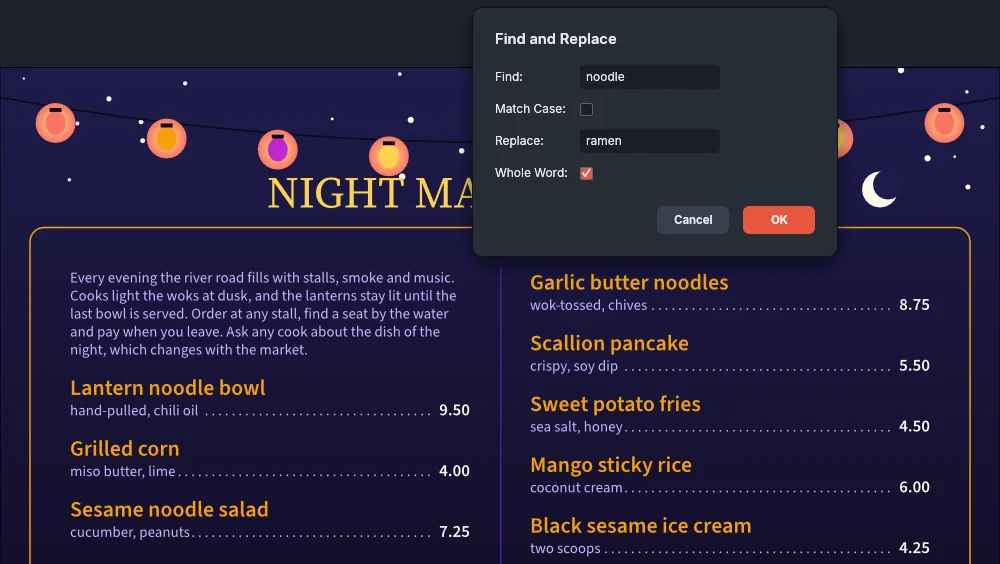
Section titled “Find and replace text”- Choose Edit → Find and Replace….
- Type the text to look for in Find and the new text in Replace.
- Turn on Match Case to match capital and lowercase letters exactly, and Whole Word to skip matches inside longer words. With Whole Word on, “noodle” does not match “noodles.”
- Click OK.
VectorCraft replaces every match in every type object of the document in one step, which Edit → Undo reverses. It skips hidden or locked type, type on hidden or locked layers, and type on locked artboards. A match must lie inside text with one set of character attributes, so a word that changes font or color partway through is not found.
In VectorCraft 0.22.0, Edit → Find Next does not search. Choosing it from the menu shows the error “invalid parameters for edit.findNext: missing find”. To find text, use Edit → Find and Replace….
Insert spaces and breaks
Section titled “Insert spaces and breaks”Type → Insert Whitespace Character and Type → Insert Break Character add a character that is hard to type. VectorCraft adds it at the end of the text of each selected type object.
| Submenu | Characters |
|---|---|
| Insert Whitespace Character | Em Space, En Space, Hair Space, Sixth Space, Thin Space, Nonbreaking Space, Figure Space, Punctuation Space, Third Space, Quarter Space |
| Insert Break Character | Forced Line Break, Tab |
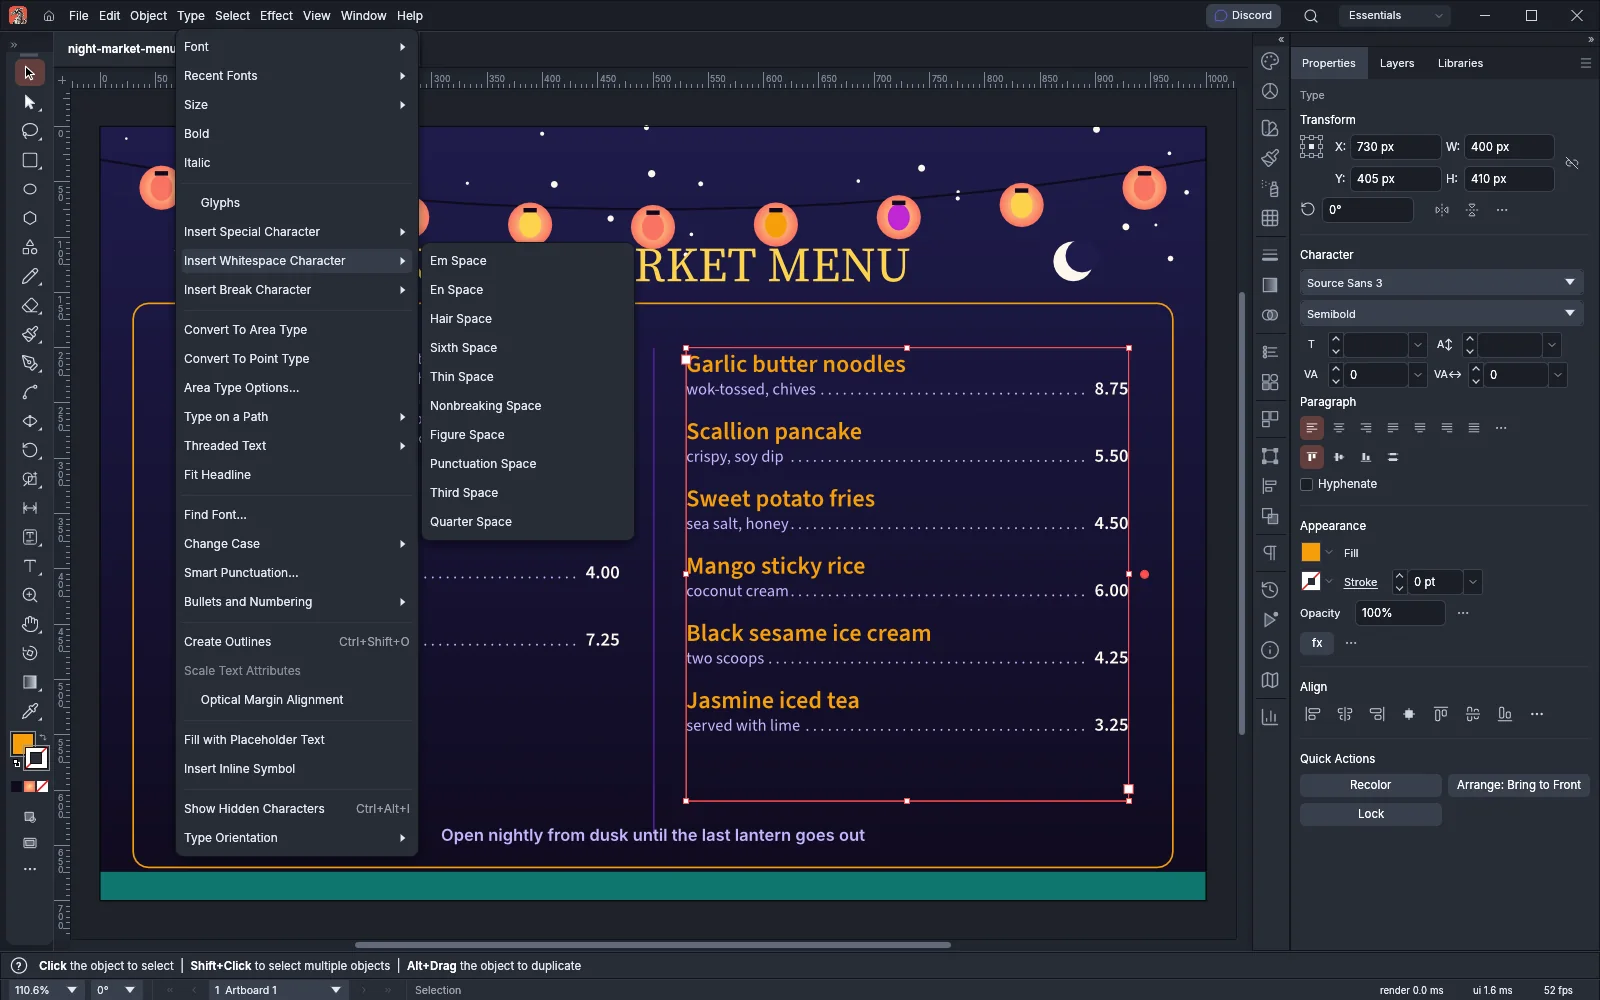
These commands do not insert at the caret. The Glyphs panel does not list space characters, so you cannot place one of these spaces at the caret from there either.
Type → Insert Inline Symbol places a symbol inside the text as one character, so it moves with the words around it:
- In the Symbols panel, select the symbol.
- With the Type tool, click where the symbol should go.
- Choose Type → Insert Inline Symbol.
The symbol is drawn as tall as the font size, centered on the capital letters. Backspace or Delete removes it as one character.
Set vertical type
Section titled “Set vertical type”In vertical type, each line runs from top to bottom.
- In the toolbar, choose the Vertical Type tool, the Vertical Area Type tool or the Vertical Type on a Path tool from the Type tool’s group.
- Click or drag on the artboard and type, as with the horizontal tools.
To turn type you already made, select it and choose Type → Type Orientation → Vertical. Type → Type Orientation → Horizontal turns it back.
The tate-chu-yoko commands set a short run, such as a two-digit number, upright across the column. They appear once the East Asian options are on:
- Choose Edit → Preferences… (Ctrl+K, or Cmd+K on macOS). On the Type page, under Language Options, turn on Show East Asian Options. On macOS, choose VectorCraft → Settings → Type… instead.
- With the Type tool, select the characters in vertical type.
- In the Character panel menu, choose Tate-chu-yoko. The characters stand side by side across one em of the column.
- To nudge the block, choose Tate-chu-yoko Settings… from the same menu. A positive Up/Down moves it up and a positive Left/Right moves it right, from -1296 to 1296 pt.
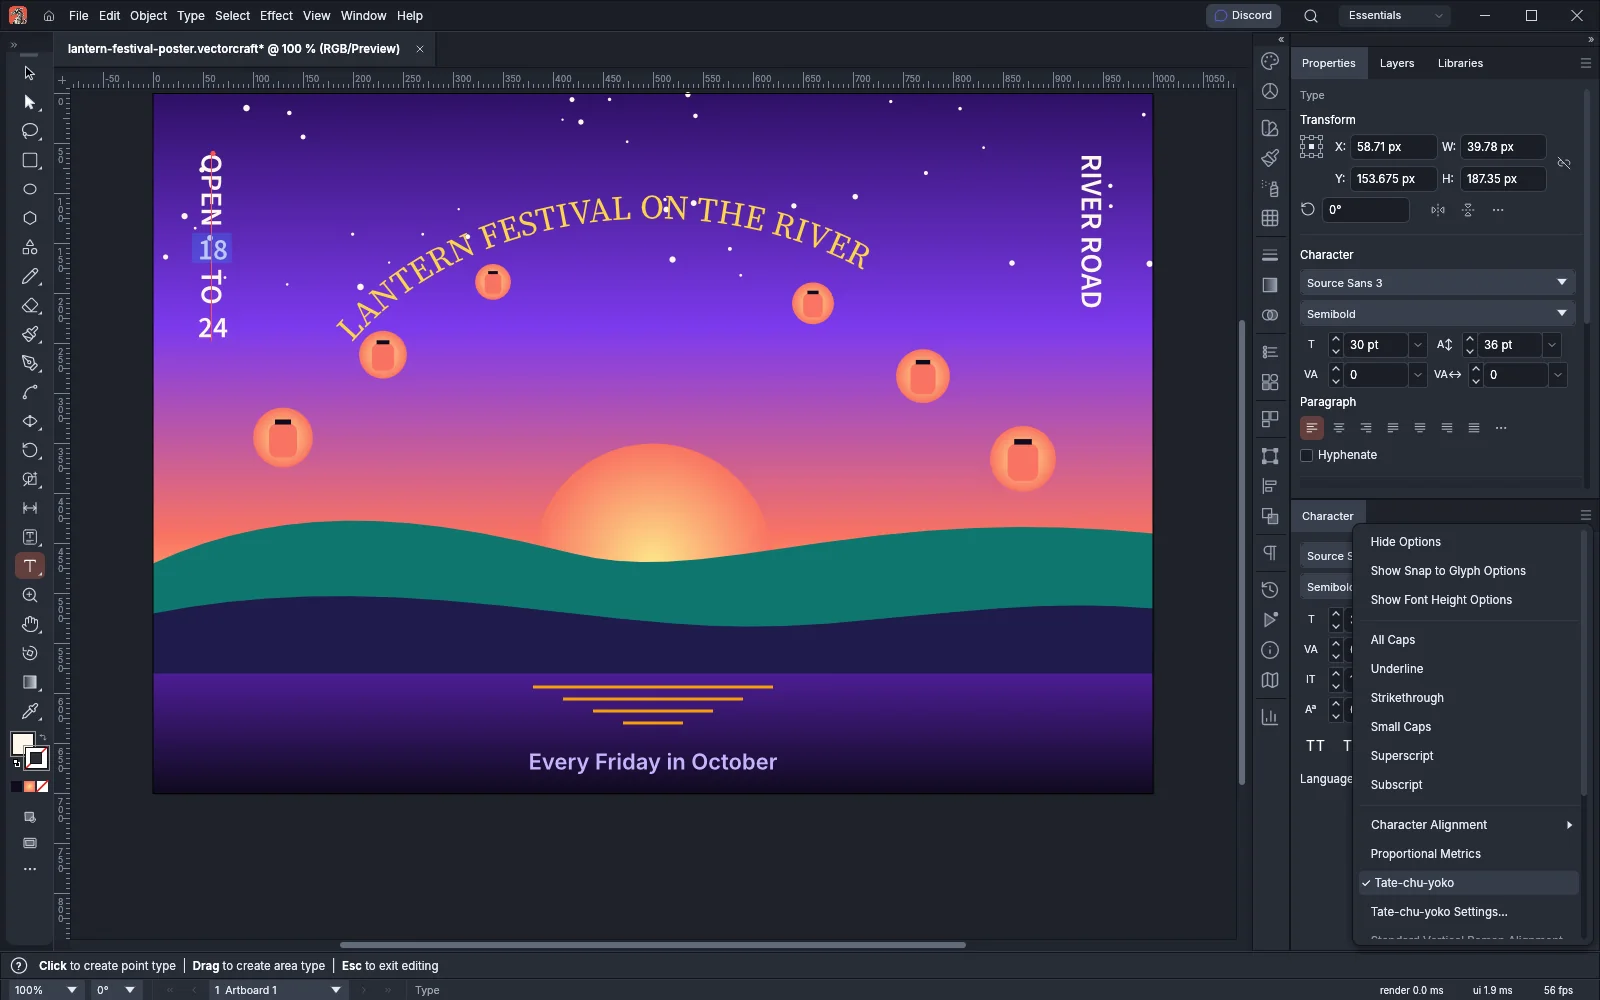
Standard Vertical Roman Alignment in the same menu sets Latin letters and digits upright, one below the other, instead of rotated. Tate-chu-yoko and Standard Vertical Roman Alignment do not change horizontal type.
Fine-tune justification and hyphenation
Section titled “Fine-tune justification and hyphenation”The Paragraph panel menu holds Justification…, Hyphenation… and the choice of composer. They apply to the paragraphs of the selected type, or to those the Type tool’s selection touches.
Single-line Composer breaks each line on its own. Every-line Composer, the default, sets the line breaks of the whole paragraph together. To switch the selected paragraphs between the two, press Ctrl+Alt+Shift+C (Cmd+Option+Shift+C on macOS). Hyphenation Zone works only with the Single-line Composer.
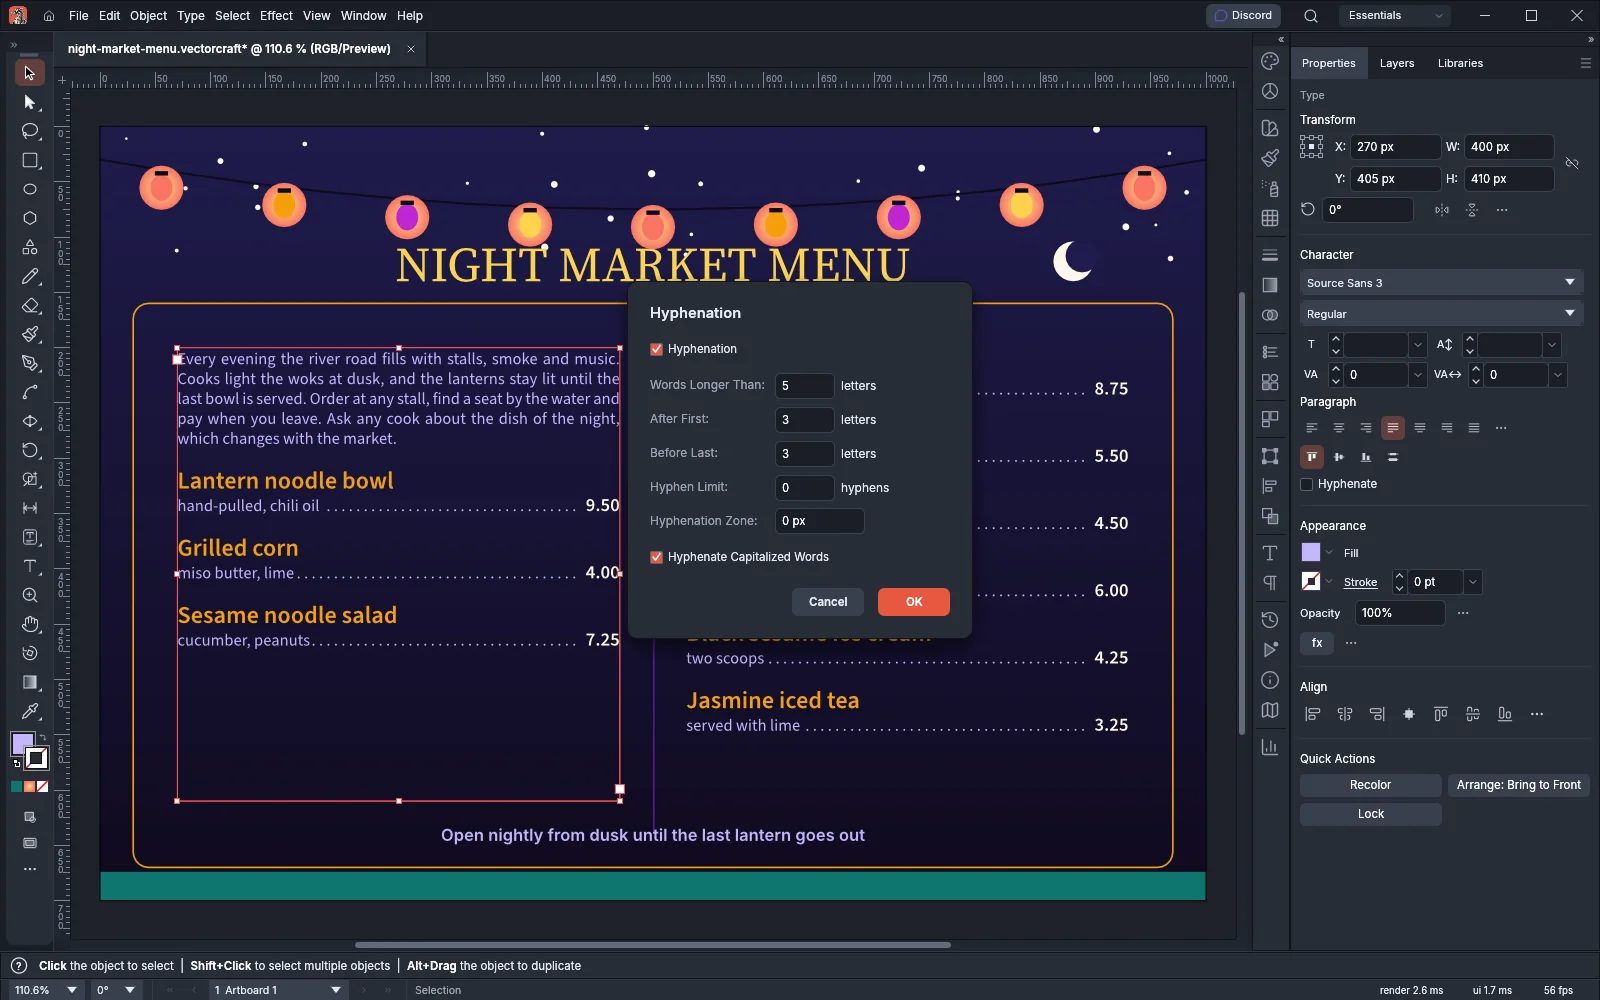
To turn hyphenation on, turn on Hyphenate in the Paragraph panel, or press Ctrl+Alt+Shift+H (Cmd+Option+Shift+H on macOS). The Hyphenation… dialog sets which words break and where:
| Option | What it does | Default |
|---|---|---|
| Hyphenation | Turns hyphenation on or off for the paragraphs, as Hyphenate in the Paragraph panel does | Off |
| Words Longer Than | Only words with more letters than this break, from 1 to 25 letters | 5 |
| After First | The fewest letters before the hyphen, from 1 to 15 | 3 |
| Before Last | The fewest letters after the hyphen, from 1 to 15 | 3 |
| Hyphen Limit | The most lines in a row that end with a hyphen, from 0 to 25; 0 sets no limit | 0 |
| Hyphenation Zone | A line whose text already ends this close to the right edge moves the next word down instead of breaking it, from 0 to 1296 pt | 0 |
| Hyphenate Capitalized Words | Allows breaks in words that start with a capital letter. Words in capitals only never break | On |
The Justification… dialog sets spacing as a percentage. Desired applies to every line. Minimum and Maximum limit how far justified lines may go to fill the width. Minimum must not exceed Desired, and Desired must not exceed Maximum. While a row is out of order, the dialog shows the warning “Minimum must not exceed Desired, nor Desired Maximum.” and OK is unavailable. Turn on Preview to see the spacing on the canvas while the dialog is open.
| Option | What it sets | Range | Defaults (Minimum, Desired, Maximum) |
|---|---|---|---|
| Word Spacing | The space between words, as a share of the font’s word space | 0% to 1000% | 80%, 100%, 133% |
| Letter Spacing | Space added after each letter, as a share of a word space | -100% to 500% | 0%, 0%, 0% |
| Glyph Scaling | The width of the letters | 50% to 200% | 100%, 100%, 100% |
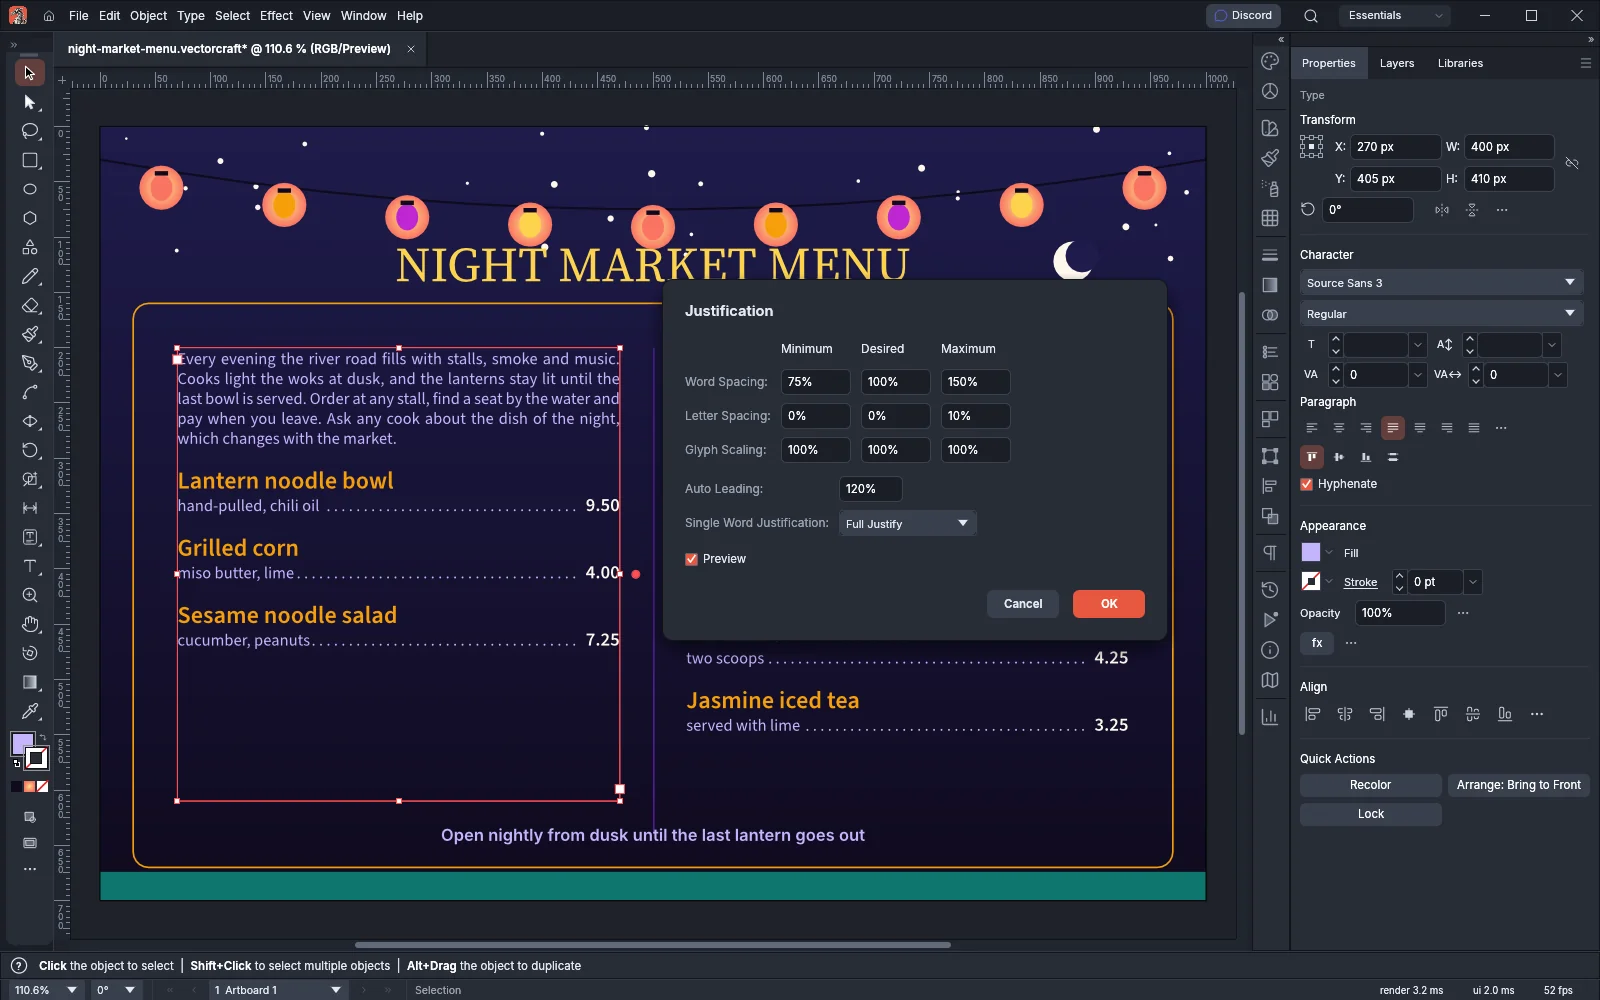
The dialog also holds two single settings. Auto Leading sets the leading of characters set to Auto, as a share of the font size, from 0% to 500%. The default is 120%. Single Word Justification sets how a justified line that holds one word is set: Full Justify (the default), Align left, Align center or Align right.
Type → Optical Margin Alignment lets punctuation hang outside the margins. Quotation marks, hyphens, periods and commas hang outside fully. Asterisks, tildes, ellipses, dashes, colons and semicolons hang by half, and the letters A, V, W, Y, v, w and y by a tenth of their width. Choose the command again to turn it off. It applies to the selected type and every frame threaded with it.
Tweak single letters with Text Tweaker
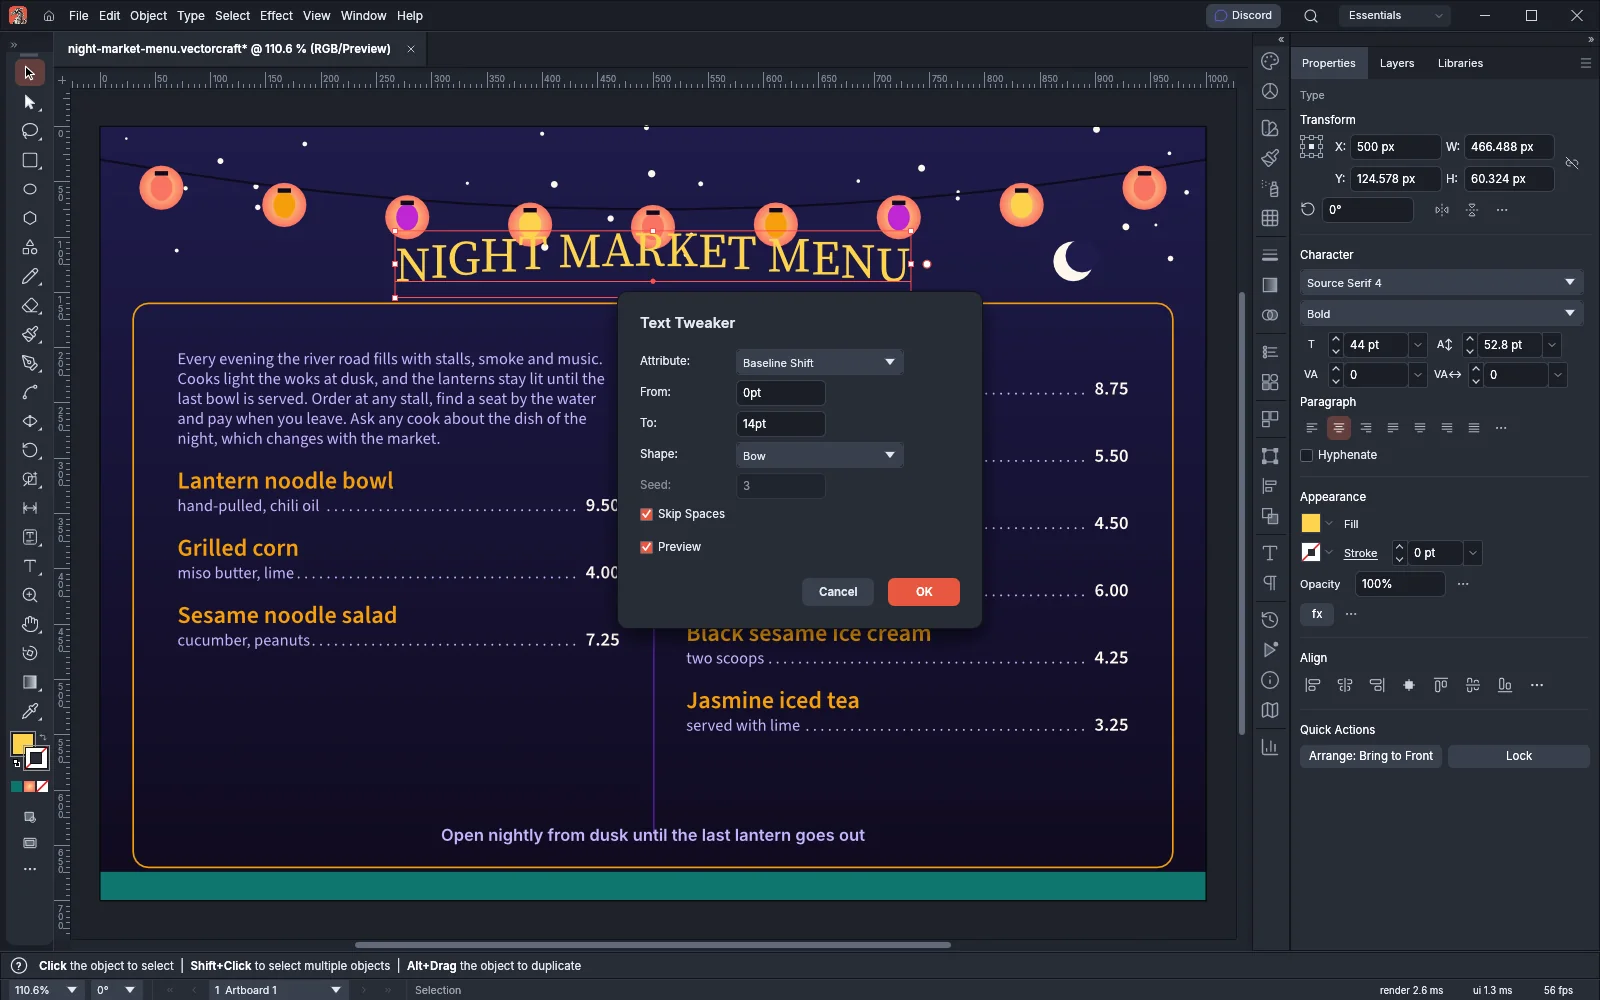
Section titled “Tweak single letters with Text Tweaker”Text Tweaker, part of the built-in Type Tools plug-in, changes one attribute letter by letter from a start value to an end value. The text stays editable.
- Select type objects, or select characters with the Type tool. At a caret with nothing selected, Text Tweaker changes all of the object’s text.
- Choose Object → Plug-ins → Type Tools → Text Tweaker….
- Set the options from the following table. Turn on Preview to see the change on the canvas.
- Click OK. The change is one undo step.
| Option | What it does |
|---|---|
| Attribute | Font Size, Baseline Shift, Character Rotation, Horizontal Scale, Vertical Scale, Tracking, Leading or Stroke Weight. Font Size is the default |
| From and To | The value of the first and last character. Each attribute starts from its own pair, for example 12 to 36 pt for Font Size and 0° to 30° for Character Rotation. The allowed values are in the next table |
| Shape | Straight steps evenly, Ease In Out starts and ends slowly, Bow curves from the From value up to the To value in the middle and back, Spike does the same in straight lines, and Random gives each character any value between the two |
| Seed | For Random, picks the pattern. The same seed and text give the same result |
| Skip Spaces | Leaves spaces and line breaks as they are. On by default |
| Preview | Shows the change on the canvas while the dialog is open |
From and To take these values:
| Attribute | Range |
|---|---|
| Font Size | 0.1 to 1296 pt |
| Baseline Shift | -1296 to 1296 pt |
| Character Rotation | -360° to 360° |
| Horizontal Scale and Vertical Scale | 1% to 10000% |
| Tracking | -1000 to 10000 |
| Leading | 0.1 to 5000 pt |
| Stroke Weight | 0 to 1000 pt |
Stroke Weight shows only on characters that have a stroke.
Release type from a path
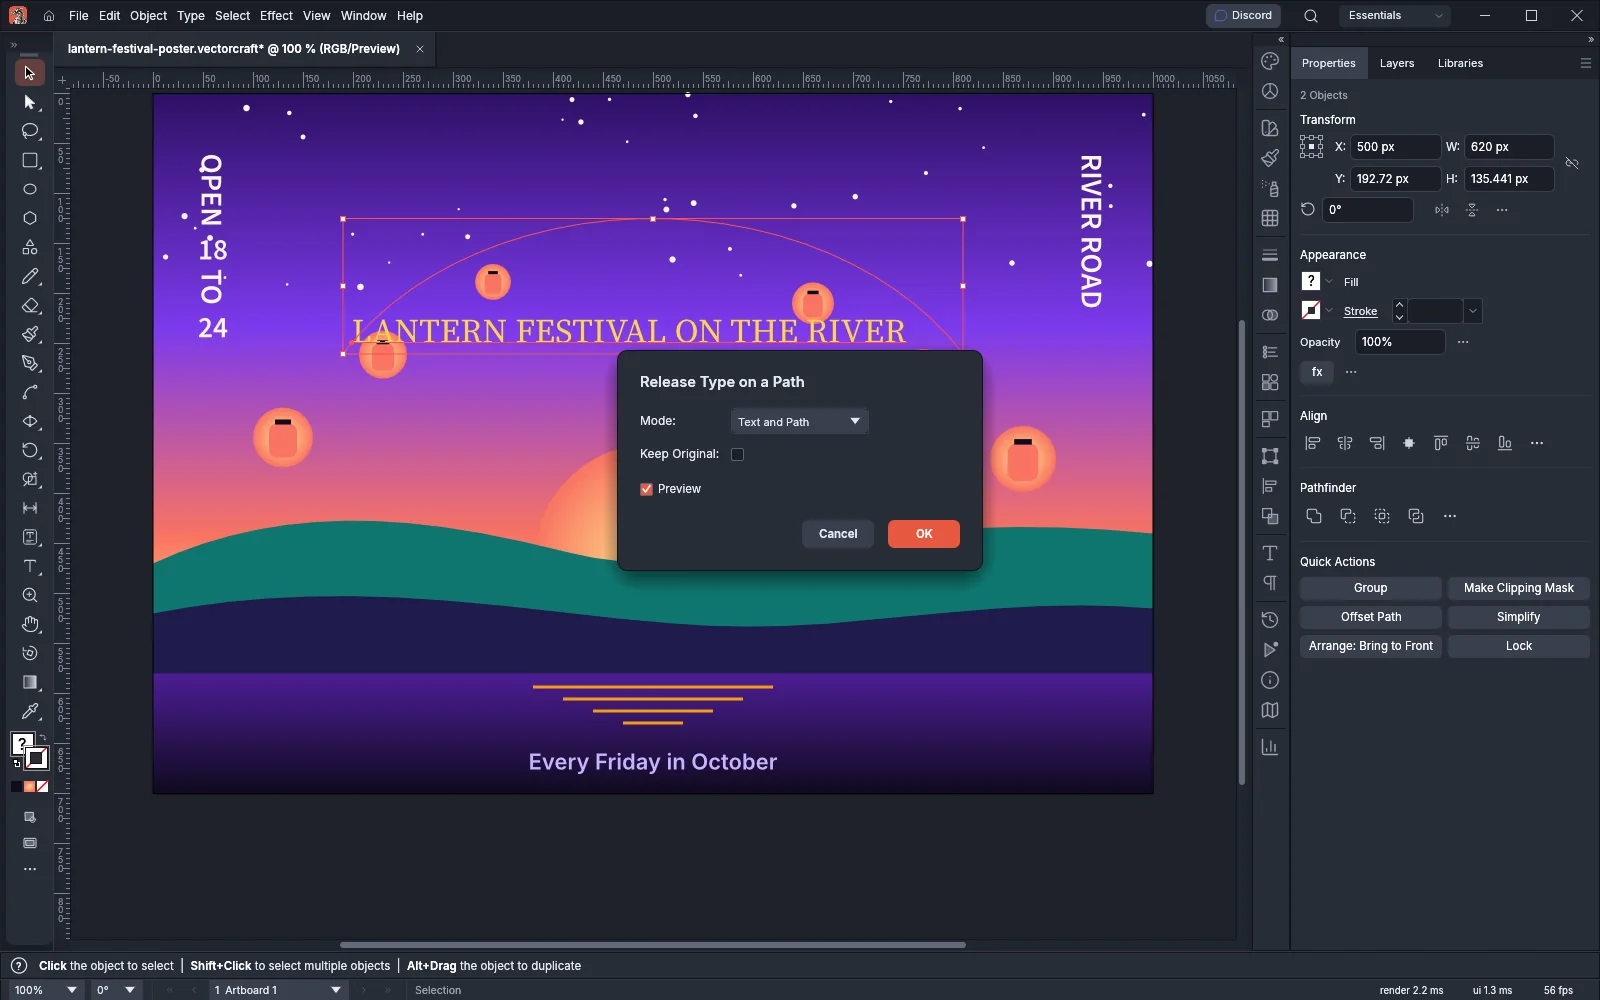
Section titled “Release type from a path”Release Type on a Path, also part of the Type Tools plug-in, turns type on a path into point type on one straight line and the plain path it was set on. The point type keeps its text and its character and paragraph attributes. The path keeps its shape and has no fill and no stroke.
- Select the type on a path with the Selection tool.
- Choose Object → Plug-ins → Type Tools → Release Type on a Path….
- Set the options from the following table.
- Click OK. The change is one undo step, and the released objects are selected.
| Option | What it does | Default |
|---|---|---|
| Mode | What the command makes: Text and Path makes both, Path Only keeps only the path, and Text Only keeps only the point type | Text and Path |
| Keep Original | Leaves the type on a path in place and puts the released objects just above it | Off |
| Preview | Shows the result on the canvas while the dialog is open | Off |
Other type commands
Section titled “Other type commands”- Type → Scale Text Attributes changes a scaled type object so that its font size, leading, baseline shift and horizontal scale show the scaled values, and the object itself has no scale. It is available when the selected type has been scaled.
- View → Snap to Glyph lets drawing snap to the bounds of live type, and on a single line of type to its baseline, x-height, character widths and letter anchor points.
Shortcuts
Section titled “Shortcuts”| Command | Windows and Linux | macOS |
|---|---|---|
| Tabs panel | Ctrl+Shift+T | Cmd+Shift+T |
| OpenType panel | Ctrl+Alt+Shift+T | Cmd+Option+Shift+T |
| Hyphenate | Ctrl+Alt+Shift+H | Cmd+Option+Shift+H |
| Switch between the Single-line and Every-line Composer | Ctrl+Alt+Shift+C | Cmd+Option+Shift+C |
To change these shortcuts, choose Edit → Keyboard Shortcuts….