
Export for screens and the web
This page shows how to export every artboard of a document at several scales and formats at once, how to collect pieces of art as assets and export them on their own, and how to write single SVG and PNG files. It also covers the options of each export format, the pixel tools for small screen art and the Save for Web (Legacy) dialog.
Choose an export command
Section titled “Choose an export command”All of these commands are in the File menu.
| Command | What it writes | Use it for |
|---|---|---|
| Export → Export for Screens… | Every chosen artboard or asset, in every format row, in one pass | Icon sets, app assets and web images at 1x, 2x and other sizes |
| Export → Export As… | One file in the format you pick, or one file per artboard | A single SVG, PNG, PDF or other file |
| Export → Export As SVG… | An SVG file, with the SVG Options dialog | SVG files for the web |
| Export → Export As PNG… | A PNG file, with the PNG Options dialog | A single PNG image |
| Export → Save for Web (Legacy)… | One optimized GIF, JPEG, PNG-8 or PNG-24 image, previewed beside the original | Comparing file sizes before you save |
| Export Selection… | The selected objects, collected as an asset and opened on the Assets tab of Export for Screens | One icon or element out of a larger design |
Export artboards with Export for Screens
Section titled “Export artboards with Export for Screens”- Give each artboard the name you want its files to have. Export for Screens names each file after its artboard.
- Choose File → Export → Export for Screens… (Ctrl+Alt+E, or Cmd+Option+E on macOS). The dialog opens on the settings the document last exported with. If the Artboard tool is active, the dialog checks the artboards you selected with that tool.
- On the Artboards tab, check the artboards to export. Grid View and List View change how the thumbnails are shown, and Clear Selection unchecks them all.
- Under Select, choose All, Range (for example
1-3), or Full Document. Full Document writes one file per format row for the whole document: a PDF row writes every artboard, and the other rows write the bounds of all visible art. - Turn on Include Bleed to grow each artboard by the document’s bleed. Include Artboard Fill draws each artboard’s background color behind its art. It is on by default.
- Under Export to, choose a folder. Open Location after Export shows the files in your file manager when the export finishes. Create Sub-folders puts each row’s files in a sub-folder named by Scale (for example
2x) or by Format (for exampleSVG). - Under Formats, set each row’s Scale, Suffix and Format. + Add Scale adds a PNG row at the next whole factor above the largest factor so far, and the Remove button at the end of a row deletes it.
- Type a Prefix to put the same text in front of every file name.
- Check the line under the lists, which shows how many items are selected and how many files the export will write.
- Choose Export Artboard. On the Assets tab the button reads Export Asset.
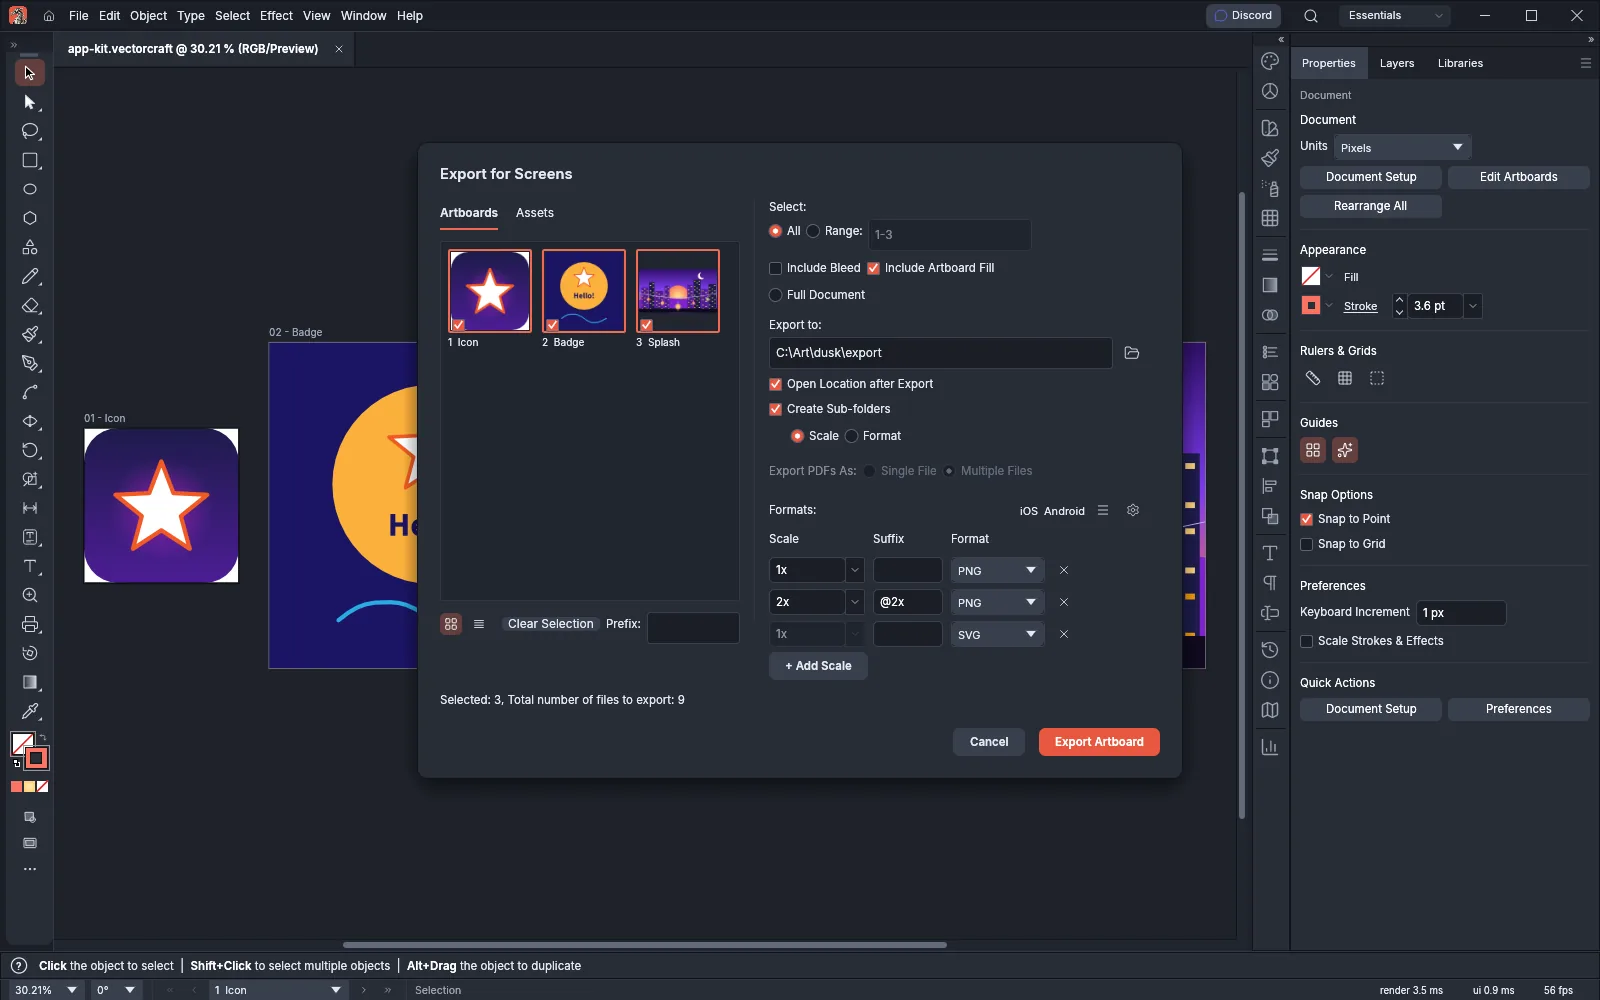
In the web version of VectorCraft, the Export to area reads “Your browser downloads the files (several as one .zip).” and the button reads Download. An export of one file downloads that file, and an export of several files downloads them as one .zip file.
Scales, suffixes and file names
Section titled “Scales, suffixes and file names”A raster row’s Scale can be a factor or a target size:
| Scale | What the row writes | Default suffix |
|---|---|---|
1x |
The artboard at its own size | None |
2x, 3x |
The artboard at two or three times its size | @2x, @3x |
100w |
An image 100 pixels wide | @100w |
100h |
An image 100 pixels high | @100h |
72ppi |
An image at 72 pixels per inch | None |
The Scale list offers 0.5x, 0.75x, 1x, 1.5x, 2x, 3x, 4x, 512w, 512h, 72ppi, 150ppi and 300ppi, and you can type any other value. While a row’s suffix is the default one, it changes with the scale. The Scale field is unavailable on SVG, PDF, EPS, AI and VectorCraft rows.
With these settings, an artboard named Icon and a 2x PNG row with sub-folders by scale gives the file 2x/Icon@2x.png. Vector rows (SVG, PDF, EPS) leave out size suffixes. When two artboards have the same name, the files of the second and later ones end in -2, -3 and so on. An unnamed artboard is written as Artboard-N, where N is its number.
The Format Settings button (the gear) sets the options that apply to every row of one format, such as the JPEG method or SVG styling. The Format Presets menu saves the current rows and settings as a preset with Save Preset… and removes one with Delete Preset. When you export artboards with a PDF row, Export PDFs As chooses Single File (every artboard as a page of one PDF) or Multiple Files.
The Format list offers these choices:
| Group | Formats |
|---|---|
| Raster | PNG, PNG 8, JPG 100, JPG 80, JPG 50, WebP, GIF, TIFF |
| Vector and documents | SVG, PDF, PDF Print, EPS, AI, VectorCraft |
A PDF Print row adds trim marks, registration targets, color bars and page information. When you choose PDF Print for a row with an empty suffix, VectorCraft sets the suffix to -print. EPS, AI and VectorCraft rows write a document that holds the item alone, on its one artboard.
Set the options for every row of a format
Section titled “Set the options for every row of a format”- In Export for Screens, choose the Format Settings button (the gear) at the right end of the Formats line. The right side of the dialog shows the options of the first row’s format.
- Choose another format from the Format list if needed: PNG, PNG 8, JPG, WebP, GIF, TIFF, SVG or PDF.
- Set the options. They apply to every row of that format.
- Choose Done to go back to the format rows.
The raster formats show the same options as their Export As dialogs (see Set the options for each format), without the JPEG quality, which each JPG row sets, and without the image map. SVG shows the SVG options. PDF shows a PDF Preset list with VectorCraft Default and the PDF presets you saved.
Export PDFs as one file or several
Section titled “Export PDFs as one file or several”Export PDFs As is available on the Artboards tab when at least one row writes PDF and Select is not set to Full Document. Multiple Files (the default) writes one PDF per artboard. Single File writes one PDF for each PDF row, with every chosen artboard as a page, and the counter under the lists counts that PDF as one file.
Save and reuse format presets
Section titled “Save and reuse format presets”A format preset keeps the format rows, their Format Settings, the prefix, the sub-folder choice, Include Bleed and Include Artboard Fill. It does not keep which artboards or assets are checked. Presets are stored with your preferences, so every document can use them.
- In Export for Screens, set up the format rows and their settings.
- Choose the Format Presets button (☰) beside the platform buttons, then Save Preset….
- Type a name in the Name field and choose Save. Cancel closes the field without saving. Saving under the name of a preset you saved before replaces it.
- To use a preset, open the Format Presets menu and choose its name. The dialog takes the preset’s rows, settings, prefix, sub-folders and bleed and fill choices.
- To remove a saved preset, apply it, then choose Delete Preset in the same menu.
VectorCraft has two built-in presets, which you can apply but not replace or delete:
| Preset | What it writes |
|---|---|
| Logo Package | SVG, PNG at 1x, PNG at 2x with the @2x suffix, PDF, and a PDF with printer’s marks and the -print suffix, in one sub-folder per format |
| Print-Ready PDF | One PDF with printer’s marks, the document’s bleed and the -print suffix |
To share presets with another computer, use Export Preset… and Import Preset… in the Asset Export panel menu (see the next section). Preset files have the .vcexportpresets extension.
Collect and export assets
Section titled “Collect and export assets”An asset is a piece of art that Export for Screens exports on its own, cropped to its bounds and named after the asset.
- Select the art you want to export.
- Choose Object → Collect for Export → As Single Asset to make one asset of the whole selection, or As Multiple Assets to make one asset per object. Each asset is named after its object, or Asset 1, Asset 2 and so on.
- Choose Window → Asset Export to see the document’s assets as thumbnails with their names.
- In the panel, double-click an asset to rename it. Click to select assets, and hold Shift or Ctrl (Cmd on macOS) to add to the selection. The trash icon removes the selected assets from the panel, and their art stays in the document.
- Set the format rows under Export Settings. The panel shares its rows with Export for Screens.
- Choose Export to write the selected assets (or all of them when none is selected) to a folder you pick. With assets selected, the button reads Export N Selected. The Export for Screens button in the panel opens the dialog on its Assets tab instead.
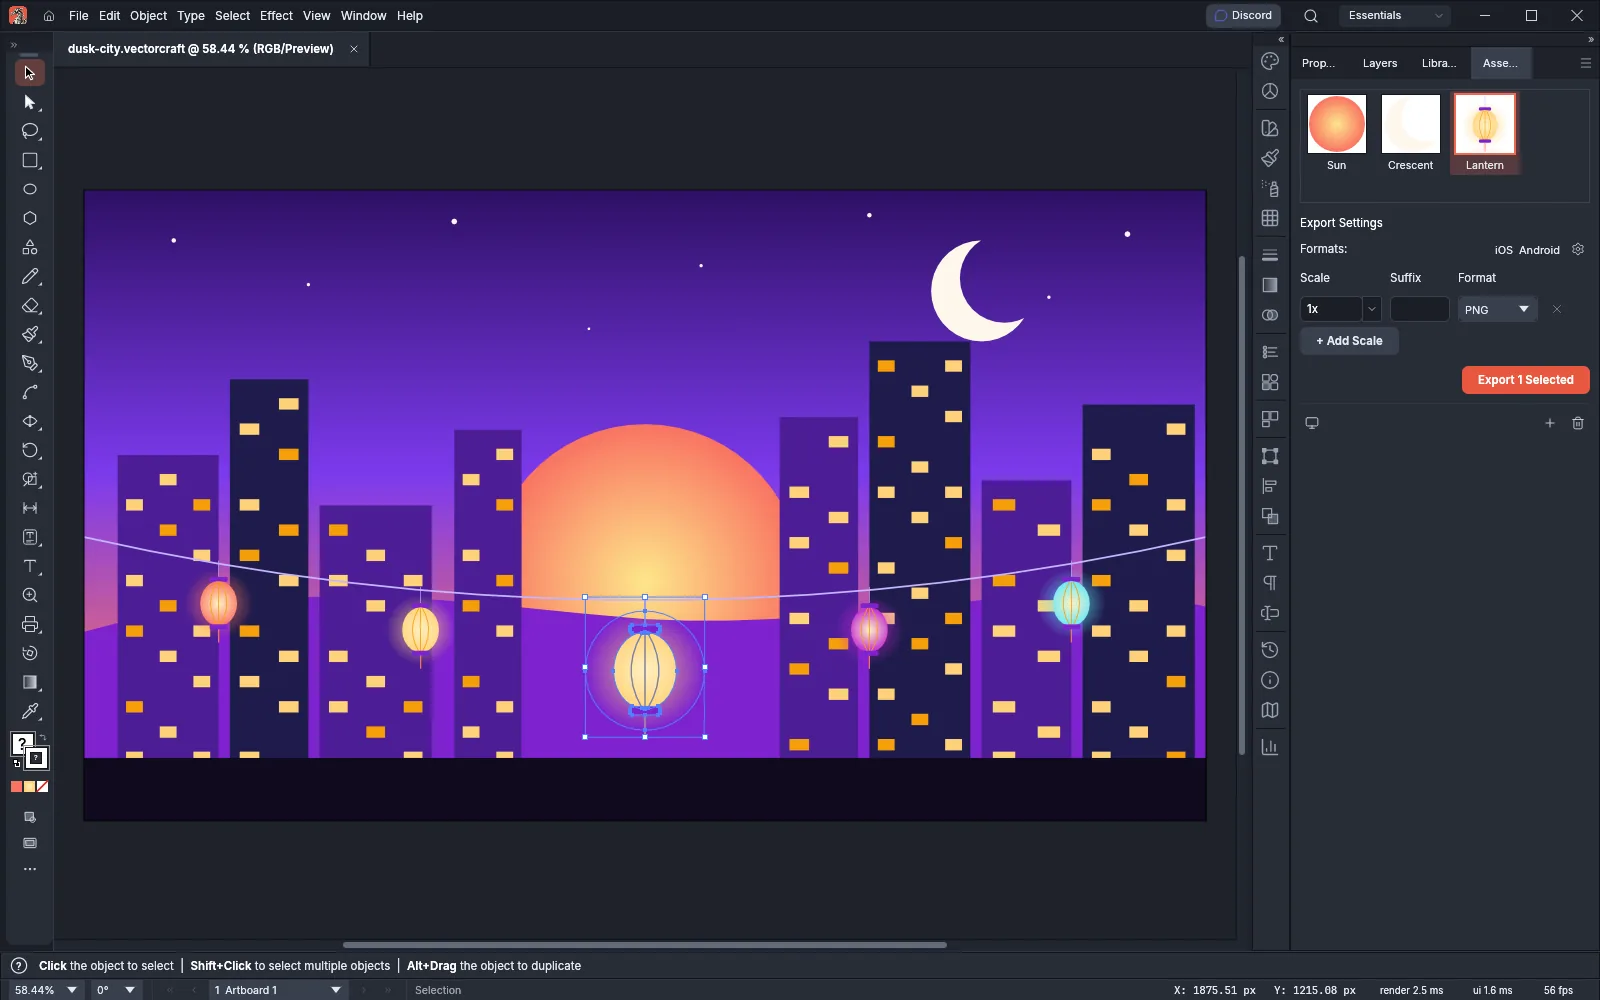
You can also drag art from the canvas into the Asset Export panel, or select it and click +. Each object becomes its own asset. Hold Alt (Option on macOS) to make one asset of all of them.
File → Export Selection… collects the selected objects as one asset and opens Export for Screens on the Assets tab with that asset checked.
In the web version, Export in the panel downloads the files, and several files download as one .zip file.
Use the Asset Export panel menu
Section titled “Use the Asset Export panel menu”The Asset Export panel menu has these commands:
| Command | What it does |
|---|---|
| Add Selected Artwork as One Asset | Makes one asset of the selected objects. Available when art is selected. |
| Add Selected Artwork as Multiple Assets | Makes one asset of each selected object. Available when art is selected. |
| Select All Assets | Selects every asset in the panel |
| Remove Selected Assets | Removes the selected assets from the panel. Their art stays in the document. |
| Export for Screens… | Opens Export for Screens on the Assets tab, with the selected assets checked (or all of them when none is selected) |
| A preset name | Applies that format preset to the panel’s export settings. The built-in presets come first, then the ones you saved. |
| Save As Preset… | Shows a Name field under Export Settings. Type a name and choose Save to save the panel’s export settings as a preset. |
| Save Changes | Saves the panel’s current export settings into the saved preset you applied last |
| Delete Preset | Deletes the saved preset you applied last |
| Import Preset… | Adds the presets of a .vcexportpresets file to your saved presets |
| Export Preset… | Writes the preset you applied last to a .vcexportpresets file named after it |
Export one file with Export As
Section titled “Export one file with Export As”- Choose File → Export → Export As….
- Pick a Format.
- Turn on Use Artboards to write one file per artboard, named
<name>-<artboard>with the format’s extension, and choose All or a Range. For a PDF, each artboard becomes a page. With Use Artboards off, the export covers the bounds of the visible art. - Choose Export… and pick the file name. The options dialog for the format follows, for example PNG Options or SVG Options.
Export As SVG… goes straight to SVG Options, and Export As PNG… asks for the file and then opens PNG Options.
These formats are available from Export As:
| Kind | Formats |
|---|---|
| Vector | SVG, SVG Compressed (gzipped SVG), PDF, EPS, DXF, EMF, WMF |
| Raster | PNG, PNG-8, JPEG, WebP, GIF, TIFF, BMP, Targa, PSD |
| Text | Text: the document’s text, in stacking order from back to front |
| Document | VectorCraft Template |
The Format list ends with DWG (use DXF), which is unavailable: VectorCraft does not write DWG files, so export DXF instead. Formats added by installed exporter plug-ins come after the built-in formats. A plug-in writes the whole document, so Use Artboards is unavailable for its format.
After you pick the file, this is what follows:
| Format | What opens next |
|---|---|
| SVG, SVG Compressed | SVG Options |
| PDF with Use Artboards on | The Save PDF dialog, with one page per artboard |
| PNG, PNG-8, JPEG, WebP, GIF, TIFF, BMP, Targa, PSD | The format’s options dialog, for example PNG Options |
| EPS | EPS Options |
| DXF | DXF Options |
| Text | Text Export Options |
| PDF with Use Artboards off, EMF, WMF, VectorCraft Template | No dialog: VectorCraft writes the file |
Set the options for each format
Section titled “Set the options for each format”Each options dialog has Cancel and Export. Export writes the file you picked in Export As.
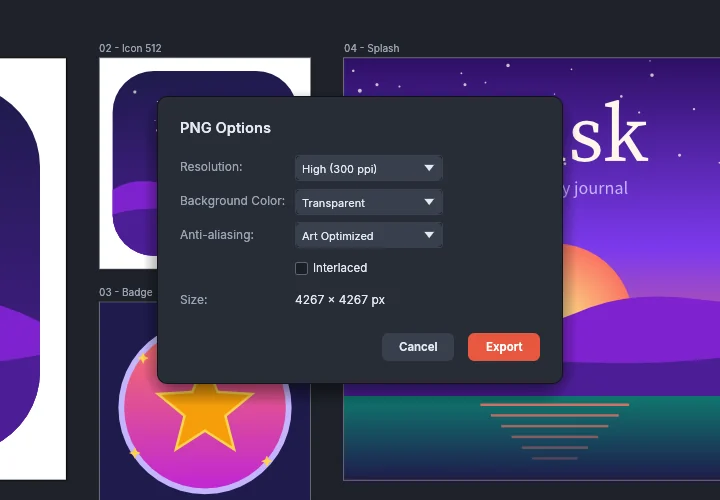
Options shared by the raster formats
Section titled “Options shared by the raster formats”PNG, PNG-8, JPEG, WebP, GIF, TIFF, BMP, Targa and PSD start with these rows:
| Option | Choices |
|---|---|
| Resolution | Screen (72 ppi, the default), Medium (150 ppi), High (300 ppi), or Other, which shows a field for any value from 1 to 4608 ppi |
| Background Color | Transparent, White, Black, or Other, which shows a color button. It starts as White for JPEG and for documents with a white background, and as Transparent otherwise. |
| Anti-aliasing | None (hard edges), Art Optimized (smooth edges, the default) or Type Optimized (smooth edges with type snapped to the pixel grid for crisper small text) |
| Size | The width and height in pixels at the chosen resolution. The row shows when the export covers one artboard or the art’s bounds. |
When the chosen options cannot keep transparency (JPEG, TIFF in CMYK or Grayscale, BMP below 32 bits, Targa at 24 bits, a flat PSD), the Background Color list starts at White, and transparent areas are written on white.
PNG Options
Section titled “PNG Options”| Option | Choices |
|---|---|
| Interlaced | Writes an interlaced PNG. Off by default. |
JPEG Options
Section titled “JPEG Options”| Option | Choices |
|---|---|
| Color Model | RGB, CMYK or Grayscale. A CMYK document starts on CMYK. |
| Quality | A slider from 0 to 10, with Low, Medium, High or Maximum shown beside it. The default is 9 (Maximum). |
| Method | Baseline (Standard), the default, which every decoder reads; Baseline Optimized, for smaller files; or Progressive, which shows a Scans field from 3 to 5 (default 3) |
| Image Map | None (the default), Client-side (.html) or Server-side (.map) |
| Embed ICC Profile | Embeds the color profile. On by default. |
GIF and PNG-8 Options
Section titled “GIF and PNG-8 Options”| Option | Choices |
|---|---|
| Color Reduction | Perceptual, Selective (the default), Adaptive, Web, Black & White or Grayscale |
| Colors | 2, 4, 8, 16, 32, 64, 128 or 256 (the default), or type any number from 2 to 256 |
| Dither | No Dither, Diffusion (the default), Pattern or Noise. Any choice but No Dither shows an amount from 0% to 100% (default 100%). |
| Matte | None, White (the default), Black, or Other, which shows a color button |
| Transparency | Keeps transparent areas transparent. On by default. |
| Interlaced | Writes an interlaced image. Off by default. |
WebP Options
Section titled “WebP Options”WebP Options has the shared rows only. The line under them reads “Lossless (lossy WebP isn’t available yet)”: VectorCraft writes lossless WebP files.
TIFF Options
Section titled “TIFF Options”| Option | Choices |
|---|---|
| Color Model | RGB (the default), CMYK or Grayscale. A CMYK document starts on CMYK. Only RGB keeps transparency. |
| Byte Order | Little-endian (II), the default, or Big-endian (MM) |
| LZW Compression | Compresses the image without loss. On by default. |
| Embed ICC Profile | Embeds the color profile. On by default. |
BMP Options
Section titled “BMP Options”| Option | Choices |
|---|---|
| Color Model | RGB (the default) or Grayscale |
| File Format | Windows (the default) or OS/2 |
| Depth | 1, 4, 8, 16, 24 (the default) or 32 bit. OS/2 files take 1, 4, 8 or 24 bit. Only 32 bit keeps transparency. |
| Color Reduction, Dither | Shown for an RGB image at 4 or 8 bit, with the same choices as GIF Options |
| Compress (RLE) | Run-length compression. Available for Windows files at 4 or 8 bit. |
| Flip Row Order | Writes the rows from top to bottom. Available for Windows files that are not compressed. |
Targa Options
Section titled “Targa Options”| Option | Choices |
|---|---|
| Depth | 16, 24 (the default) or 32 bits/pixel. 16 and 32 bits/pixel keep transparency. |
PSD Options
Section titled “PSD Options”| Option | Choices |
|---|---|
| Color Model | RGB (the default), CMYK or Grayscale. A CMYK document starts on CMYK. |
| Options | Flat Image writes one flattened image. Write Layers (the default) writes the layers, which keep transparency. |
| Maximum Editability | Available with Write Layers. Off by default. |
| Include Hidden Layers | Available with Write Layers. Off by default. |
| Embed ICC Profile | Embeds the color profile. On by default. |
EPS Options
Section titled “EPS Options”EPS Options remembers your choices for the next EPS export.
| Option | Choices |
|---|---|
| Preview → Format | None, TIFF (Black & White), or TIFF (8-bit Color), the default. The color preview can be Transparent (the default) or Opaque. |
| Transparency → Overprints | Preserve (the default) keeps overprinting objects overprinting on press. Discard makes them knock out like other art. |
| Transparency → Preset | The transparency flattener preset that flattens transparent art: High Resolution, Medium Resolution (the default), Low Resolution, or a preset you saved |
| Fonts | Embed Fonts (for other applications) is always on and unavailable, because type is written as outlines |
| Include Linked Files | Off by default |
| Include Document Thumbnails | On by default |
| Include CMYK PostScript in RGB Files | On by default |
| Compatible Gradient and Gradient Mesh Printing | Off by default. When on, gradients are written as bands of color. |
| PostScript | Language Level 2 or Language Level 3 (the default). Level 2 writes gradients as bands of color. |
DXF Options
Section titled “DXF Options”DXF Options remembers your choices for the next DXF export.
| Option | Choices |
|---|---|
| Version | 2018 (the default), 2013–2017, 2010–2012, 2007–2009, 2004–2006, 2000–2002, R14, R13 or R12 |
| Scale | Sets how many DXF units 1 unit of the art becomes. Pick the unit (Millimeters by default) and type the number of DXF units (1 by default, from 0.000001 to 1000000). |
| Scale Lineweights | Scales lineweights by the Scale value. When it is off, lineweights keep their printed width. Off by default. |
| Number of Colors | 8 Colors, 16 Colors, 256 Colors or True Colors (the default). True Colors needs version 2004 or later; earlier versions get the nearest of 256 colors. |
| Raster File Format | PNG (the default) or JPEG, for placed images |
| Export Option | Preserve Appearance (the default) turns type into outlines, and strokes that a CAD line cannot draw into filled shapes. Maximize Editability keeps type as text, and writes every stroke as a line with its lineweight and dashes. |
| Export Selected Art Only | Exports only the selection. Available when art is selected. |
| Alter Paths for Appearance | Writes a stroke that a CAD line cannot draw as the filled area it paints, for example a stroke wider than the widest lineweight. Off by default. |
| Outline Text | Writes type as outlines. Always on with Preserve Appearance. |
Text Export Options
Section titled “Text Export Options”| Option | Choices |
|---|---|
| Encoding | UTF-8 (the default) or UTF-16 (Unicode) |
| Line Endings | LF (macOS, Linux) or CRLF (Windows). The default matches your operating system. |
| Selection Only | Writes only the text of the selected objects. Available when objects are selected. |
Set SVG options
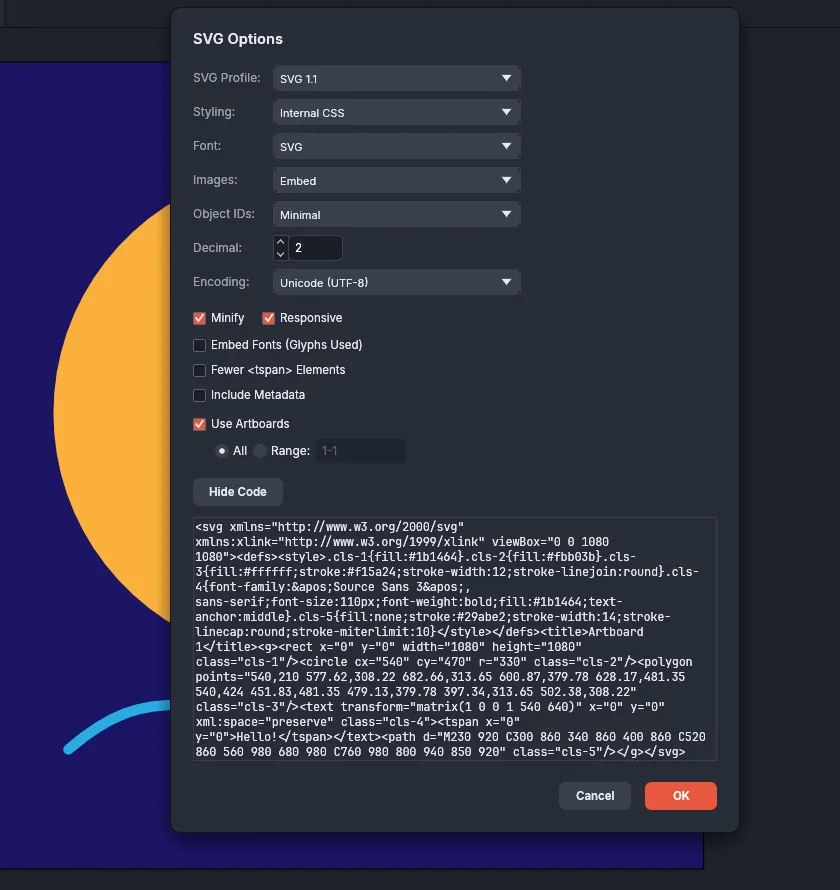
Section titled “Set SVG options”The SVG Options dialog opens from Export As SVG…, from Export As when the format is SVG, and when you save a document as SVG. VectorCraft keeps your choices for the next export.
| Option | Choices |
|---|---|
| SVG Profile | SVG 1.1 or SVG Tiny 1.2 |
| Styling | Internal CSS (the default), Presentation Attributes, Style Attributes, or Style Attributes (Entity References) |
| Font | SVG keeps text as text; Convert To Outlines writes it as shapes |
| Images | Embed puts images inside the SVG; Link writes them as separate files |
| Object IDs | Layer Names, Minimal or Unique |
| Decimal | Digits after the decimal point, from 1 to 7 (default 3) |
| Encoding | Unicode (UTF-8), Unicode (UTF-16) or ISO 8859-1 |
| Minify | Writes the file without extra spaces and line breaks |
| Responsive | On by default; leaves out the width and height so the SVG scales to its container |
| Embed Fonts (Glyphs Used) | Puts the glyphs the text uses into the file |
| Fewer <tspan> Elements | Writes text with fewer <tspan> elements |
| Include Metadata | Adds the document’s metadata |
| Use Artboards | On by default; exports all artboards or a range, one file each |
Embed Fonts and Fewer <tspan> Elements are unavailable when Font is set to Convert To Outlines. SVG Tiny 1.2 uses presentation attributes and does not embed fonts. When you save a document as SVG, the dialog shows Preserve Editing Capabilities in place of Use Artboards.
Choose Show Code to see the SVG markup the current settings write, and Hide Code to close it.
Keep small art sharp on screen
Section titled “Keep small art sharp on screen”- Choose View → Pixel Preview (Ctrl+Alt+Y, or Cmd+Option+Y on macOS) to see the art as it will look when written to pixels.
- Turn on View → Snap to Pixel so that the objects you draw or move snap to whole pixels.
- To fix art you have already drawn, select it and choose Object → Make Pixel Perfect. It snaps each object’s edges to the pixel grid, places odd stroke weights on half pixels, and rounds stroke weights.
Compare web image settings
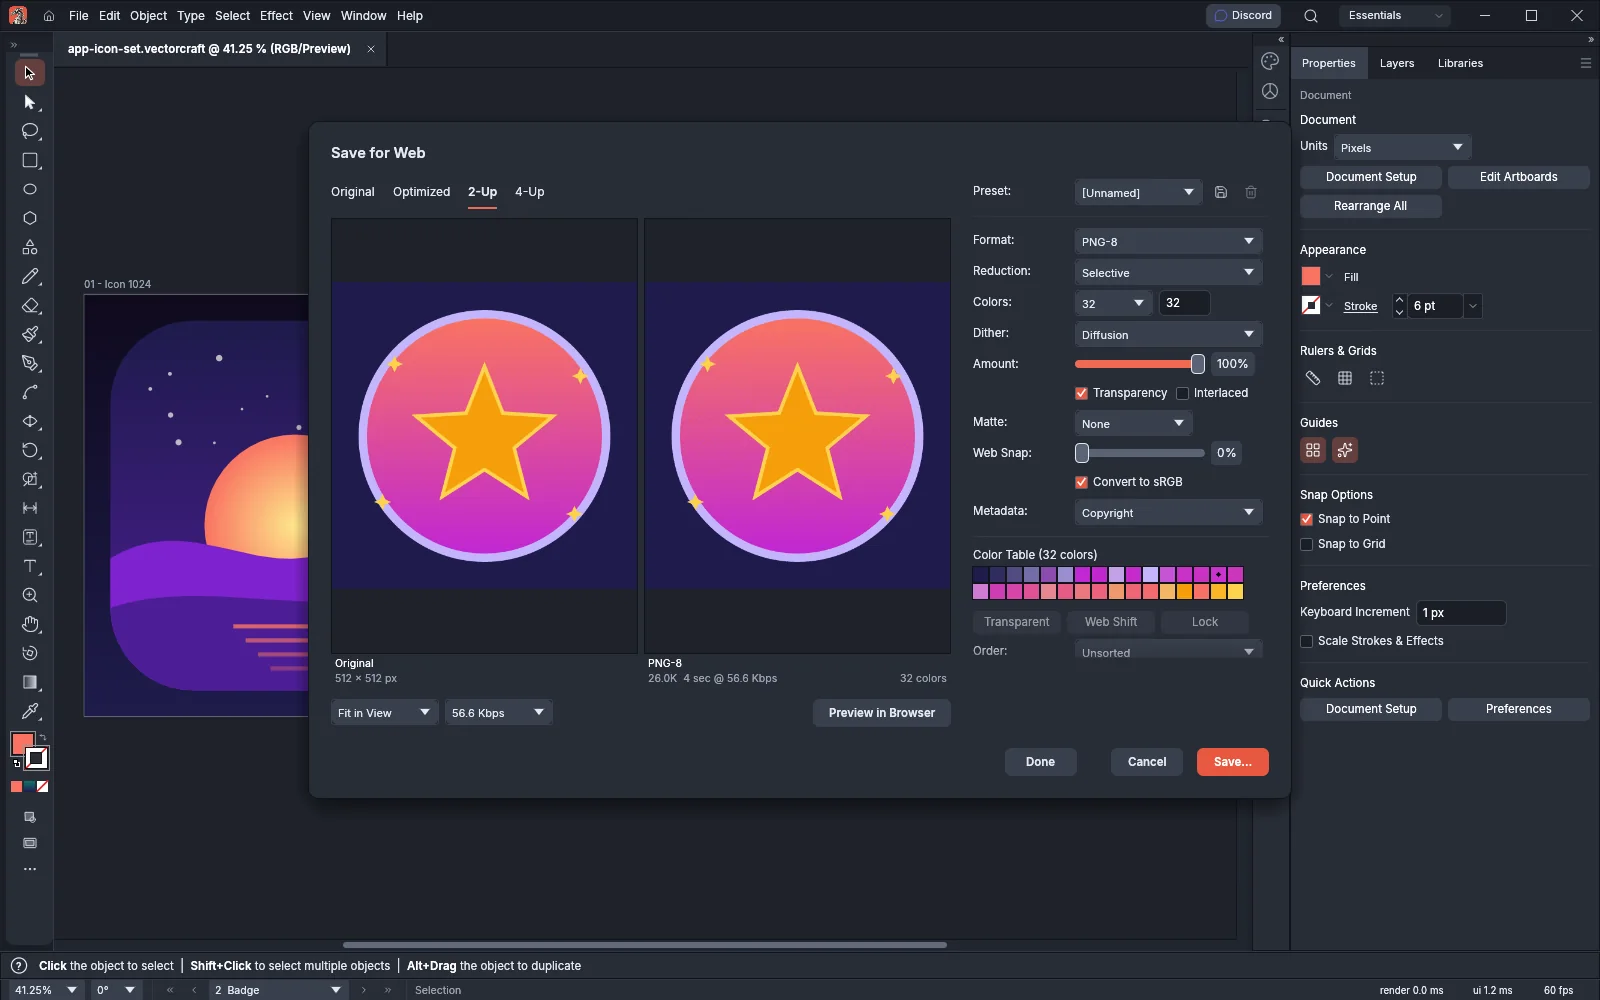
Section titled “Compare web image settings”File → Export → Save for Web (Legacy)… (Ctrl+Alt+Shift+S, or Cmd+Option+Shift+S on macOS) previews the art as an optimized GIF, JPEG, PNG-8 or PNG-24 image. The Original, Optimized, 2-Up and 4-Up views show the original beside one or more optimized versions, each with its file size and download time. The dialog also sets colors, dither, transparency and matte, JPEG quality, the color table and the image size.
- Save… keeps the settings and writes the files.
- Done keeps the settings and does not write any files.
- Make the artboard you want to export the active artboard.
- Choose File → Export → Save for Web (Legacy)…. The dialog opens on the 2-Up view at 100%, with the active artboard and the settings you used last. With more than one artboard, the Artboard list under Clip to Artboard picks another one.
- Pick a Preset, or choose a Format and set its options. The settings column scrolls when it is taller than the dialog.
- Compare the file size and download time under each preview. On the 4-Up view, the two extra panes show lighter versions of your settings, such as a lower JPEG quality or fewer colors. Click one to take its settings.
- Choose Save… and pick the file name. In the web version the button reads Download.
These controls sit under the preview:
| Control | Choices |
|---|---|
| Zoom | Fit in View, 50%, 100% (the default), 200% or 400%. Drag a preview to move it. |
| Download | The connection speed that the download times assume, from 28.8 Kbps to 8 Mbps. The default is 56.6 Kbps. |
| Preview in Browser | Writes an HTML page with the image to a temporary folder and opens it in your browser. Available in the desktop app only. |
The settings column has these options. The rows change with the format.
| Option | Formats | Choices |
|---|---|---|
| Preset: | All | The built-in presets for GIF, JPEG, PNG-8 and PNG-24, then the presets you saved. It reads [Unnamed] when the settings match no preset. The disk button shows a Name: field with Save, and the trash icon deletes the saved preset that is shown. |
| Format: | All | GIF (the default), JPEG, PNG-8 or PNG-24 |
| Reduction: | GIF, PNG-8 | Perceptual, Selective (the default), Adaptive, Web, Black & White or Grayscale |
| Colors: | GIF, PNG-8 | 2 to 256 (default 128), from the list or typed |
| Dither:, Amount: | GIF, PNG-8 | No Dither, Diffusion (the default), Pattern or Noise, with an amount from 0% to 100% (default 100%) |
| Transparency | GIF, PNG-8, PNG-24 | Keeps transparent areas transparent. On by default. |
| Interlaced | GIF, PNG-8, PNG-24 | Writes an interlaced image. Off by default. |
| Matte | All | None, White (the default), Black, or Other, which shows a color button |
| Web Snap | GIF, PNG-8 | 0% to 100% (default 0%) |
| Lossy | GIF | 0% to 100% (default 0%) |
| Quality | JPEG | Low (10), Medium (30), High (60, the default), Very High (80) or Maximum (100), with a slider for any value from 0 to 100 |
| Progressive | JPEG | Off by default |
| Optimized | JPEG | On by default |
| ICC Profile | JPEG | Embeds the color profile. Off by default. |
| Convert to sRGB | All | On by default |
| Metadata | All | None, Copyright (the default), Copyright and Contact Info, or All |
| Color Table | GIF, PNG-8 | The image’s colors as swatches. Select a swatch, then choose Transparent (or Restore), Web Shift (or Unshift) or Lock (or Unlock). Order sorts the table: Unsorted, Sort by Hue, Sort by Luminance or Sort by Popularity. |
| Image Size → W, H | All | The width and height in pixels. Changing one changes the other in proportion. |
| Percent | All | The size as a percentage of the art’s size |
| Anti-aliasing | All | None, Art Optimized (the default) or Type Optimized |
| Clip to Artboard | All | Exports the artboard’s area. On by default. With more than one artboard, an Artboard list picks which one. |
| Slices | All | All Slices, Selected Slices or No Slices. Shown when the document has slices. |
| Output | All | Images Only (the default) or HTML and Images |
For slices and their HTML output, see Slice artwork for the web.
Keyboard shortcuts
Section titled “Keyboard shortcuts”| Command | Windows and Linux | macOS |
|---|---|---|
| Export for Screens… | Ctrl+Alt+E | Cmd+Option+E |
| Pixel Preview | Ctrl+Alt+Y | Cmd+Option+Y |
| Save for Web (Legacy)… | Ctrl+Alt+Shift+S | Cmd+Option+Shift+S |
To change these shortcuts, choose Edit → Keyboard Shortcuts….