
Fill, stroke and color
On this page you paint the inside and the outline of your art, save the colors you use as swatches, and change how strokes look. You also find colors that go together, build linear, radial, freeform and mesh gradients, mask and blend art, and adjust the colors of finished artwork.
Choose the fill or the stroke
Section titled “Choose the fill or the stroke”Every object has a fill, which paints its inside, and a stroke, which paints its outline. The Fill and Stroke boxes in the toolbar show the current paint. The box in front is the active one, and the Color panel, the Swatches panel and the None key paint whichever box is in front.
- Select the objects you want to paint.
- Press X to bring the Fill box or the Stroke box to the front.
- Pick a color in the Color panel or click a swatch in the Swatches panel.
- Press / to set the active box to None.
With nothing selected, the same steps set the paint for the next object you draw.
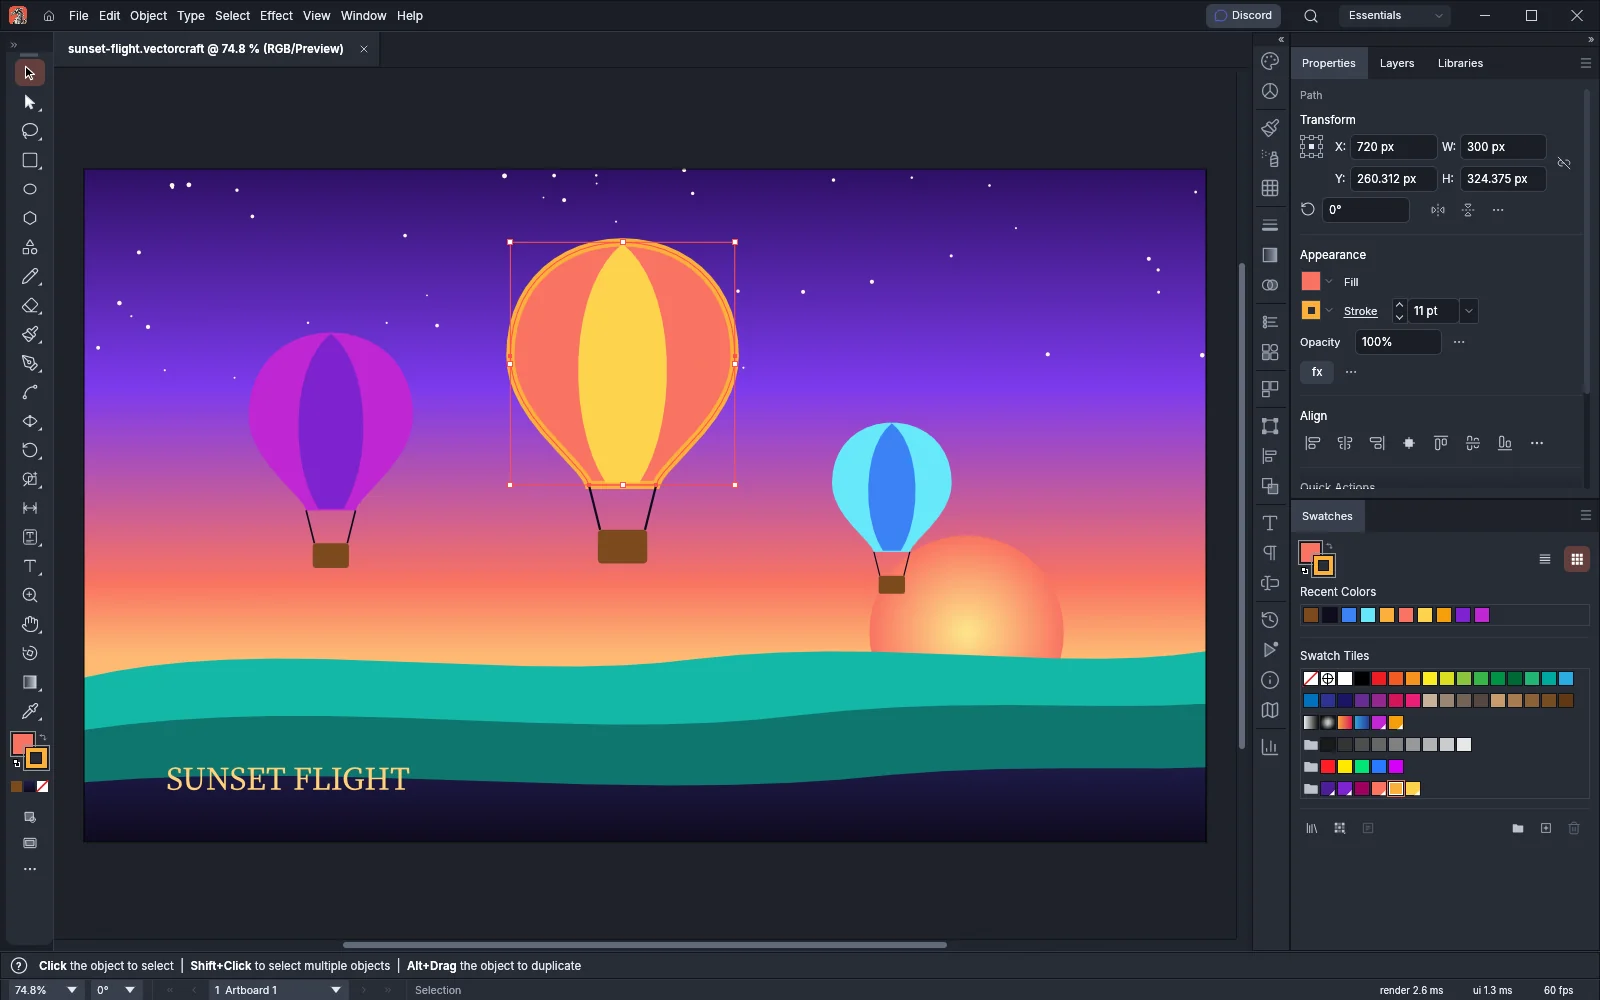
| Key | What it does |
|---|---|
| D | Sets a white fill and a 1 pt black stroke. Type gets a black fill and no stroke. |
| X | Brings the Fill box or the Stroke box to the front. |
| Shift+X | Swaps the fill and the stroke of the selection. |
| / | Sets the active box to None. |
| I | Selects the Eyedropper Tool. |
| G | Selects the Gradient Tool. |
| U | Selects the Mesh Tool. |
To change these shortcuts, choose Edit → Keyboard Shortcuts….
Mix a color
Section titled “Mix a color”Choose Window → Color (F6) to open the Color panel. The panel shows sliders for Grayscale, RGB, HSB, CMYK or Web Safe RGB, with value fields, a hex field, a spectrum bar and None, Black and White chips.
- Pick a mode from the panel menu, or Shift-click the spectrum to step through the modes.
- Drag a slider, type a value, or click the spectrum.
- To keep the color, choose Create New Swatch… from the panel menu.
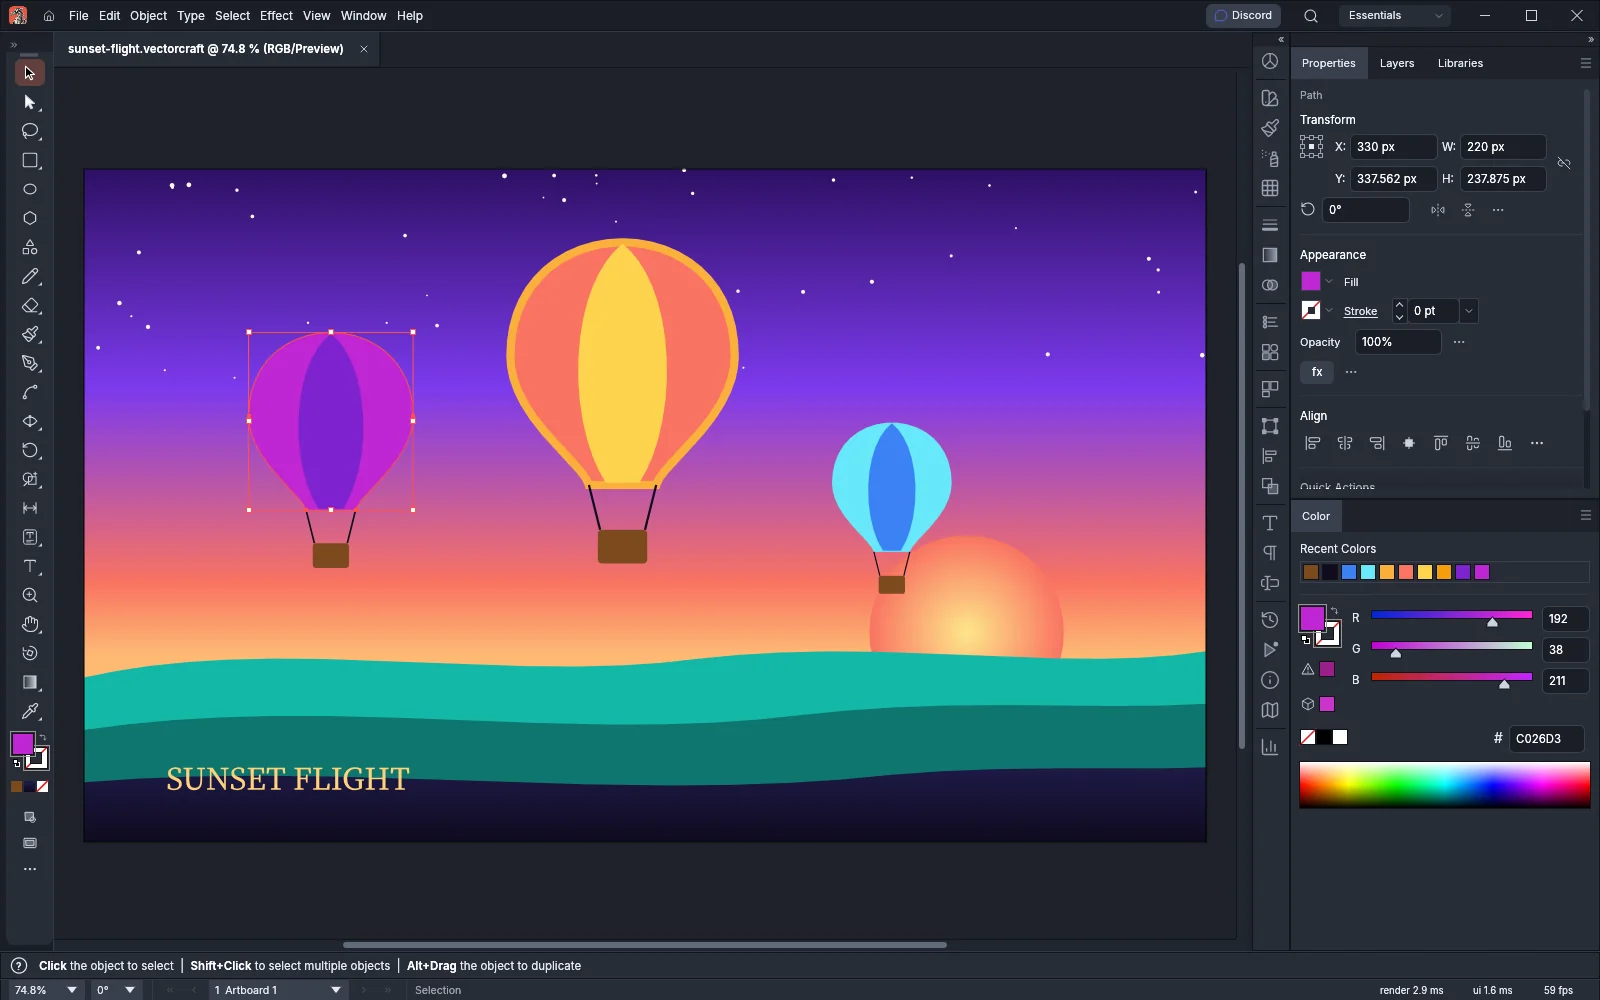
When the selected art uses a global or spot swatch, the Color panel shows that swatch’s tint slider instead. Picking a mode from the panel menu turns the color into a plain process color.
Copy colors with the Eyedropper
Section titled “Copy colors with the Eyedropper”- Select the objects you want to change.
- Press I to choose the Eyedropper Tool.
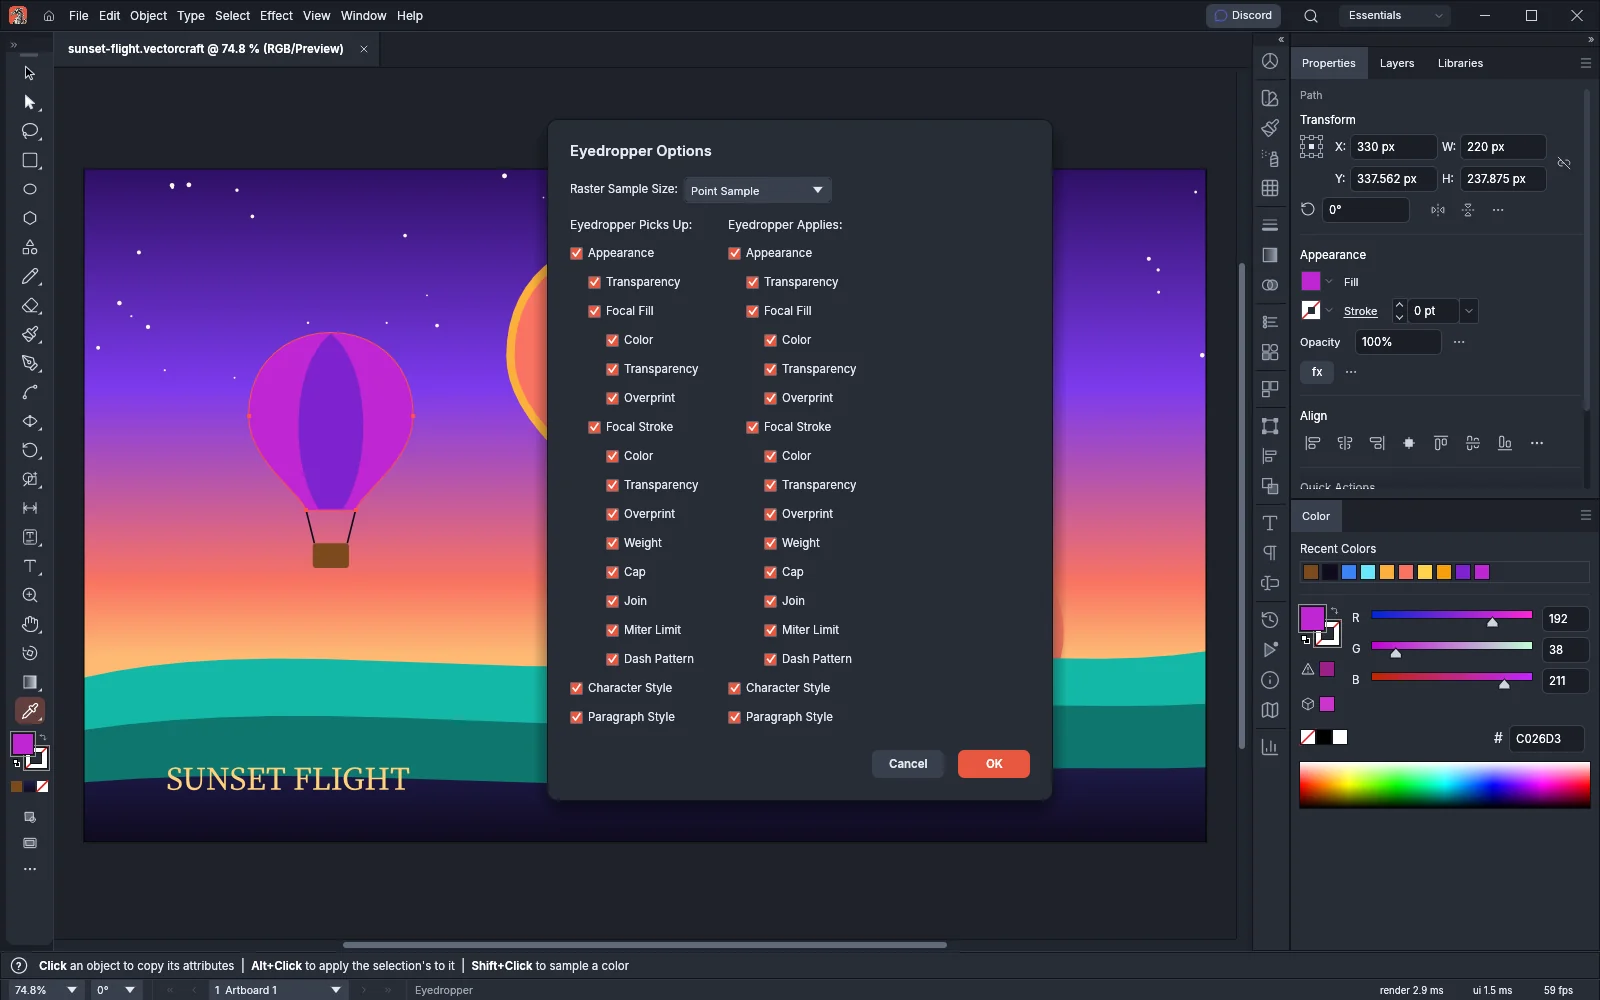
- Click another object. The selection takes that object’s attributes, as Eyedropper Options sets them. Double-click the Eyedropper Tool to open Eyedropper Options.
Shift-click samples only the color under the pointer into the active Fill or Stroke box. On a gradient, Shift-click takes the gradient’s color at that point. Alt-click (Option-click on macOS) copies the selection’s attributes onto the object you click.
Save and reuse swatches
Section titled “Save and reuse swatches”Choose Window → Swatches to open the Swatches panel. Clicking a swatch paints the active box, and Alt-click (Option-click on macOS) paints the other box.
- Paint the active box with the color, gradient or pattern you want to keep.
- Click the New Swatch button at the bottom of the panel, or choose New Swatch… from the panel menu.
- In the New Swatch dialog, type a Swatch Name, choose a Color Type, and turn on Global if you want the swatch to stay linked to your art.
- Click OK.
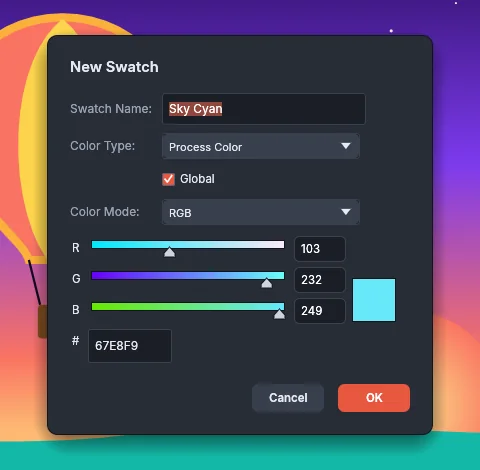
For a gradient, a pattern or a tint of a global color, the dialog asks only for a name.
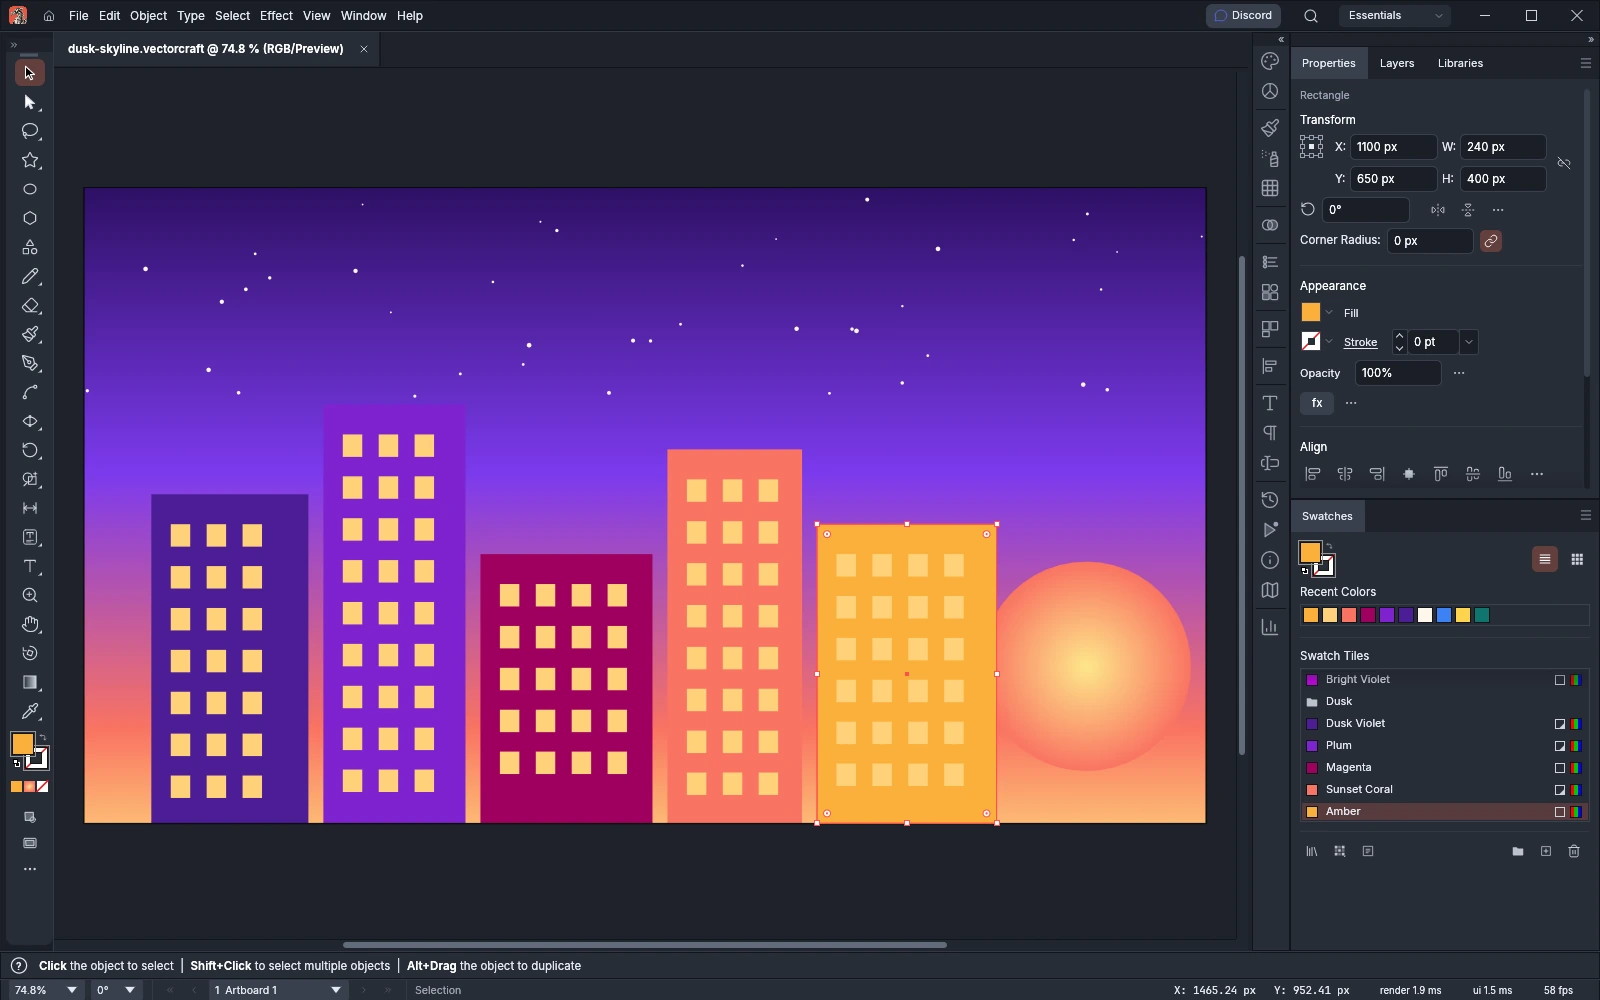
Art painted with a global swatch stays linked to it. When you edit the swatch with Swatch Options…, every object that uses it changes color. To group colors, click New Color Group at the bottom of the panel.
To use ready-made colors, choose Window → Swatch Libraries and pick a library. Open Swatch Library and Save Swatch Library… in the Swatches panel menu open a library file or save the document’s swatches as one.
Find colors that go together with the Color Guide
Section titled “Find colors that go together with the Color Guide”The Color Guide panel builds a set of colors from one base color by a harmony rule, and shows lighter and darker versions of each. Choose Window → Color Guide (Shift+F3) to open it.
- Pick the base color in the Color panel, the Swatches panel or the Color Picker. The guide follows the color you last picked there. Selecting artwork does not change the base. To make the current color the base, click the base color chip at the top left.
- Choose a harmony rule from the menu next to the chip, for example Analogous, Triad or Complementary. The strip below shows the rule’s colors.
- Select the objects you want to paint, and click a color in the strip or in the grid. The color goes to the active Fill or Stroke box, and the base color does not change.
- To keep colors, Shift-click or Ctrl-click (Cmd-click on macOS) the cells you want, then click Save selected colors as swatches at the bottom of the panel.
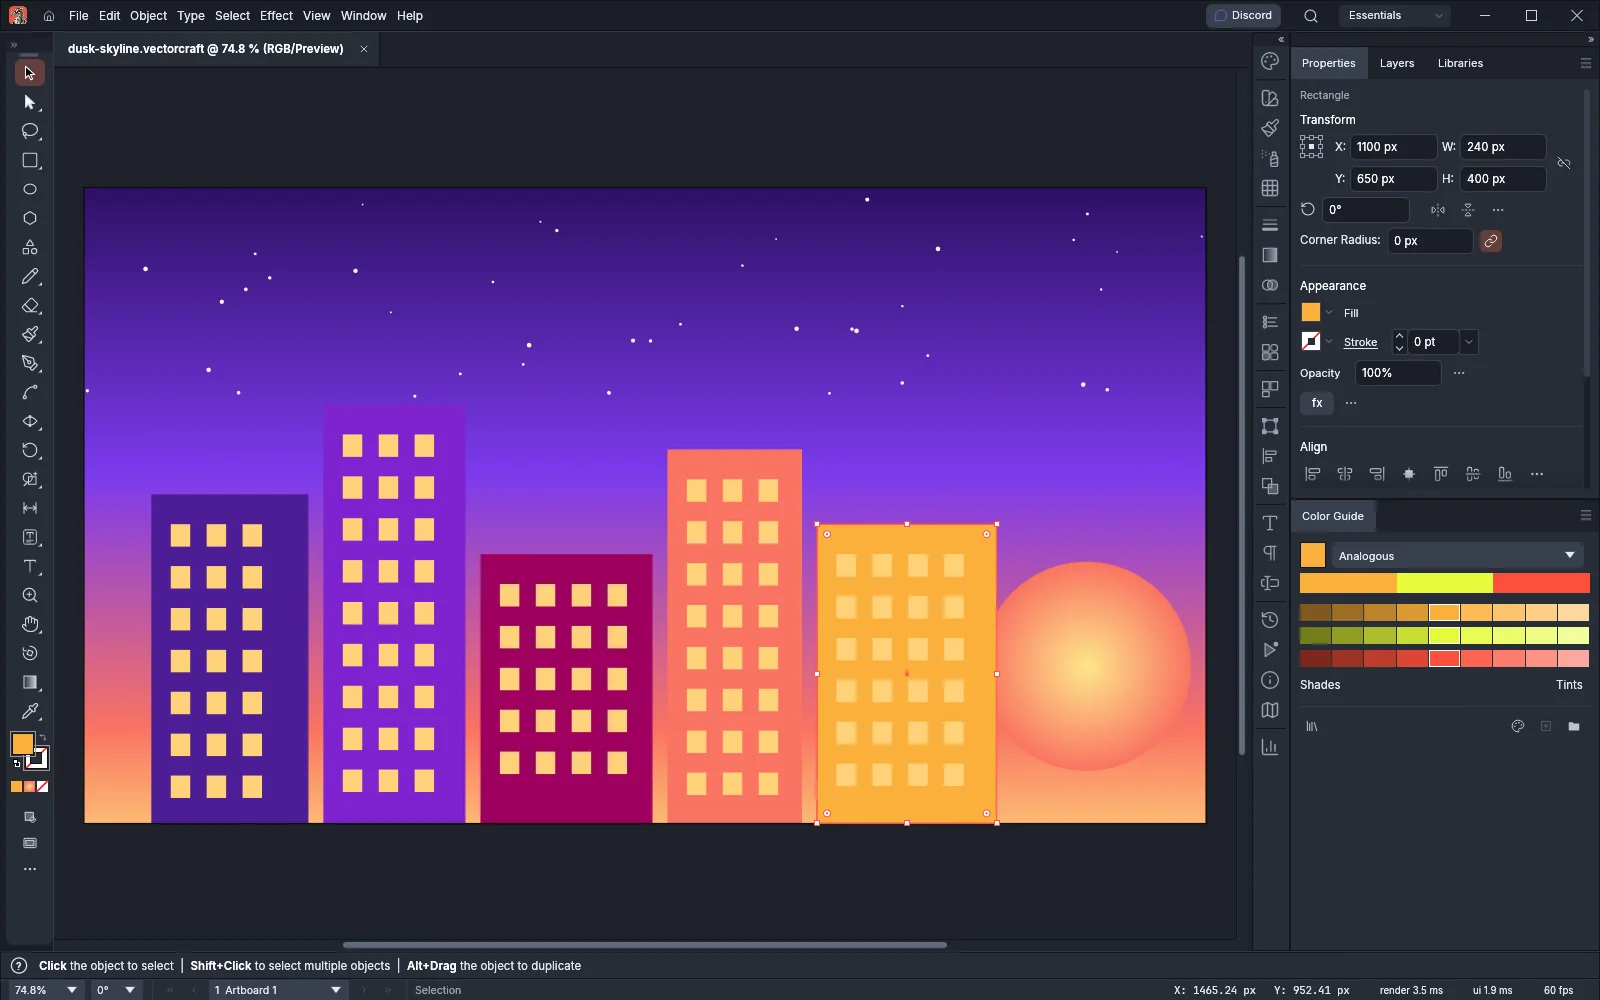
The grid has one row for each color of the rule. The color itself sits in the middle column. The panel menu sets what the two sides show:
| Panel menu item | Left side | Right side |
|---|---|---|
| Show Tints/Shades | Shades | Tints |
| Show Warm/Cool | Cool | Warm |
| Show Vivid/Muted | Muted | Vivid |
Color Guide Options… in the panel menu sets Steps, the number of colors on each side of the middle column (1 to 20, default 4), and Variation, how far the outermost colors move from the middle one (0% to 100%, from Less to More, default 50%). A row below the sliders previews the base color’s variations.
The buttons at the bottom of the panel do the following:
| Button | What it does |
|---|---|
| Limit colors to swatch library | Snaps every color in the guide to a swatch library, or to the document’s swatches with Document Swatches. None removes the limit. |
| Edit or Apply Colors | Opens Recolor Artwork with the rule’s colors as the new colors. With no art selected, OK saves the colors as a color group. |
| Save selected colors as swatches | Adds the cells you selected to the Swatches panel. |
| Save color group to Swatch panel | Adds the rule’s colors to the Swatches panel as a color group named after the rule. |
Use color themes and libraries
Section titled “Use color themes and libraries”Make a color theme
Section titled “Make a color theme”A color theme is a set of five colors that you build on a color wheel and keep for later. Themes are saved on this computer and are available in every document. Choose Window → Color Themes to open the Color Themes panel.
- On the Create tab, choose a harmony rule from Rule. A new theme starts from the current color with Analogous 2. Choose Custom to move each color on its own.
- Drag the markers on the wheel. With a rule, the colors move together. Click a color chip under the wheel to select it, then type a hex value in Color, or click the eyedropper button to set it to the current color.
- Type a name in Name. Unnamed themes are saved as Theme 1, Theme 2 and so on.
- Click Save theme to My Themes at the bottom of the panel. To put the colors in the document as well, click Add to Swatches, which adds them to the Swatches panel as a color group.
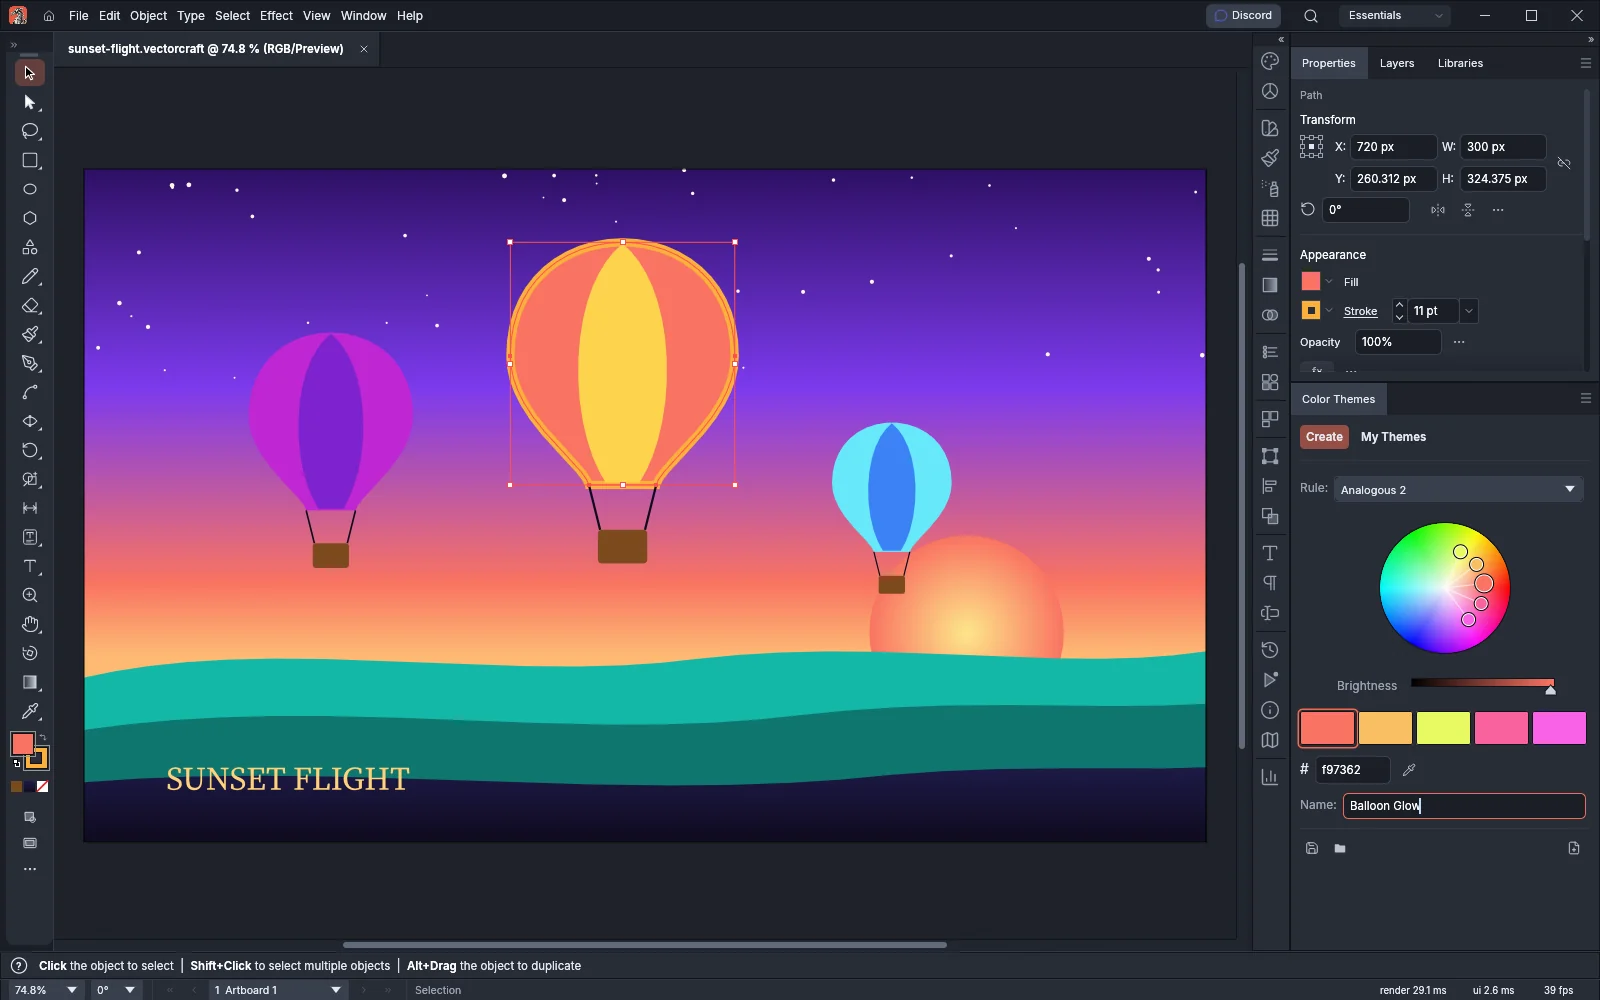
The My Themes tab lists the saved themes. Click a theme to select it, then use the buttons to edit it, add it to the Swatches panel or delete it. Double-click a theme to open it on the Create tab. New theme from the current color starts a new theme.
Keep colors and art in a library
Section titled “Keep colors and art in a library”A library holds colors, gradients, patterns, character and paragraph styles, and graphics that you want in any document. Libraries are stored on this computer and do not need an account. Choose Window → Libraries, or click the Libraries tab next to Properties and Layers.
- Click Create New Library, or choose Create New Library… from the panel menu when a library already exists, and type a name.
- Select art, click + (Add Content) at the bottom of the panel, and choose what to add: Graphic, Fill Color, Stroke Color, Fill Pattern, Stroke Pattern, Fill Gradient, Stroke Gradient, Character Style or Paragraph Style. You can also drag art from the canvas or swatches from the Swatches panel onto the library.
- To use an item, select your art and click a color, gradient or pattern. It paints the active Fill or Stroke box. Click a style to apply it to the selected type. Drag a graphic onto the canvas, or double-click it, to place a copy.
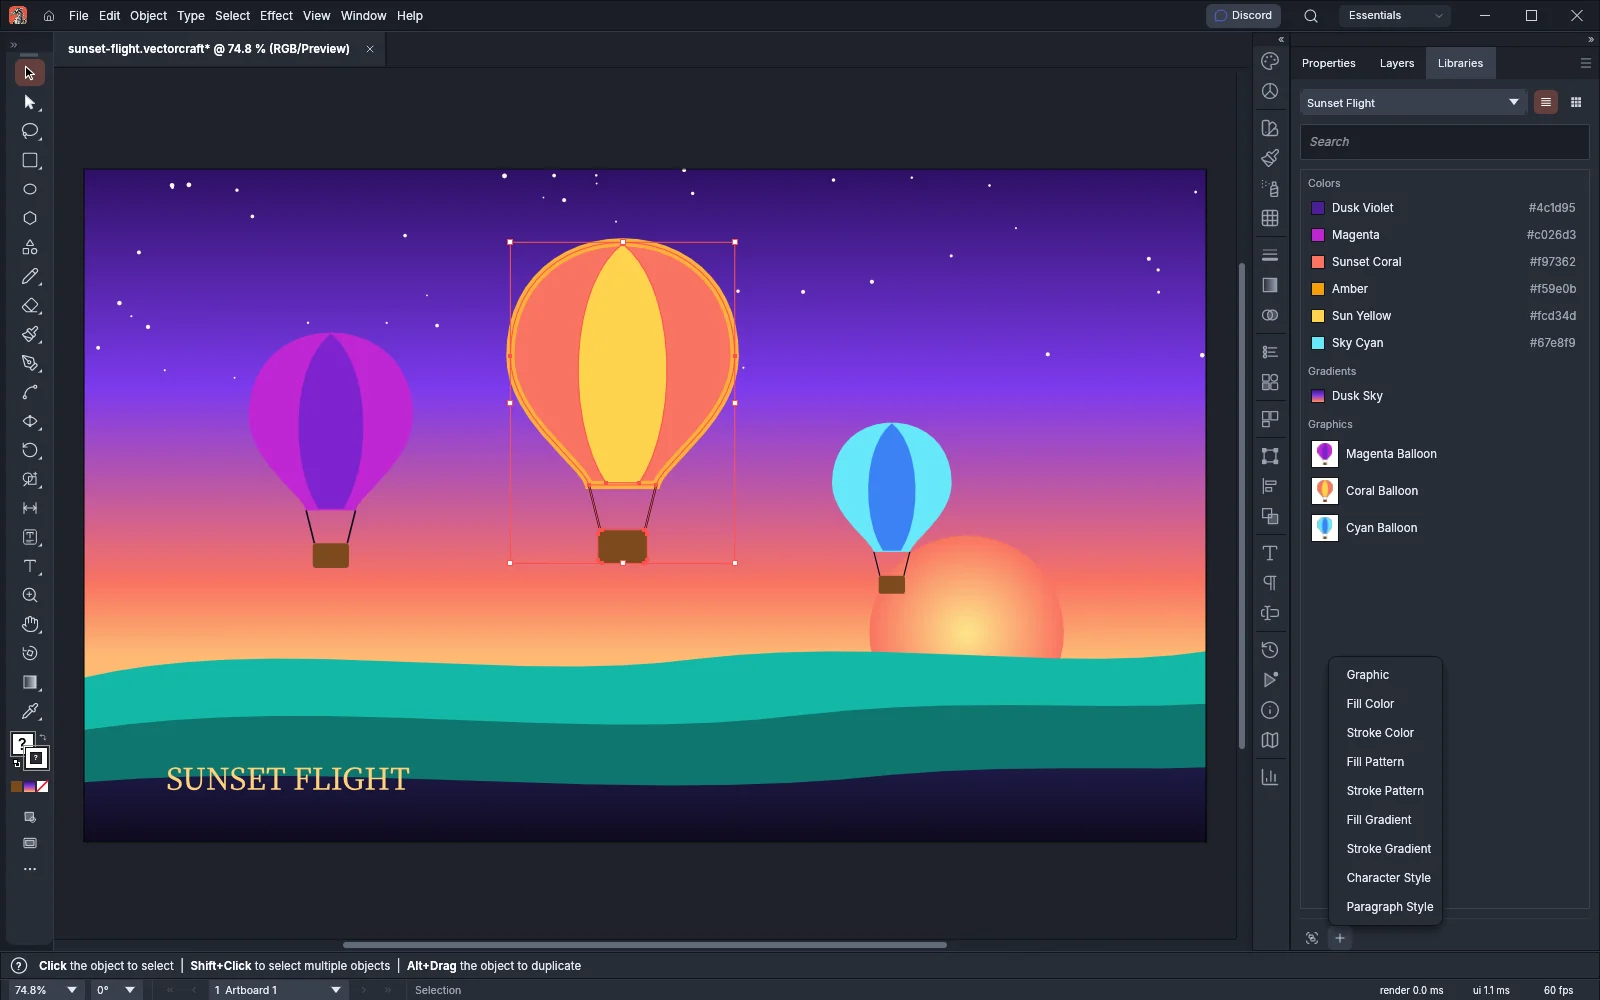
Type in the search field to filter the items by name, and click New Group to sort them into groups. The panel menu also has Create New Library…, Rename Library…, Delete Library, New Group…, Import Library… and Export Library…. Export saves the library as a .vclibrary file, and Import adds such a file as a new library.
Style a stroke
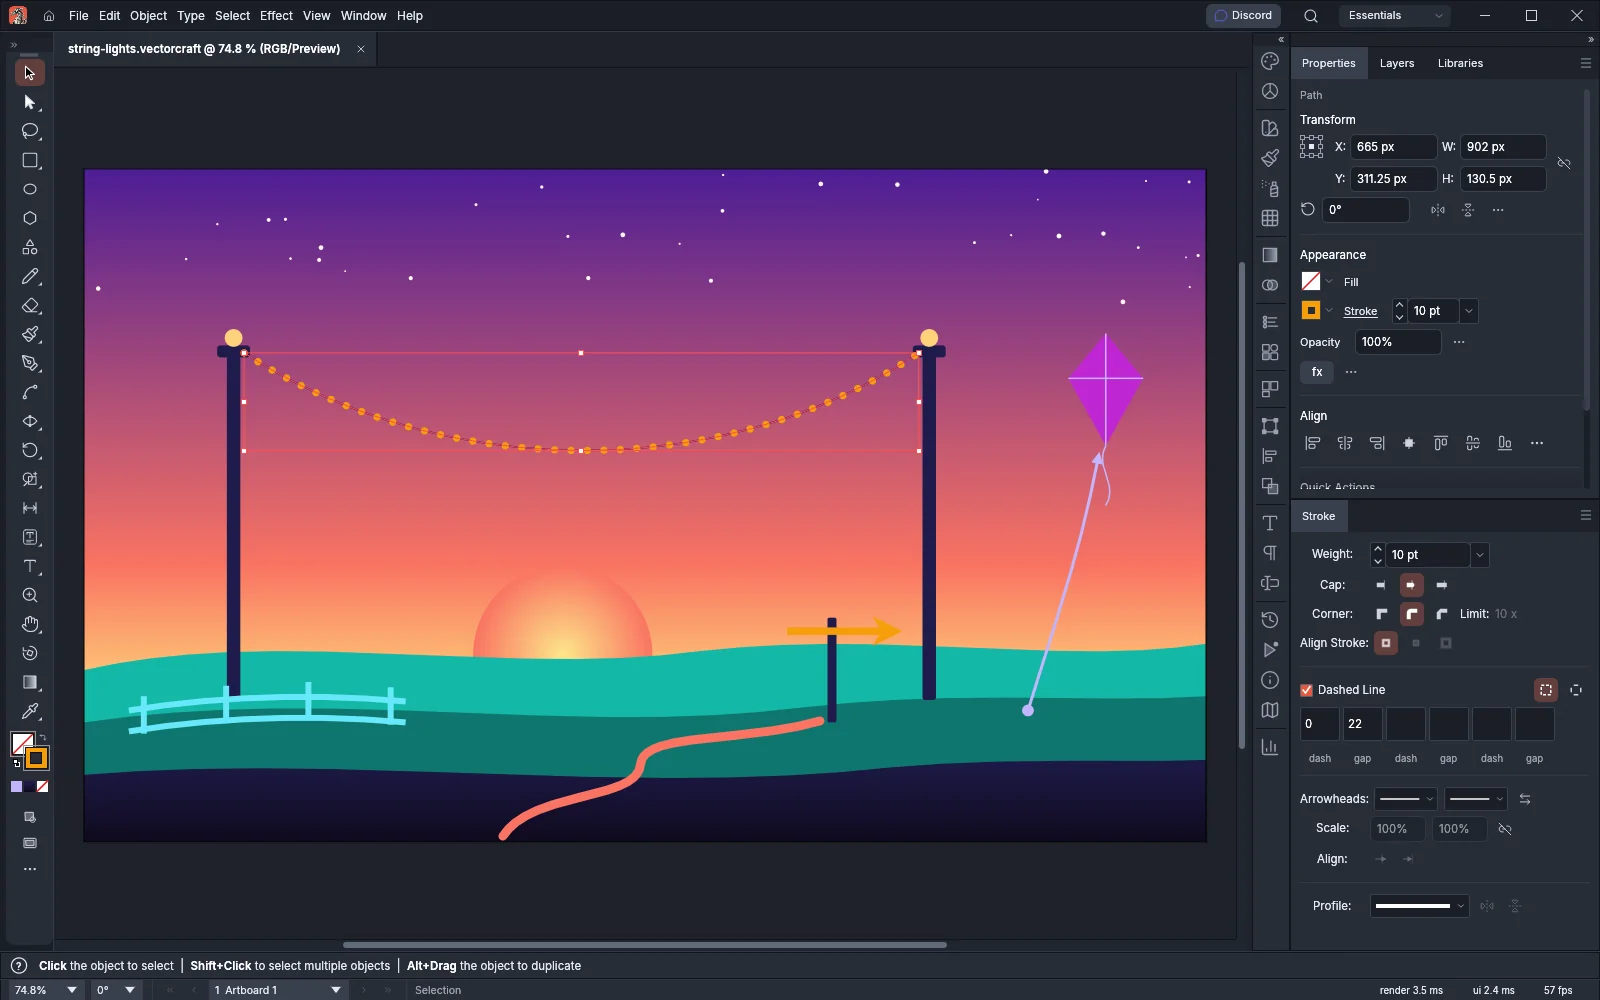
Section titled “Style a stroke”Choose Window → Stroke (Ctrl+F10, or Cmd+F10 on macOS) to open the Stroke panel. Choose Show Options from the panel menu if only the weight is visible.
| Option | Choices |
|---|---|
| Weight | The stroke width, in the unit that the Stroke setting on the Units page of Preferences sets. |
| Cap | Butt Cap, Round Cap or Projecting Cap, for the ends of open paths. |
| Corner | Miter Join, Round Join or Bevel Join. Limit sets when a miter join turns into a bevel. |
| Align Stroke | Align Stroke to Center, Align Stroke to Inside or Align Stroke to Outside. |
| Dashed Line | Dash and gap lengths, with Exact dash lengths or Fit dashes to corners and ends. |
| Arrowheads | A start and an end arrowhead, each with its own Scale, and a button that swaps them. |
| Profile | A variable width profile, with Flip Along and Flip Across. |
To change the weight of the selected strokes by one step, press Ctrl+Alt+. (Cmd+Option+. on macOS) to make them thicker and Ctrl+Alt+, (Cmd+Option+, on macOS) to make them thinner.
Build a gradient
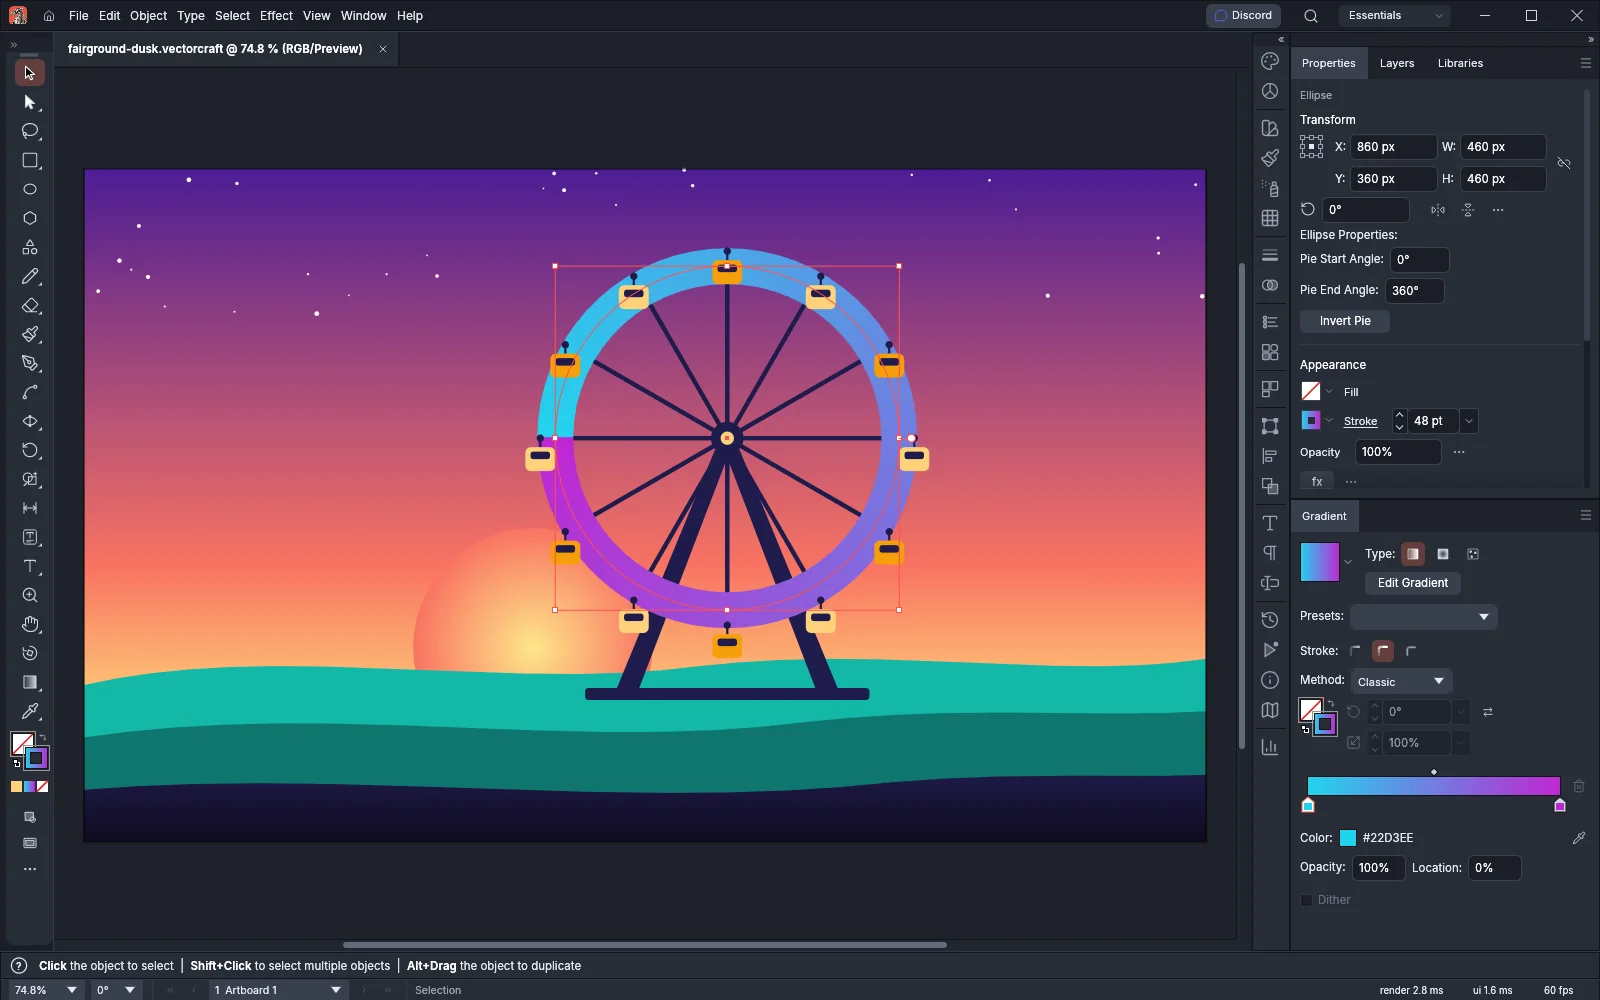
Section titled “Build a gradient”Choose Window → Gradient (Ctrl+F9, or Cmd+F9 on macOS) to open the Gradient panel. Clicking the ramp or a type button applies a gradient to the active box. A new gradient runs from white to black.
- Select an object and bring the Fill or Stroke box to the front.
- Under Type, click Linear Gradient, Radial Gradient or Freeform Gradient.
- For a linear or radial gradient, set the Angle. For a radial gradient, also set the Aspect Ratio.
- Click a color stop under the ramp and set its color, Location and Opacity. Click below the ramp to add a stop.
- Click Reverse Gradient to flip the order of the stops.
| Setting | What it does |
|---|---|
| Angle | Rotates the gradient. |
| Aspect Ratio | Stretches a radial gradient into an ellipse. |
| Location | Moves the selected stop along the gradient. |
| Opacity | Sets the selected stop’s opacity. |
| Dither | Adds fine noise to a linear or radial fill to hide banding. |
| Method | Classic or Perceptual color blending between stops. |
| Stroke | With the Stroke box in front: Gradient within stroke, Gradient along stroke or Gradient across stroke. |
To save the gradient as a swatch, choose Add to Swatches from the Gradient panel menu.
Edit a gradient on the canvas
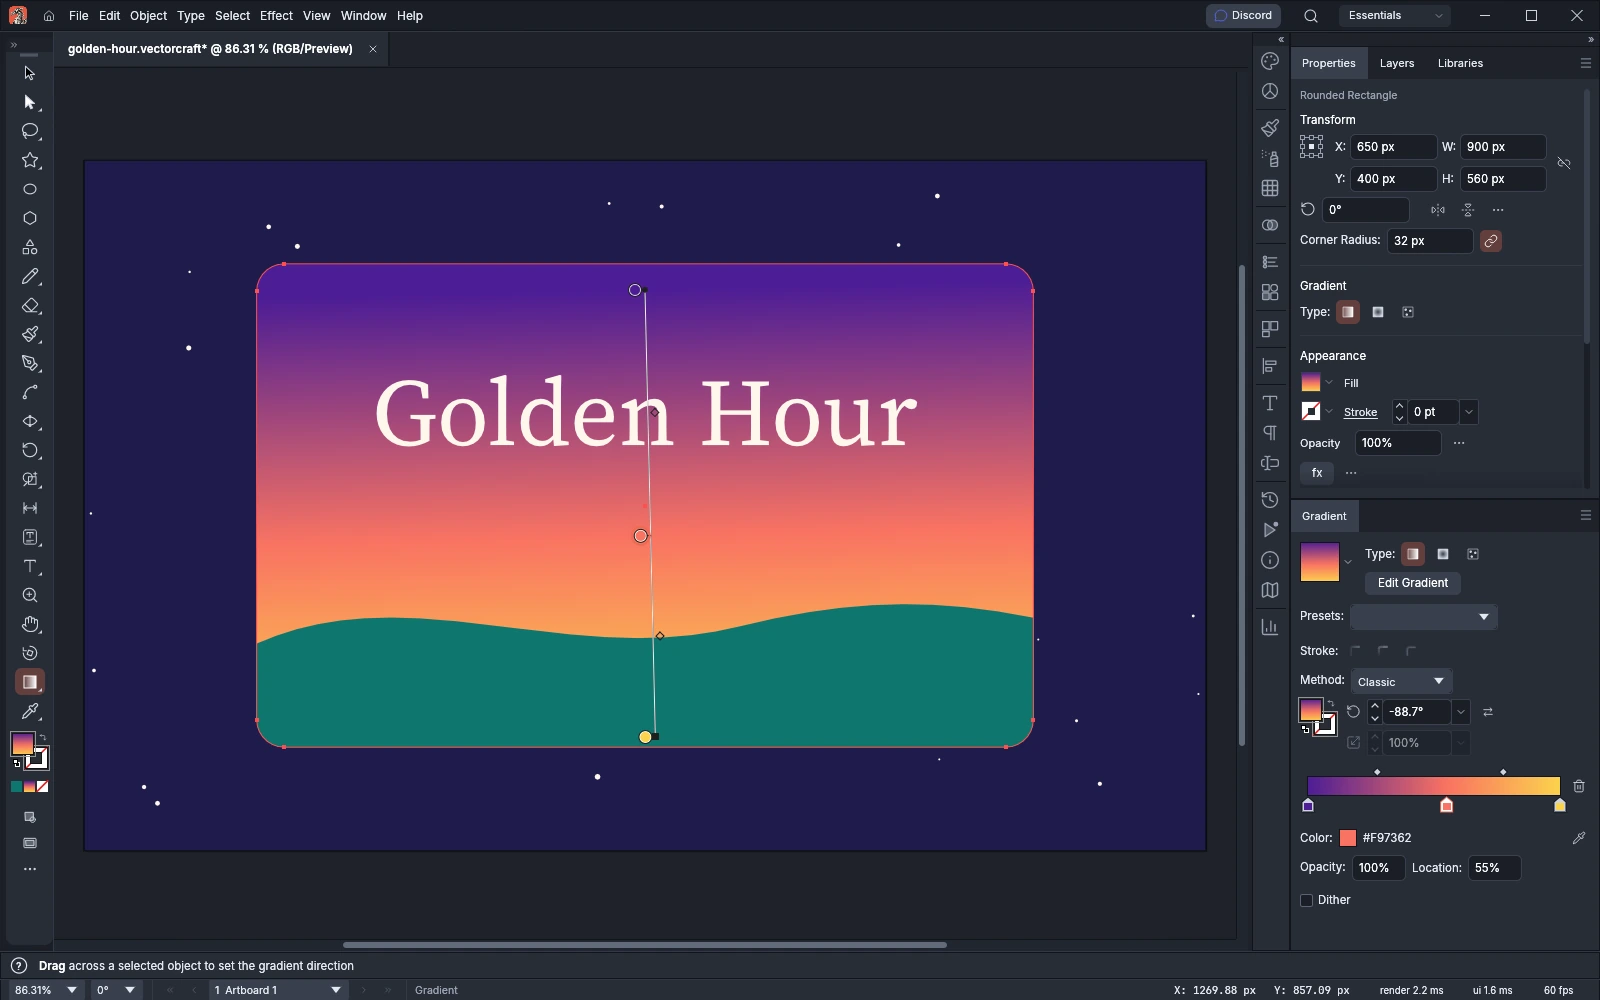
Section titled “Edit a gradient on the canvas”Press G to choose the Gradient Tool. Drag across the selected objects to set where the gradient starts and ends. The annotator then shows a bar from a round start handle to a square end handle.
- Drag the start handle or the bar to move the gradient.
- Drag the end handle to change the gradient’s length and angle.
- Click the bar to add a color stop.
- Drag a stop to move it, or Alt-drag (Option-drag on macOS) to copy it.
- Drag a stop off the bar to delete it.
- Double-click a stop to change its color.
Hold Shift while you drag a handle to keep the gradient at 45° steps. On a radial gradient, a dashed ellipse shows its extent, and you drag the dot on it to change the aspect ratio.
Shade with a gradient mesh
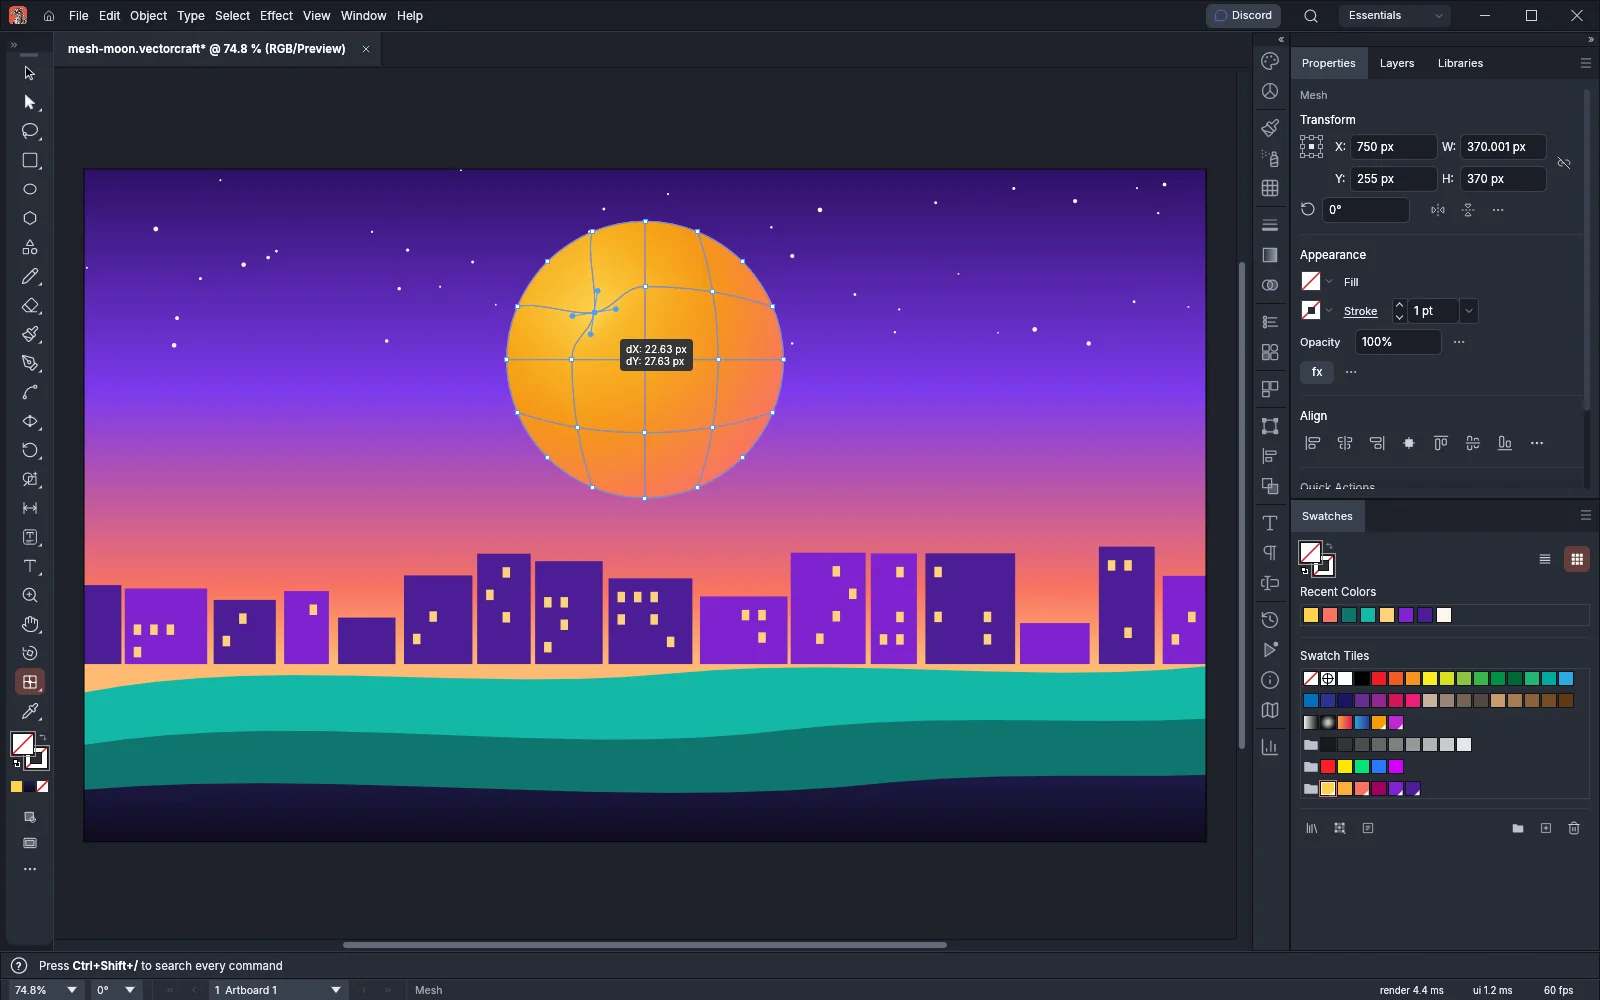
Section titled “Shade with a gradient mesh”A gradient mesh shades a shape smoothly between color points. Each mesh point has its own color and four direction handles, and the color blends toward the neighboring points along the mesh lines. Select a shape and choose Object → Create Gradient Mesh…, or press U to choose the Mesh Tool and click inside the shape to add mesh points.
Make a mesh from a dialog
Section titled “Make a mesh from a dialog”- Select one or more filled paths, or an embedded image.
- Choose Object → Create Gradient Mesh….
- Set the options and click OK.
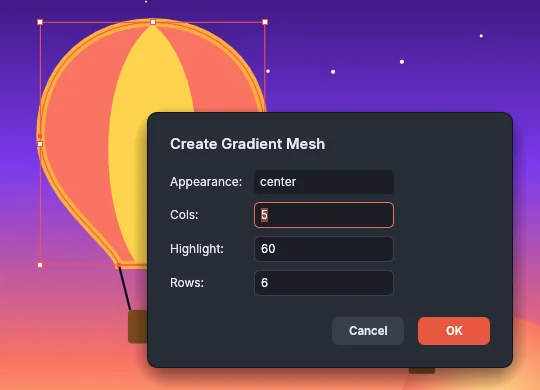
| Option | What it does |
|---|---|
| Appearance | Type flat, center or edge. The default is flat. flat keeps every point in the shape’s fill color. center lightens the points toward white in the middle of the shape, and edge lightens them toward white at its edges. |
| Cols | The number of columns, from 1 to 50. The default is 4. |
| Highlight | How far toward white center and edge lighten the points, from 0 to 100%. The default is 100. |
| Rows | The number of rows, from 1 to 50. The default is 4. |
A path with a gradient fill takes the gradient’s color at each point. An embedded image becomes a mesh whose points take the picture’s colors around them. A linked image must be embedded first.
Edit a mesh with the Mesh Tool
Section titled “Edit a mesh with the Mesh Tool”Press U to choose the Mesh Tool.
- Click inside a filled path to turn it into a mesh. The tool adds one row and one column through the point you click.
- Click inside a mesh to add another row and column. When the current fill is a solid color, the new point takes that color. Hold Shift while you click to keep the mesh’s color there instead.
- Click a mesh point to select it and show its four handles. To color it, pick a color in the Color panel or click a swatch. The color goes only to the selected points.
- Drag a point to move it. Its handles move with it. Drag a handle to change how the color spreads from the point.
- Alt-click (Option-click on macOS) a point to delete the mesh lines through it.
Shift-click points to select several. Dragging one of them moves them all, and the arrow keys nudge them. Press Escape during a drag to cancel it. With mesh points selected, the opacity you set in the Transparency panel goes to those points, and only the mesh around them becomes transparent. The Direct Selection Tool also selects and moves mesh points.
Make a pattern
Section titled “Make a pattern”Select the artwork to repeat and choose Object → Pattern → Make. VectorCraft adds a pattern swatch to the Swatches panel and opens the pattern for editing. Apply the swatch to a fill or a stroke like any other swatch. Object → Pattern → Edit Pattern changes the pattern later.
For the Pattern Options panel, tile types and repeats, see Make patterns, blends and repeats.
Set opacity and blending
Section titled “Set opacity and blending”Choose Window → Transparency (Ctrl+Shift+F10, or Cmd+Shift+F10 on macOS) to open the Transparency panel. Set the opacity and the blend mode of the selected objects there. The panel also makes opacity masks and sets Isolate Blending and Knockout Group.
- Select the objects.
- Type a value in Opacity, or click the arrow next to it and drag the slider.
- Choose a blend mode from the menu at the top left of the panel.
When the Appearance panel has a fill or a stroke selected, the opacity and the blend mode apply to that fill or stroke only, and the mask and knockout options are unavailable.
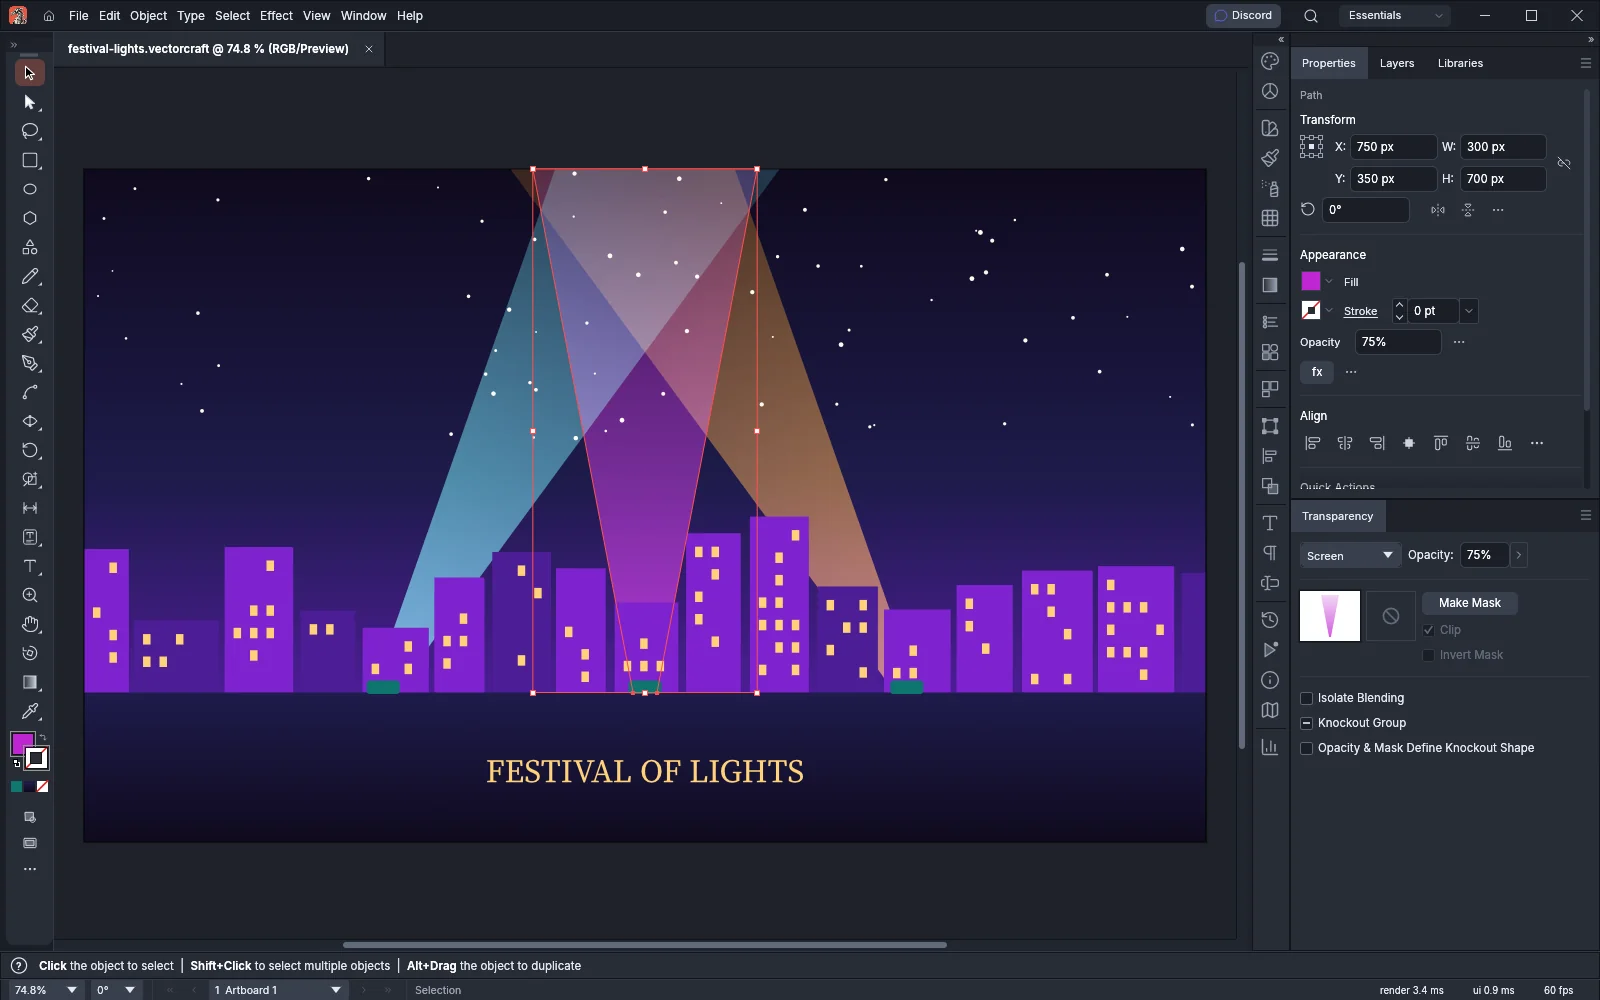
Blend modes
Section titled “Blend modes”A blend mode sets how the colors of an object mix with the colors under it. The menu groups the modes as in this table.
| Mode | What it does |
|---|---|
| Normal | Paints the object’s colors over what is under it. This is the default. |
| Darken | Keeps the darker of the two colors in each channel. |
| Multiply | Multiplies the colors, so the result is always darker. White leaves the colors under it unchanged. |
| Color Burn | Darkens the colors under the object to reflect its color. |
| Lighten | Keeps the lighter of the two colors in each channel. |
| Screen | Multiplies the inverse of the colors, so the result is always lighter. Black leaves the colors under it unchanged. |
| Color Dodge | Brightens the colors under the object to reflect its color. |
| Overlay | Multiplies or screens, depending on the colors under the object, and keeps their highlights and shadows. |
| Soft Light | Darkens or lightens the colors, depending on the object’s color, with less contrast than Hard Light. |
| Hard Light | Multiplies or screens, depending on the object’s color. |
| Difference | Subtracts the darker color from the lighter one. |
| Exclusion | Like Difference, with lower contrast. |
| Hue | Takes the hue of the object and the saturation and luminosity of the colors under it. |
| Saturation | Takes the saturation of the object and the hue and luminosity of the colors under it. |
| Color | Takes the hue and saturation of the object and the luminosity of the colors under it. |
| Luminosity | Takes the luminosity of the object and the hue and saturation of the colors under it. |
Fade art with an opacity mask
Section titled “Fade art with an opacity mask”An opacity mask uses the brightness of the mask art to set the opacity of the art under it. White shows the art, black hides it, and grays make it partly transparent. A rectangle with a gradient from white to black fades the art out toward the black end.
- Place the mask object above the art you want to mask. For a fade, use a rectangle with a gradient from white where the art should show to black where it should fade out.
- Select the art and the mask object together.
- Click Make Mask in the Transparency panel. The topmost selected object becomes the mask of the others, which are grouped if there are several.
If you select only one object, Make Mask gives it an empty mask and starts mask editing, so you can draw the mask. Click the art thumbnail to stop editing the mask.
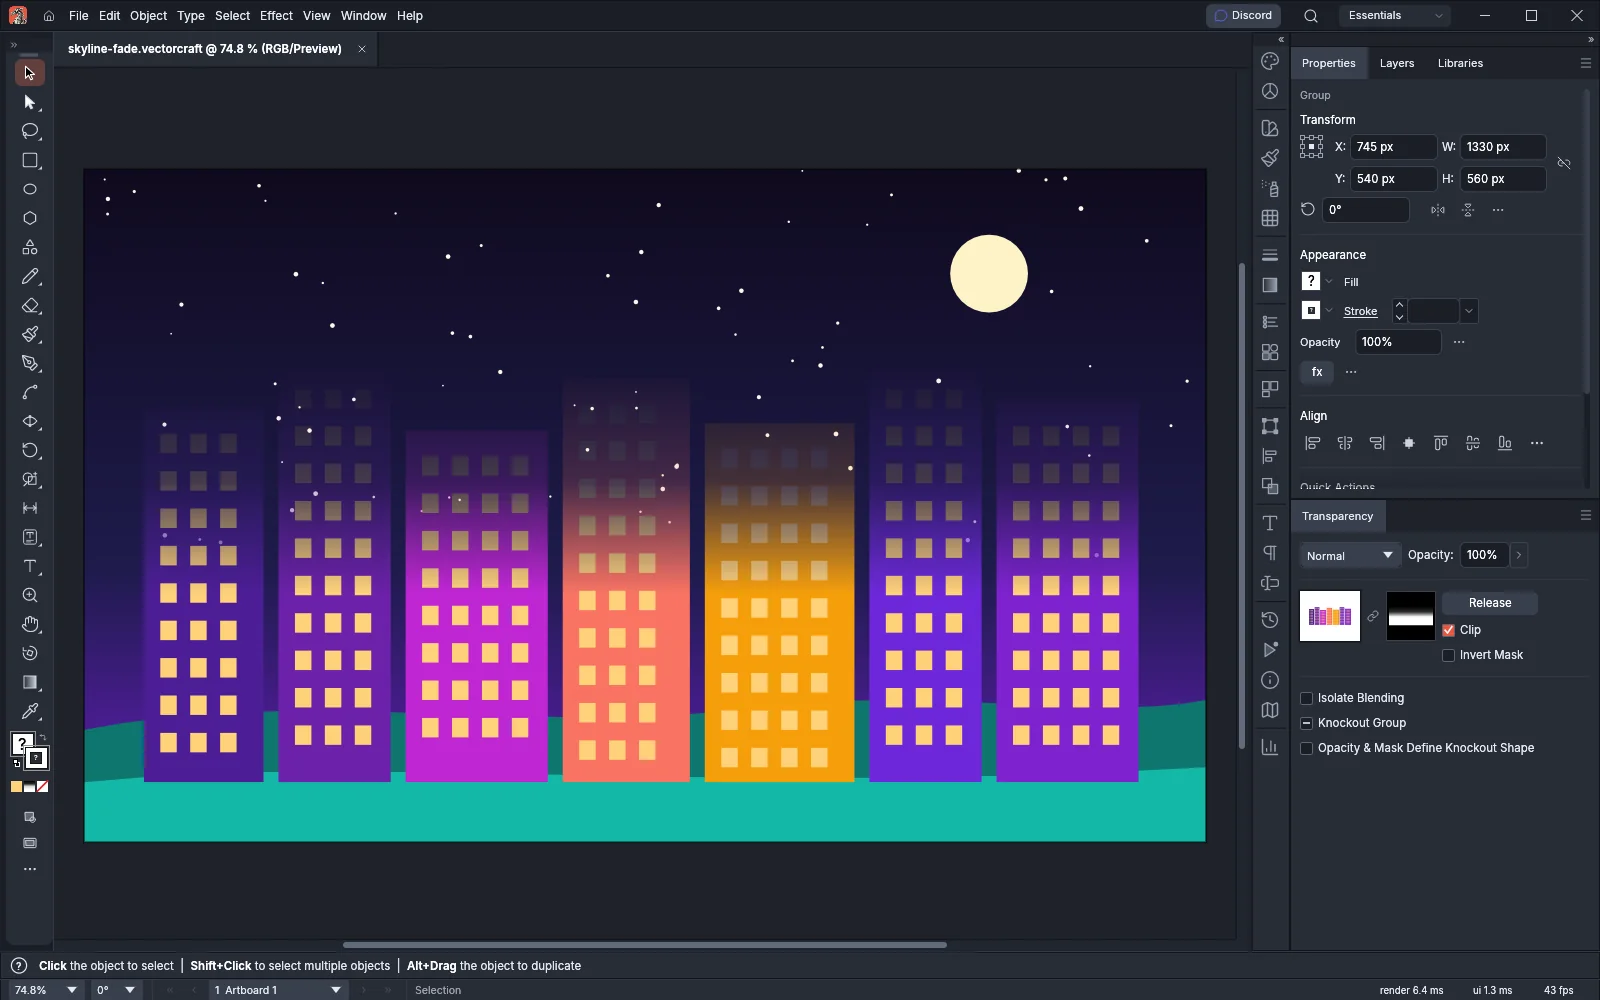
| Control | What it does |
|---|---|
| Art thumbnail | Shows the masked art. While you edit the mask, click it to go back to the art. |
| Link icon | Links the mask to the art, so they move together. Click it to unlink the mask. |
| Mask thumbnail | Click it to edit the mask art. Alt-click (Option-click on macOS) to view only the mask. Shift-click to turn the mask off or on. |
| Make Mask / Release | Makes the mask. On masked art, Release puts the mask art back above the art as an ordinary object. |
| Clip | Hides the art outside the mask object. Turn it off to keep that art visible. New masks clip by default. |
| Invert Mask | Swaps light and dark in the mask, so white hides and black shows. |
The panel menu has New Opacity Masks Are Clipping and New Opacity Masks Are Inverted to set the defaults for new masks, and Disable Opacity Mask and Unlink Opacity Mask for the selected mask.
Isolate and knock out blending
Section titled “Isolate and knock out blending”| Option | What it does |
|---|---|
| Isolate Blending | Blend modes inside the selected group mix only with each other, not with art under the group. |
| Knockout Group | Objects inside the group do not show through each other. Click it to step through on, neutral (a dash) and off. |
| Opacity & Mask Define Knockout Shape | The object’s opacity and mask set the shape of its knockout. |
Page Isolated Blending and Page Knockout Group in the panel menu apply the same settings to the whole page. Hide Options and Hide Thumbnails in the panel menu make the panel smaller.
Change the colors of finished art
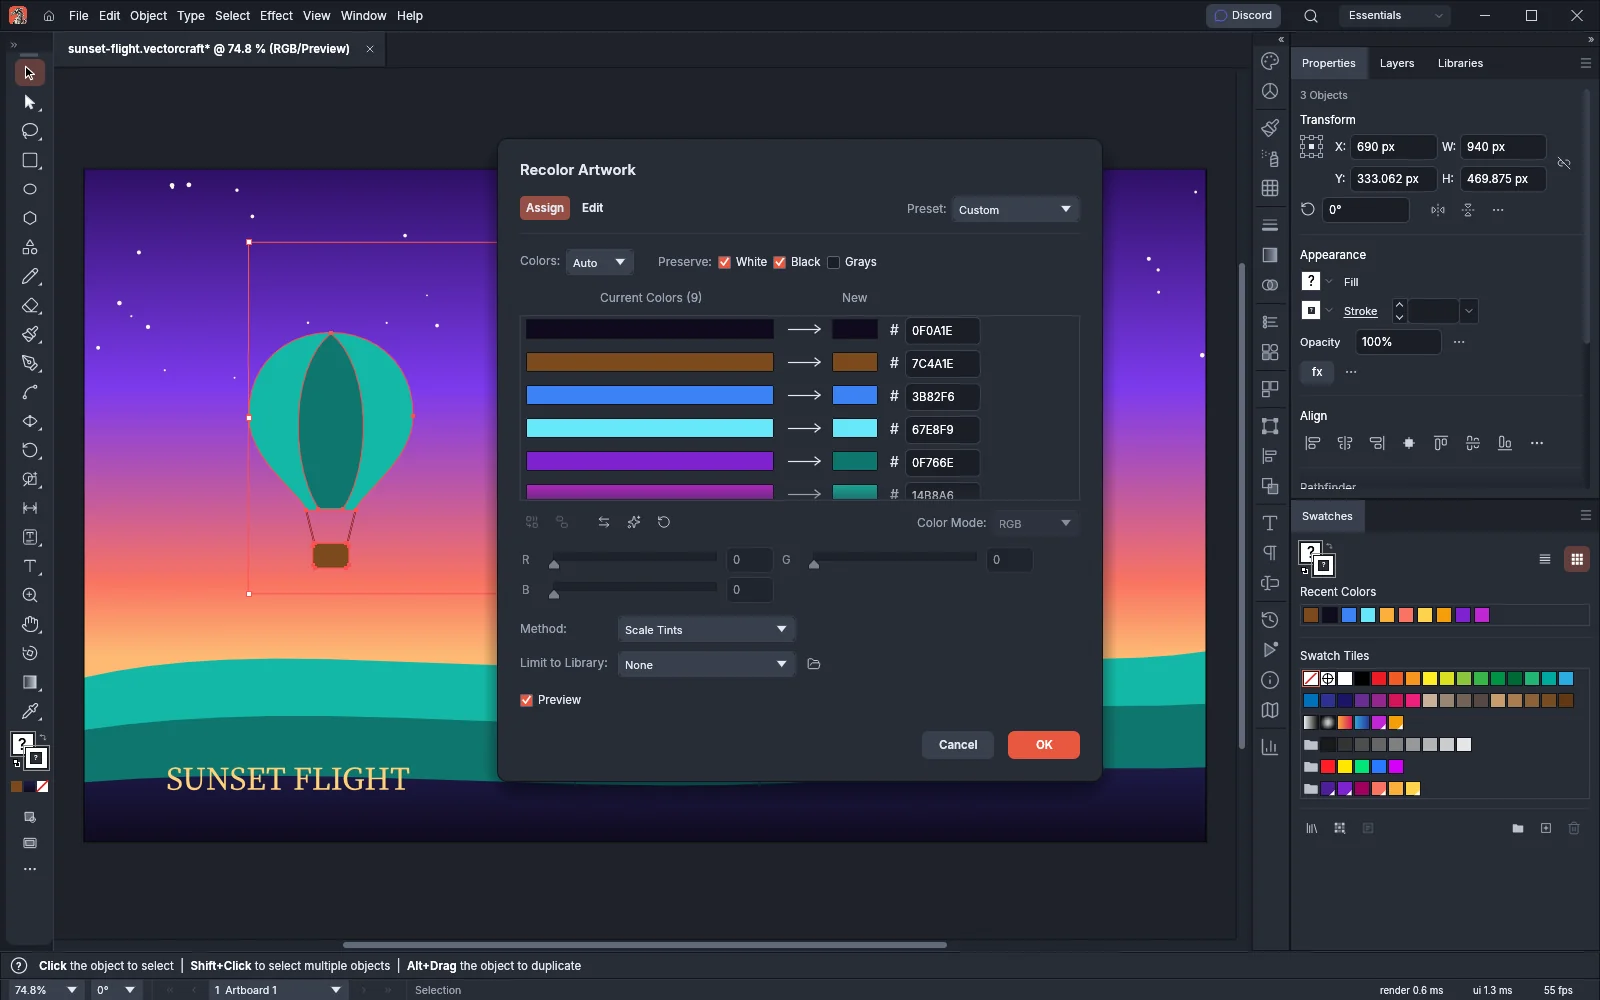
Section titled “Change the colors of finished art”Select the art, then choose a command from Edit → Edit Colors:
| Command | What it does |
|---|---|
| Recolor Artwork… | Lists the selection’s colors next to the new colors that replace them, with a live preview. |
| Adjust Color Balance… | Shows a slider for each color channel, from −100% to 100%, with a live preview. |
| Blend Front to Back | Grades the fills of three or more filled objects between the frontmost fill and the backmost fill. |
| Blend Horizontally | Grades the fills of three or more filled objects between the leftmost fill and the rightmost fill. |
| Blend Vertically | Grades the fills of three or more filled objects between the top fill and the bottom fill. |
| Convert to CMYK, Convert to Grayscale, Convert to RGB | Converts the colors to that color model. |
| Invert Colors | Replaces each color with its RGB inverse. |
| Saturate… | Raises or lowers the saturation of the colors by a percentage from −100 to 100. |
For overprinting, spot colors, color settings and soft proofing, see Manage color and proof.