
Print your artwork
This guide covers the Print dialog. It shows how to choose which artboards print and on what paper, add printer’s marks and bleed, set the graphics, color management and advanced options, scale or tile art that is larger than the paper, and save the settings as a preset for the next job.
Open the Print dialog
Section titled “Open the Print dialog”- Open the document you want to print.
- Choose File → Print… (Ctrl+P, or Cmd+P on macOS).
- Pick a section in the section list: General, Marks and Bleed, Output, Graphics, Color Management, Advanced or Summary.
- Check the preview under the section list. It shows each page as it prints. Use the arrows under the preview to step through the pages.
- Press Print to print, or Done to keep the settings with the document without printing.
VectorCraft saves the print settings with the document, and the dialog opens with the same choices next time.
Choose what prints
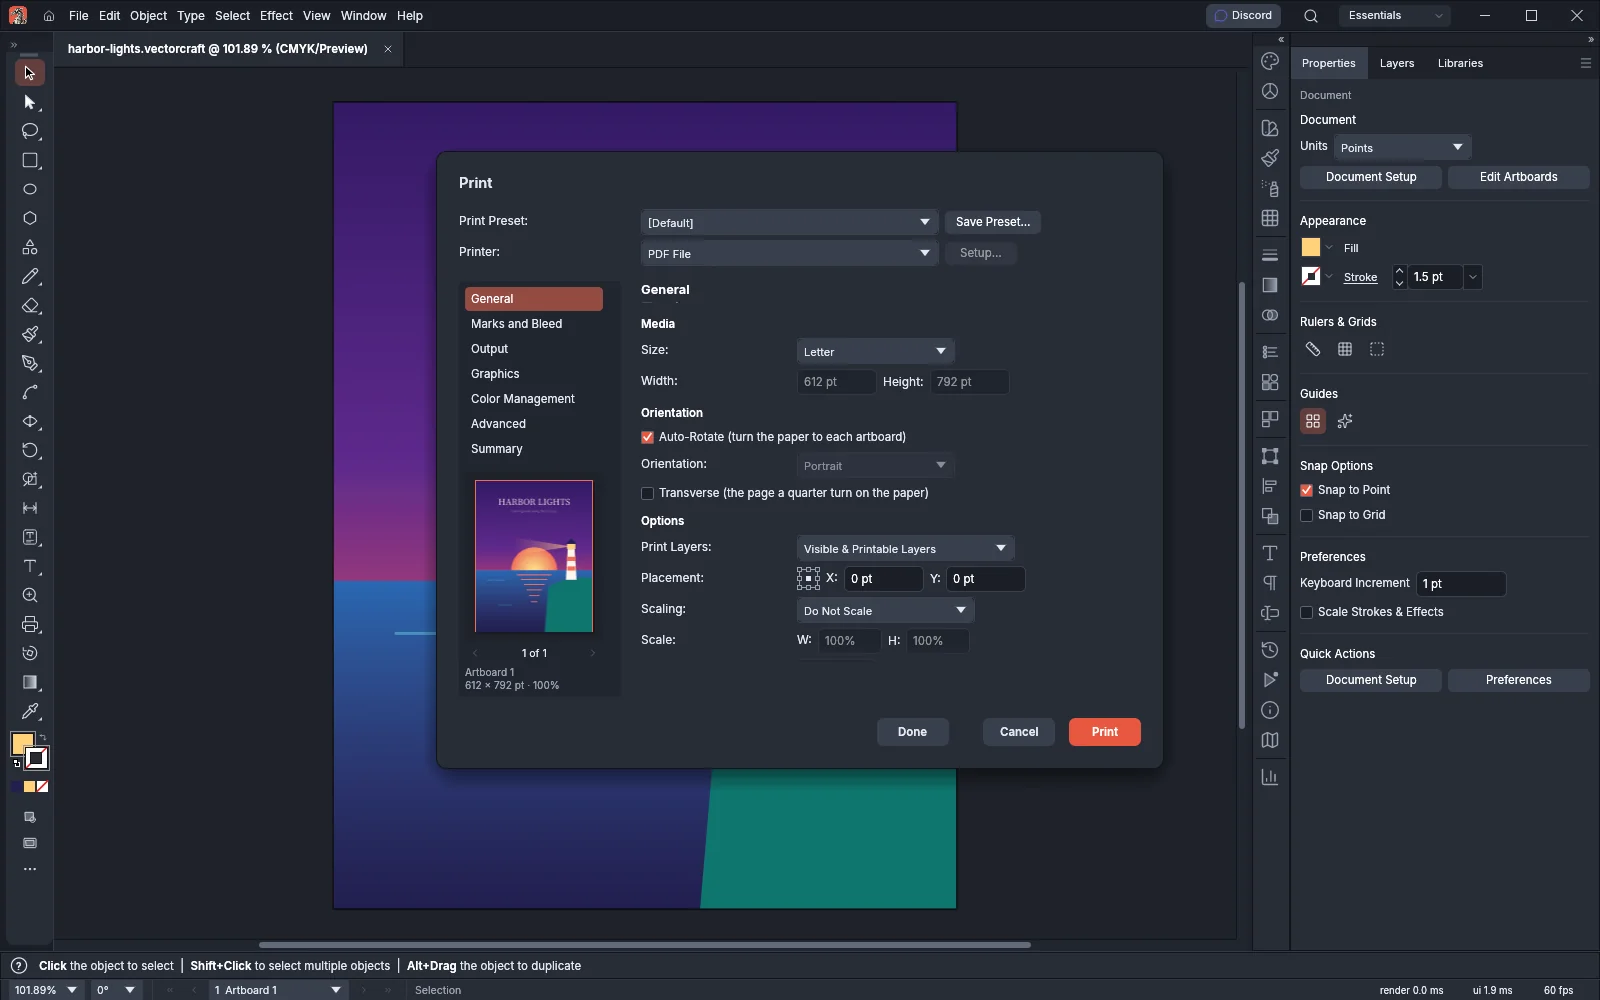
Section titled “Choose what prints”The General section sets the printer, the paper and which artboards print.
- Under Print Preset, keep [Default] or pick a preset you saved.
- Under Printer, pick a printer. PDF File writes a print-ready PDF instead of sending the job to a printer. Setup… opens the system’s settings for the chosen printer.
- Set Copies. With more than one copy, Collate prints whole sets in order. Reverse Order prints the last page first.
- Under Artboards, choose All, or choose Range and type the artboard numbers, for example
1-3, 5. Ignore Artboards (all the art as one page) prints everything in the document on one page. Skip Blank Artboards leaves out artboards with no art that prints. When every artboard you chose is blank, nothing prints and Summary reports the error. - Under Media, choose a paper Size. Custom lets you type a width and height.
- Under Orientation, leave Auto-Rotate on to turn the paper to match each artboard, or turn it off and pick an orientation. Turn on Transverse to turn the page a quarter turn on the paper, for roll-fed printers.
- Under Options, choose which layers print with Print Layers, where the art is placed on the paper with Placement, and how it is sized with Scaling.
- To move the art on the paper, drag it in the preview. When you release the mouse button, the dialog stores the new position as the Placement X and Y offset. Dragging does not move the art while a tiling choice is on.
| Option | Choices | Default |
|---|---|---|
| Copies | 1 to 999 | 1 |
| Collate | On, off | On |
| Reverse Order | On, off | Off |
| Artboards | All, Range, Ignore Artboards | All |
| Skip Blank Artboards | On, off | Off |
| Size (Media) | Letter, Legal, Tabloid, A3 to A6, B4 and B5 (ISO), B4 to B6 (JIS), Japanese paper and envelope sizes, Custom | Letter |
| Auto-Rotate | On, off | On |
| Transverse | On, off | Off |
| Print Layers | Visible & Printable Layers, Visible Layers, All Layers | Visible & Printable Layers |
| Placement | Any of nine reference points, plus an X and Y offset | Center |
| Scaling | Do Not Scale, Fit to Page, Custom Scale, Tile Full Pages, Tile Imageable Areas | Do Not Scale |
| Copies per Sheet (as many as fit, in a grid) | On, off. Not available with a tiling choice | Off |
| Gutter | The space between copies on a sheet, from 0 to 720 pt | 0 pt |
Placement is grayed out while a tiling choice is on, and after you place the pages with the Print Tiling Tool. After the tool places them, the General section shows the note “The Print Tiling tool placed the pages.” Unless a tiling choice is on, dragging in the preview then moves where the pages start. Reset next to the note discards the tool’s position, and Placement is available again when Scaling is not a tiling choice.
Choose a printer
Section titled “Choose a printer”Pick a printer under Printer. PDF File saves the job as a PDF instead, so you can print it later or check exactly what would print.
Setup… opens your system’s printer settings: the printer’s own settings on Windows, Print & Scan on macOS, and system-config-printer or the CUPS web page on Linux. VectorCraft doesn’t read changes made there, so choose the paper in the Print dialog.
VectorCraft sends the whole job to your system as one PDF. In the web version, printing goes through the browser’s print dialog.
Add printer’s marks and bleed
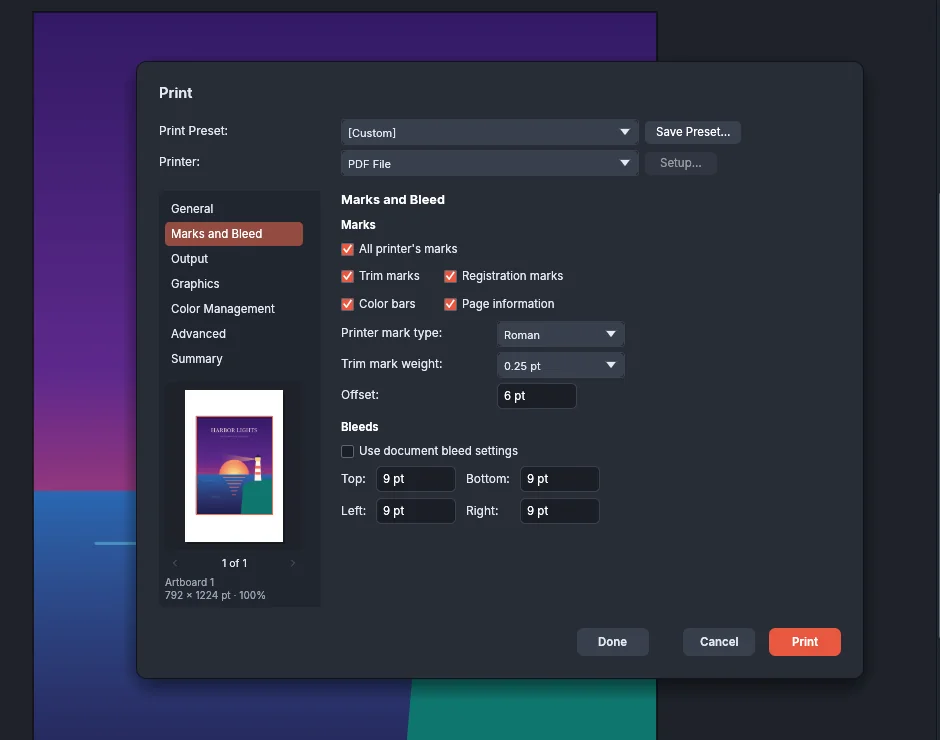
Section titled “Add printer’s marks and bleed”- Open the Marks and Bleed section.
- Turn on All printer’s marks, or pick them one at a time: Trim marks, Registration marks, Color bars and Page information.
- Choose a Printer mark type (Roman or Japanese), a Trim mark weight (0.125 pt, 0.25 pt or 0.5 pt) and an Offset from the artboard edge. The defaults are Roman, 0.25 pt and 6 pt.
- Under Bleeds, leave Use document bleed settings on to print the bleed set for the document, or turn it off and type Top, Bottom, Left and Right values.
Print separations
Section titled “Print separations”The Output section chooses between one color page and one page per ink.
- Set Mode to Composite to print in color, or to Separations to print one gray page for each ink that prints.
- Set Emulsion to Up (right reading) or Down (right reading). Down mirrors the page.
- Set Image to Positive or Negative.
- With separations, turn on Convert All Spot Colors to Process to print spot colors on the process inks instead of their own pages.
- With separations, the Document Ink Options list shows each ink. Turn single inks on or off and set their frequency and angle.
Set graphics options
Section titled “Set graphics options”Most jobs print fine with the default graphics, color and advanced settings. Change them when a printer has trouble or colors look wrong.
The Graphics section holds the curve Flatness and font Download settings.
- Open the Graphics section.
- Under Paths, leave Automatic flatness on to let the printer choose how finely it draws curves. You can turn Automatic flatness off and type a Flatness value from 0.2 (best quality) to 100 (fastest printing), and VectorCraft saves the value with the print settings. In this version the printer still chooses the flatness, and Summary shows a warning.
- Under Fonts, choose a Download setting. VectorCraft saves the choice with the print settings and presets. In this version the choice does not change the printed output.
| Option | Choices | Default |
|---|---|---|
| Automatic flatness | On, off | On |
| Flatness | 0.2 to 100 | 1 |
| Download | None, Subset, Complete | Subset |
Manage color when printing
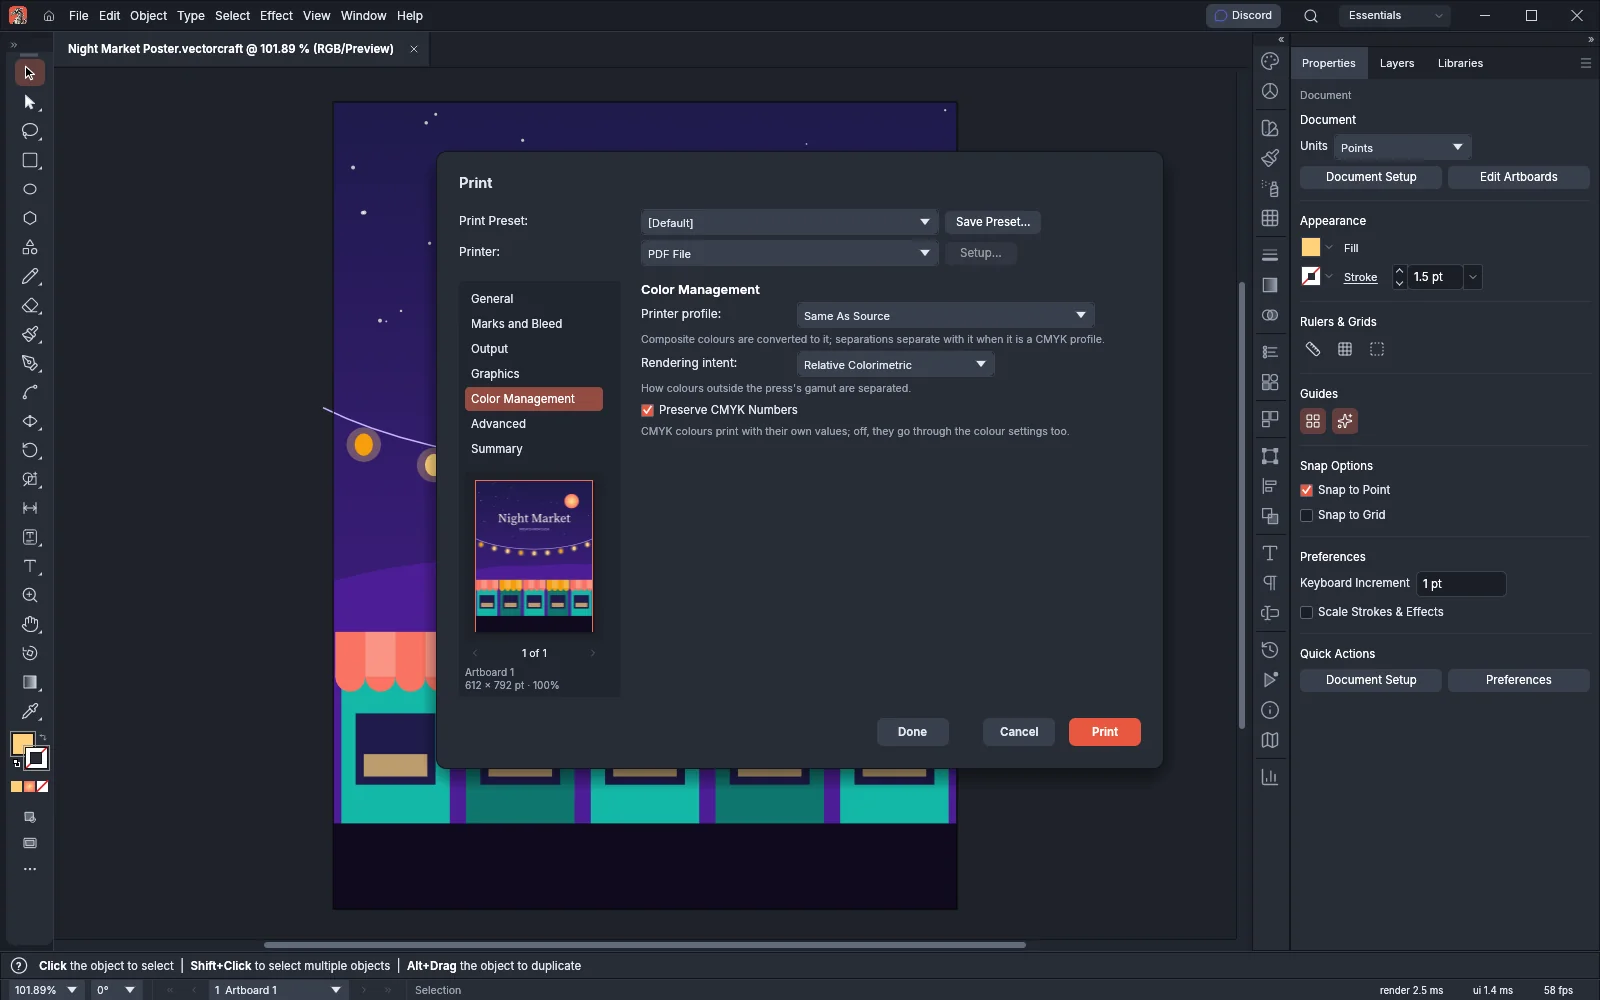
Section titled “Manage color when printing”The Color Management section sets how VectorCraft converts colors for the printer.
- Open the Color Management section.
- Under Printer profile, keep Same As Source to print the colors as they are, or pick the printer’s RGB or CMYK profile. In Composite mode, the colors are converted to that profile. In Separations mode, a CMYK profile is used to separate the colors, and an RGB profile is left out with a warning.
- Under Rendering intent, choose how colors that the printer cannot reproduce are converted.
- Leave Preserve CMYK Numbers on to print CMYK colors with their own values. Turn it off to convert CMYK colors with the color settings too.
| Option | Choices | Default |
|---|---|---|
| Printer profile | Same As Source, sRGB IEC61966-2.1, Wide Gamut RGB (1998 primaries), Display P3, ProPhoto RGB, VectorCraft Generic CMYK (SWOP-like), Device CMYK (uncalibrated), and any profiles you loaded | Same As Source |
| Rendering intent | Perceptual, Relative Colorimetric, Saturation, Absolute Colorimetric | Relative Colorimetric |
| Preserve CMYK Numbers | On, off | On |
Manage color and proof for print covers color settings, profiles and soft-proofing.
Set advanced options
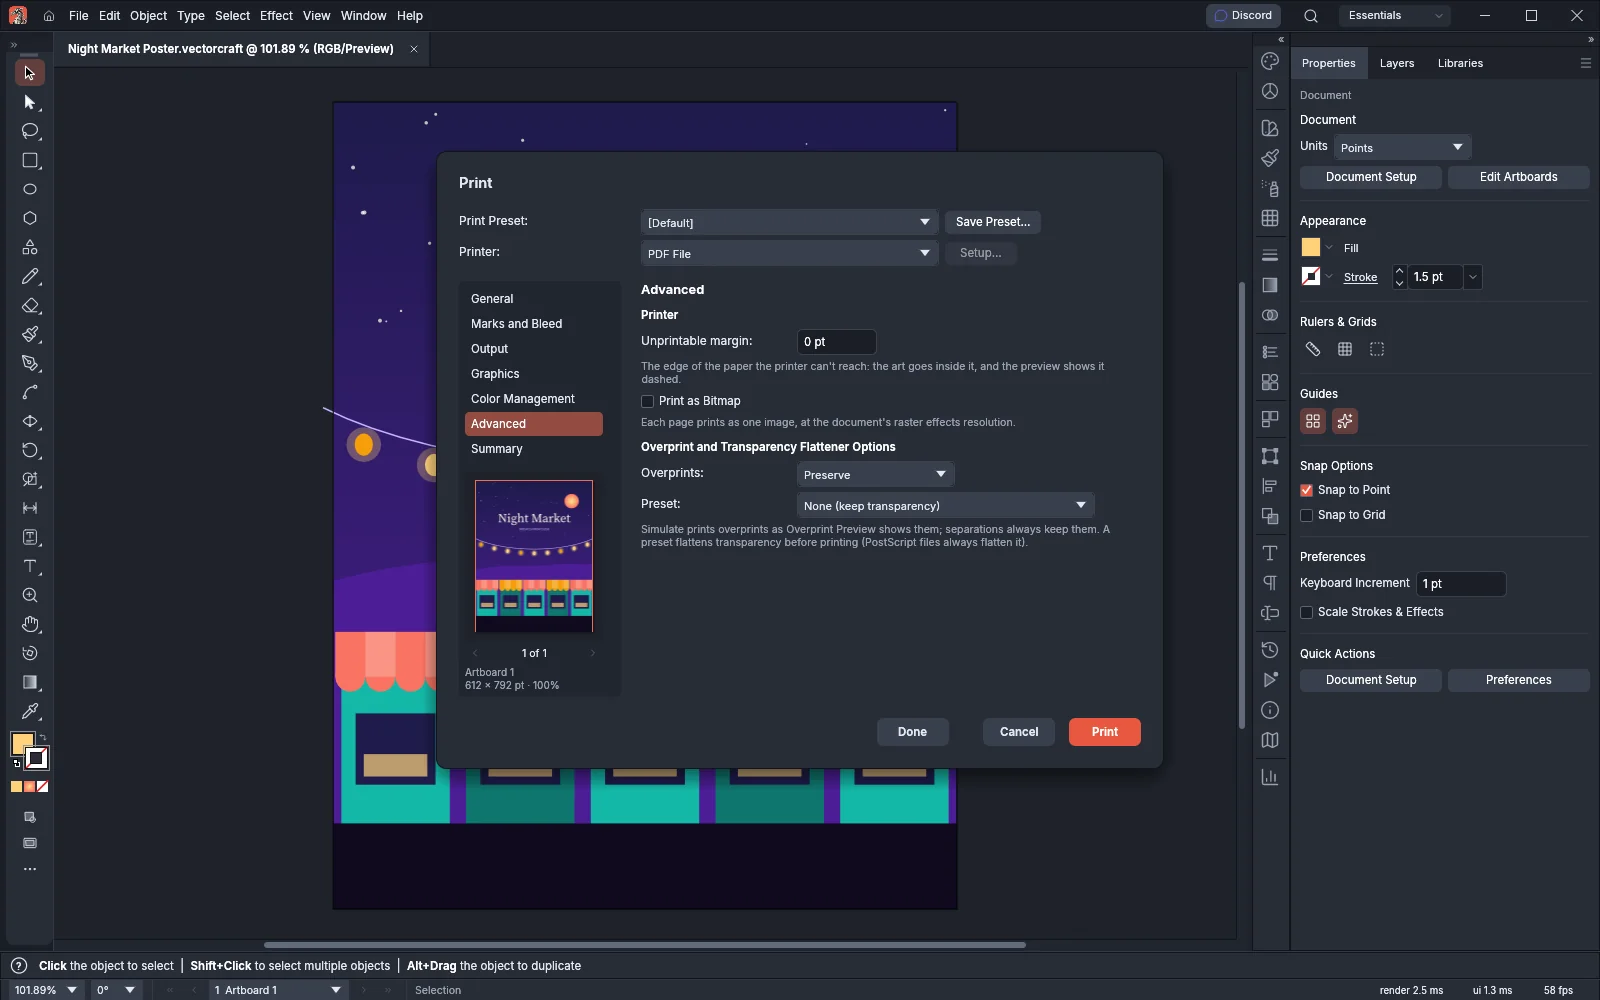
Section titled “Set advanced options”The Advanced section sets the printer’s margin, bitmap printing, overprints and transparency flattening.
- Open the Advanced section.
- Under Printer, type the Unprintable margin: the edge of the paper that the printer cannot reach. VectorCraft places the art inside it, and the preview shows the margin as a dashed line.
- Turn on Print as Bitmap to print each page as one image at the document’s raster effects resolution. This option is available in Composite mode only.
- Under Overprint and Transparency Flattener Options, choose what happens to overprinting fills and strokes with Overprints. This option is available in Composite mode only. Separations always keep overprints.
- Under Preset, keep None (keep transparency) to print transparency as it is, or pick a flattener preset to flatten transparency before printing.
| Option | Choices | Default |
|---|---|---|
| Unprintable margin | 0 to 144 pt | 0 pt |
| Print as Bitmap | On, off | Off |
| Overprints | Preserve, Discard (overprinting objects knock out), Simulate (prints them as Overprint Preview shows them) | Preserve |
| Preset | None (keep transparency), High Resolution, Medium Resolution, Low Resolution, and your saved flattener presets | None (keep transparency) |
Scale or tile large art
Section titled “Scale or tile large art”When the art is larger than the paper, scale it down or split it across several sheets.
- In the General section, open Scaling and pick a choice from the following table.
- For Custom Scale, type the width and height percentages under Scale.
| Choice | What prints |
|---|---|
| Do Not Scale | The art at 100% |
| Fit to Page | The art as large as fits the printable area with its marks, keeping its proportions |
| Custom Scale | The art at the width and height percentages you type |
| Tile Full Pages | Pages the size of the paper, overlapping by the Overlap value |
| Tile Imageable Areas | Pages the size of the printable area of the paper |
Print a large poster covers the two tiling choices step by step: the Overlap and Tile Range settings, how the tiles are numbered, View → Show Print Tiling and the Print Tiling Tool.
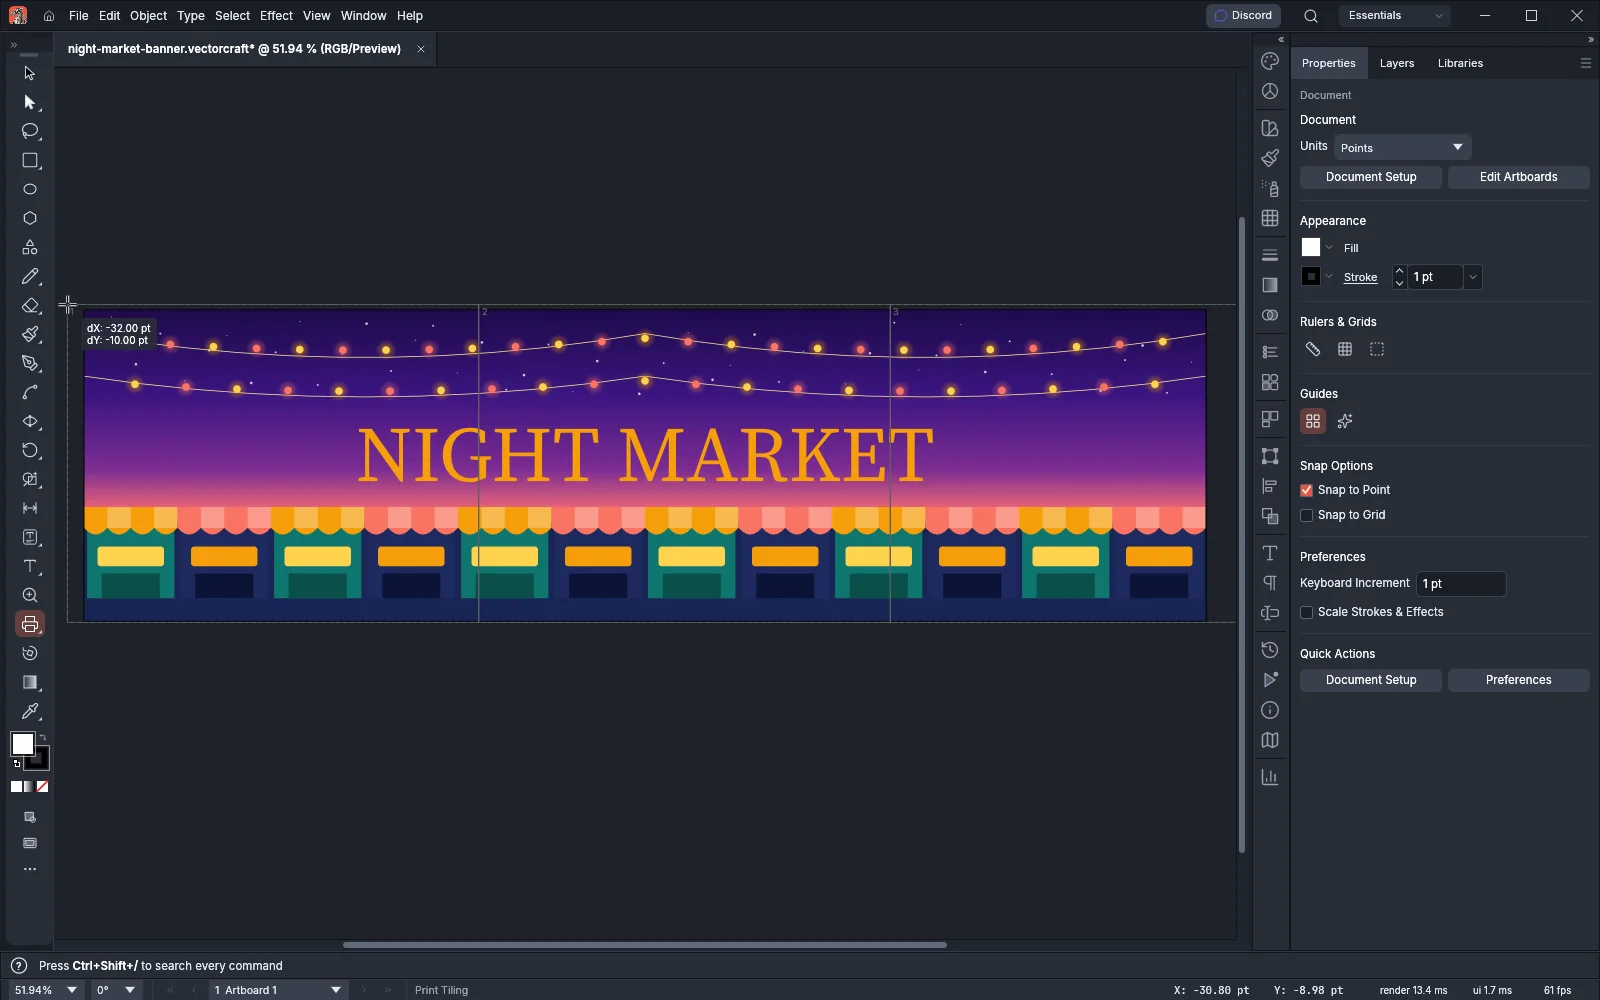
When you drag with the Print Tiling Tool, the pointer sets the top-left corner of the first page’s printable area and snaps to the artboard’s edges. Double-clicking the tool’s button in the toolbar discards that position, as Reset does.
Save print presets
Section titled “Save print presets”- In the Print dialog, press Save Preset… next to Print Preset.
- Type a name and press Save.
To manage presets without opening the Print dialog, choose Edit → Print Presets…. The list shows [Default] and your saved presets, with the differences from [Default] for the one you select.
| Button | What it does |
|---|---|
| New… | Starts a new preset from the selected one |
| Edit… | Changes a saved preset |
| Delete | Removes a saved preset |
| Import… | Loads presets from a file |
| Export… | Saves the selected preset to a file |
[Default] cannot be edited or deleted. Press New… to start an editable copy.
Check before you print
Section titled “Check before you print”- Choose View → Overprint Preview (Ctrl+Alt+Shift+Y, or Cmd+Option+Shift+Y on macOS) to see how overprinting fills and strokes will print.
- Choose Window → Separations Preview to show or hide each ink plate. Alt-click (Option-click on macOS) a plate’s eye to show only that plate.
- In the Print dialog, open Summary. It lists the page count, every option you changed from the default, and warnings such as art larger than the printable area, type that prints in a fallback font, or type that does not fit its frame.
Print from the web version
Section titled “Print from the web version”The web version of VectorCraft prints through the browser.
- Choose File → Print… and set up the job as in the desktop app.
- Under Printer, keep Default Printer. The browser does not list its printers to VectorCraft, and Setup… is unavailable.
- Press Print. VectorCraft prepares the job as a PDF and opens the browser’s print dialog, and the status bar shows “Printing “document name”: pick the printer in the browser’s print dialog.”
- Pick the printer in the browser’s print dialog and print.
To keep the job as a file instead, choose PDF File under Printer. The browser downloads the PDF.