
Set up a document and artboards
This page shows how to start a new document from a preset or your own size, then add, name and arrange its artboards. It also covers the document’s units, bleed and color mode, and the tools and shortcuts you use to move around the canvas.
Create a document
Section titled “Create a document”- Choose File → New… (Ctrl+N, or Cmd+N on macOS). The New Document dialog opens.
- Pick a category along the top: Recent, Saved, Mobile, Web, Print, Film & Video, Art & Illustration, Branding or Social.
- Click a preset card. A double-click on a card creates the document right away.
- Under PRESET DETAILS, change the name, Width, Height, units, Orientation and number of Artboards as needed.
- Click Create.
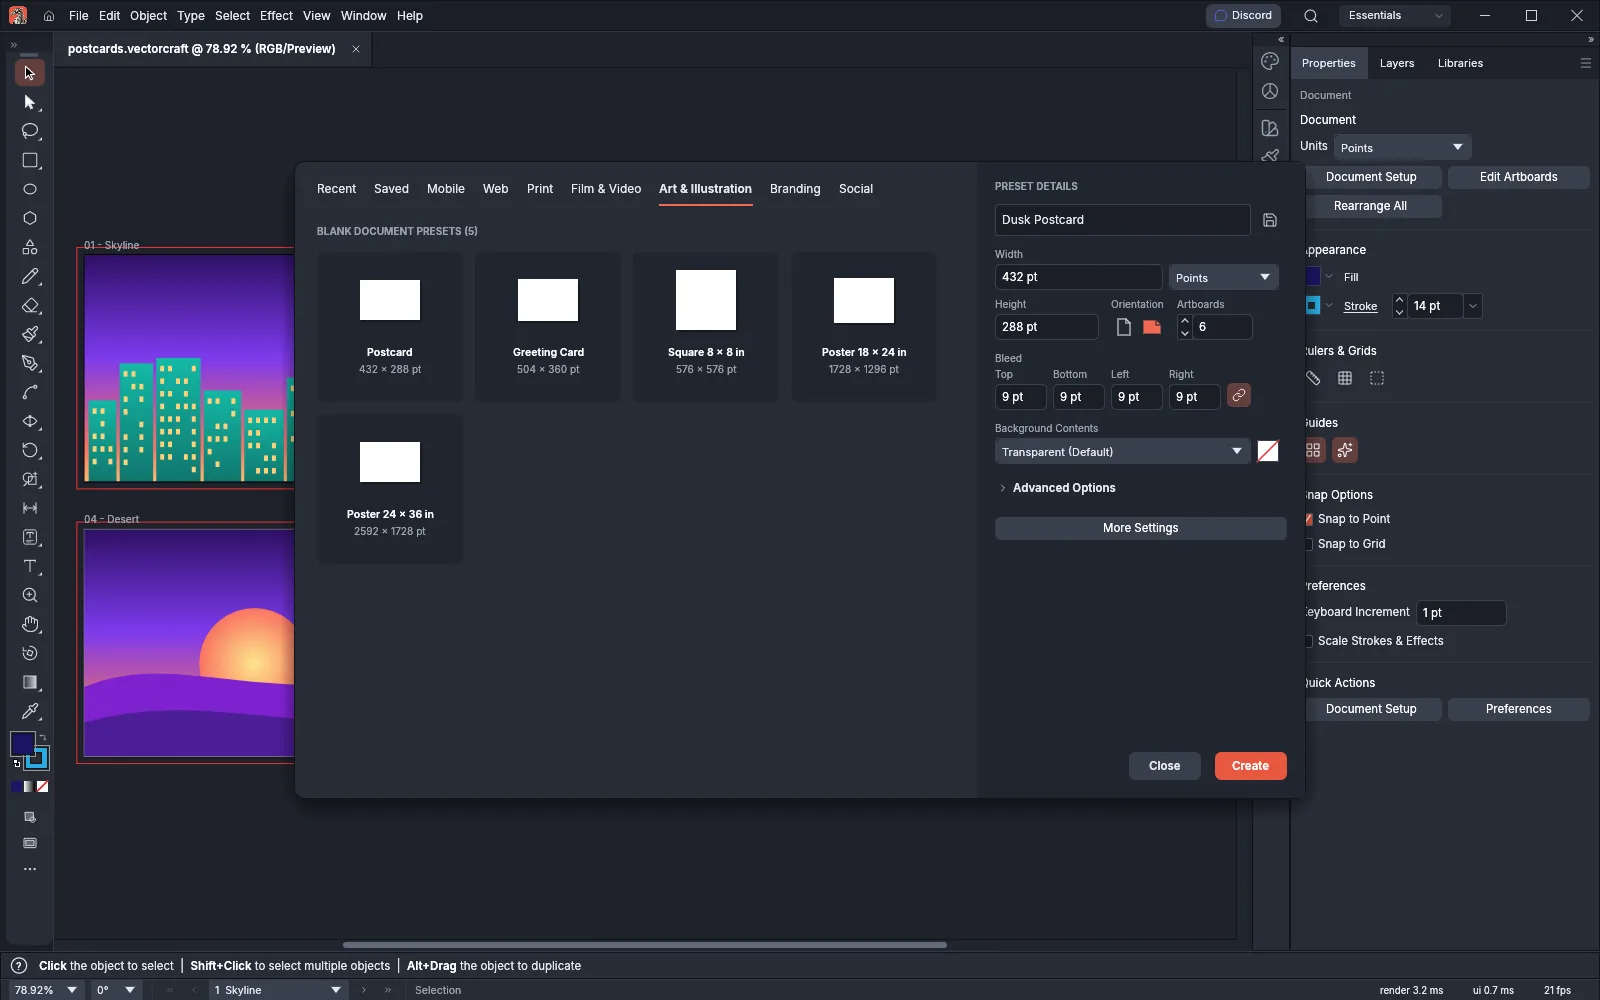
Recent lists the sizes you used last. To keep a size of your own, click Save Preset beside the name, type a Preset Name and click Save. The preset then appears under Saved.
Advanced Options holds Color Mode, Raster Effects and Preview Mode. More Settings opens the same fields in a longer form, where you also choose how several artboards are laid out.
| Setting | Choices | Default |
|---|---|---|
| Width and Height | Any size, in the units shown beside Width | 612 × 792 pt (Letter) while Recent is empty, and the last size you used after that |
| Units | Pixels, Points, Picas, Inches, Millimeters, Centimeters, Feet, Yards, Meters, Feet & Inches | Pixels for screen presets, and the general unit set in Preferences for the others |
| Orientation | Portrait, Landscape | Set by the preset’s width and height |
| Artboards | 1 to 1000 | 1 |
| Artboard layout (More Settings) | Grid by Row, Grid by Column, Arrange by Row, Arrange by Column, with Spacing, Columns and Change to Right-to-Left Layout | Grid by Row, 20 pt spacing |
| Bleed | 0 to 72 pt on each side | 0 |
| Background Contents | Transparent, White | Transparent |
| Color Mode | RGB Color, CMYK Color | CMYK for Print and Branding presets, RGB for the others |
| Raster Effects | Screen (72 ppi), Medium (150 ppi), High (300 ppi) | 300 ppi for Print, Art & Illustration and Branding presets, 72 ppi for the others |
| Preview Mode | Default, Pixel, Overprint | Default |
To start from a template, choose File → New from Template… (Ctrl+Shift+N, or Cmd+Shift+N on macOS) and pick the file. It opens as a new untitled document.
Add and arrange artboards
Section titled “Add and arrange artboards”An artboard is a page inside the document. A document can hold many artboards of different sizes.
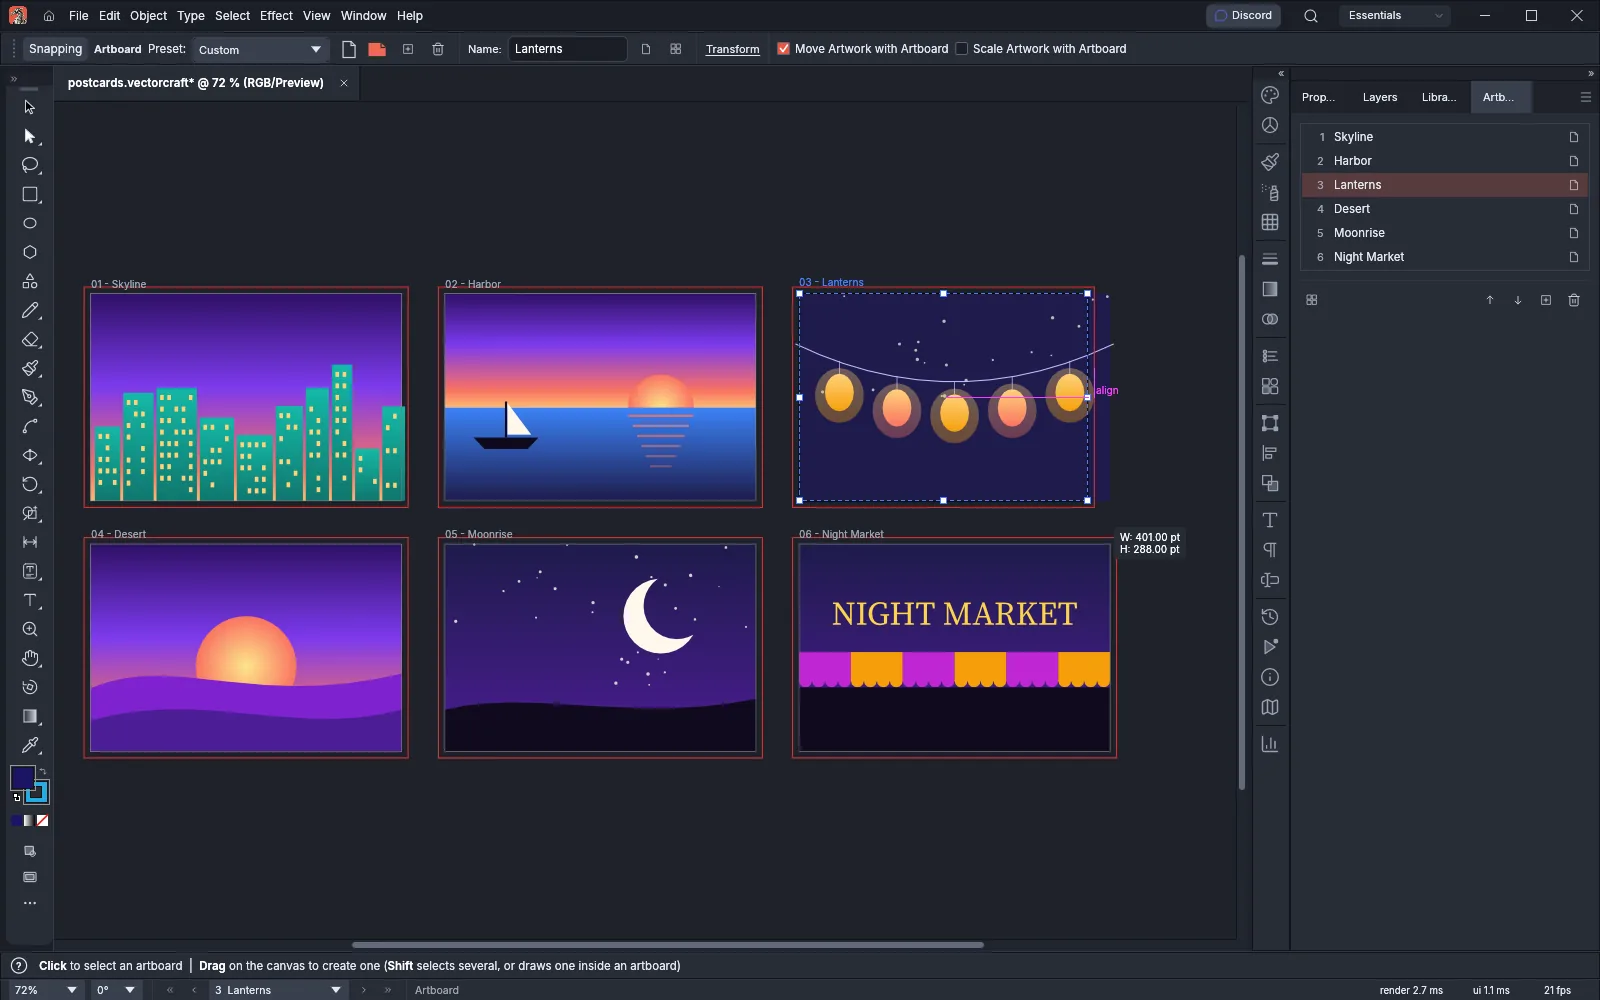
- Choose the Artboard tool (Shift+O).
- Drag on the empty area around the artboards to draw a new artboard. Hold Shift and drag to draw a new artboard inside an existing one.
- Drag inside an artboard to move it, or drag one of its handles to resize it. Hold Shift for a proportional resize, or Alt (Option on macOS) to resize from the center.
- Click an object to add an artboard that fits the object’s visible bounds.
- Press Escape to go back to the Selection tool.
While the Artboard tool is active, the Control bar shows Move Artwork with Artboard (on by default) and Scale Artwork with Artboard (off by default). Hold Alt (Option on macOS) while you drag an artboard to move a copy of it.
Use the Artboards panel
Section titled “Use the Artboards panel”Choose Window → Artboards to list every artboard in order. The buttons at the bottom of the panel are Rearrange All Artboards, Move Up, Move Down, New Artboard and Delete Artboard. The panel menu has New Artboard, Duplicate Artboards, Delete Artboards, Rename, Delete Empty Artboards, Convert to Artboards, Artboard Options…, Rearrange All Artboards… and Fit to Artwork Bounds.
Artboard Options sets an artboard’s name and Background Color, and three screen guides: Show Center Mark, Show Cross Hairs and Show Video Safe Areas. The background color and these guides show on the canvas only. They do not appear in exports or prints. To open Artboard Options with the Artboard tool, double-click an empty part of the artboard. Set artboard options lists every option in the dialog.
Click a row to make that artboard the active one. Double-click a row’s number to also fit that artboard in the window.
Set artboard options
Section titled “Set artboard options”The Artboard Options dialog sets the size, position, name and screen marks of the active artboard.
- Open the dialog in one of these ways:
- Double-click the Artboard tool in the Tools panel.
- With the Artboard tool, double-click an empty part of the artboard. A double-click on an object does not open the dialog.
- Choose Artboard Options… from the Artboards panel menu, or click the options icon at the right end of the active artboard’s row.
- With the Artboard tool, click Resize on the Contextual Task Bar.
- Change the options in the following table.
- Click OK. VectorCraft applies the changes as one step, which Edit → Undo reverses.
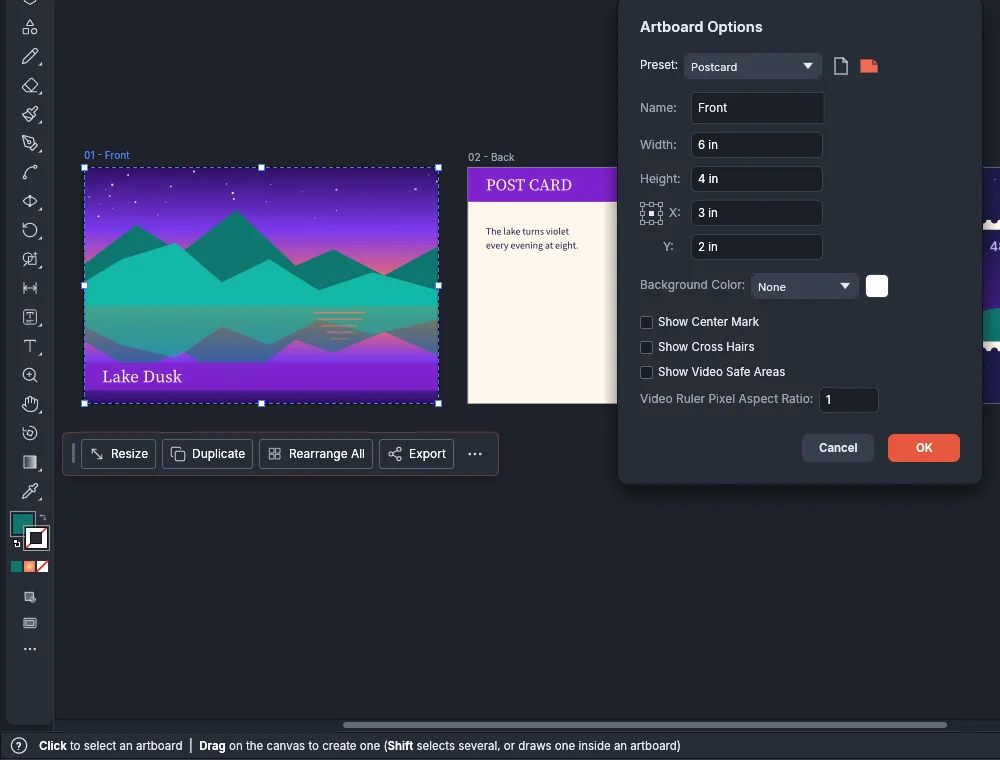
| Option | What it does | Default |
|---|---|---|
| Preset | Sets the size from a New Document preset, listed by category. A preset keeps each artboard’s own orientation. Fit to Artwork Bounds and Fit to Selected Art at the top of the list resize the artboard around the art without moving the art. The list shows Custom when the size matches no preset | The preset that matches the size |
| Portrait and Landscape buttons | Swap the width and height when the artboard is in the other orientation | Set by the width and height |
| Name | Sets the artboard’s name, which the Artboards panel and the status bar show | Artboard 1, Artboard 2 and so on |
| Width and Height | Set the size, in the document’s units. The reference point stays where it is | The current size |
| Reference point locator | Chooses the point of the artboard that X and Y describe | Center |
| X and Y | Place the reference point at this position on the rulers, counted from the ruler origin | The current position |
| Background Color | Paints the artboard: None, White or Black, or any color from the swatch beside the list, which shows Custom in the list | None |
| Show Center Mark | Draws a mark at the center of the artboard | Off |
| Show Cross Hairs | Draws a line from the middle of each side through the center | Off |
| Show Video Safe Areas | Draws the action-safe area and the title-safe area, 3.5% and 5% in from the edges | Off |
| Video Ruler Pixel Aspect Ratio | Sets the width of one video pixel compared with its height, which View → Rulers → Show Video Rulers counts in. The range is 0.1 to 10 | 1 |
Exports and prints draw the background color behind the art. The center mark, cross hairs and video safe areas show on the canvas only. When several artboards are selected with the Artboard tool, a preset, an orientation or a new width or height goes to each of them.
Fit and rearrange artboards
Section titled “Fit and rearrange artboards”The Object → Artboards menu has four commands:
| Command | What it does |
|---|---|
| Convert to Artboards | Turns the bounds of each selected object into a new artboard and removes the objects. |
| Rearrange All Artboards… | Lays all artboards out again in their panel order. |
| Fit to Artwork Bounds | Resizes each selected artboard to the visible art on it. An artboard with no art stays as it is. |
| Fit to Selected Art | Resizes the active artboard to the selected art, strokes included. |
Rearrange All Artboards opens with Layout set to Grid by Row, 2 Columns, 20 pt Spacing and Move Artwork with Artboard on. The dialog keeps the spacing you confirmed last time. Layout Order switches between left-to-right and right-to-left.
To lay out the artboards again:
- Choose Object → Artboards → Rearrange All Artboards…. You can also click Rearrange All Artboards at the bottom of the Artboards panel, or Rearrange All in the Properties panel or on the Contextual Task Bar. The command needs at least two artboards.
- Click a Layout button and a Layout Order button.
- Type the number of Columns and the Spacing between artboards.
- Click OK. The artboards move in their panel order, as one step that Edit → Undo reverses.
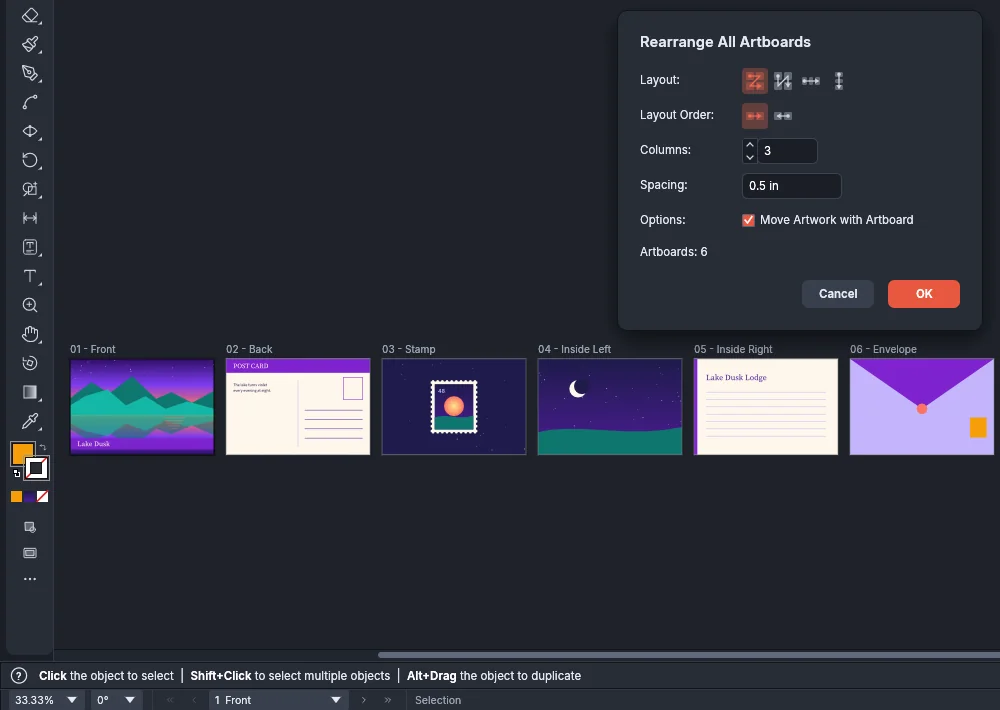
| Option | What it does |
|---|---|
| Layout | Grid by Row fills each row before the next one. Grid by Column fills each column before the next one. Arrange by Row puts every artboard in one row, and Arrange by Column puts every artboard in one column |
| Layout Order | Change to Left-to-Right Layout places the first artboard on the left, and Change to Right-to-Left Layout places it on the right. The order buttons are unavailable with Arrange by Column |
| Columns | Sets how many artboards go in each row, from 1 to the number of artboards. With Grid by Column the field is Rows. The field is unavailable with Arrange by Row and Arrange by Column |
| Spacing | Sets the gap between artboards, in the document’s units |
| Move Artwork with Artboard | Moves the art on each artboard with it. Turn it off to move only the artboards |
| Artboards | Shows how many artboards the document has |
Set units, bleed and paper
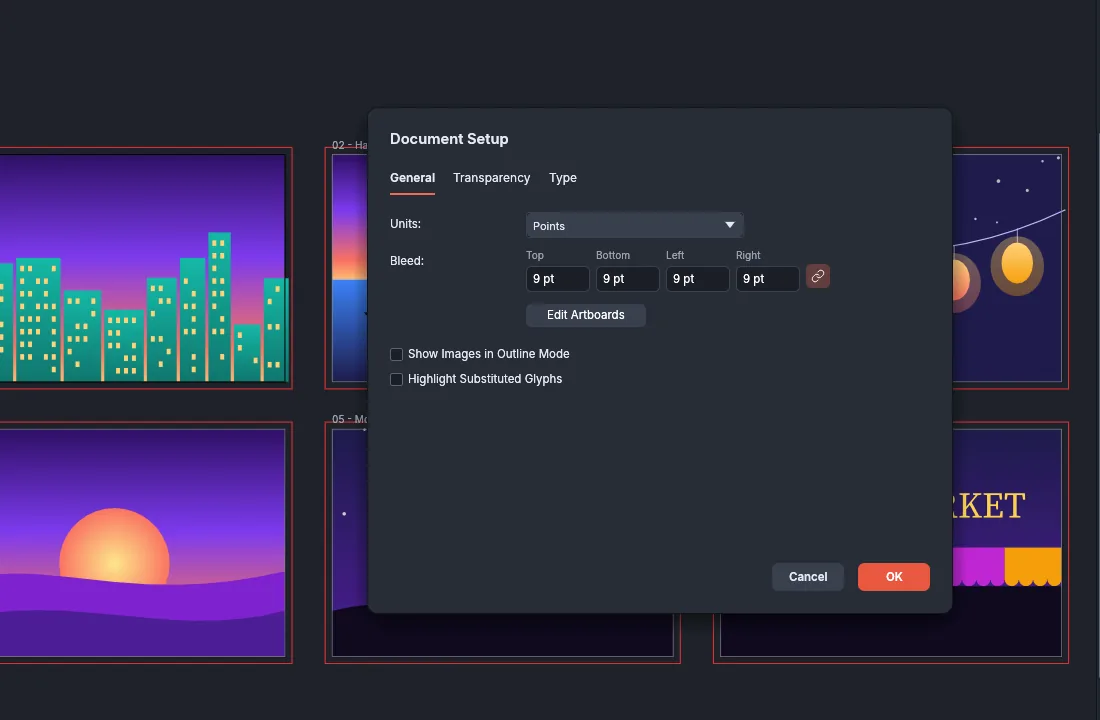
Section titled “Set units, bleed and paper”Choose File → Document Setup… (Ctrl+Alt+P, or Cmd+Option+P on macOS). The dialog has General, Transparency and Type tabs. OK applies the settings of all three tabs as one step.
| Tab | Setting | What it does |
|---|---|---|
| General | Units | Sets the unit the document shows lengths in. |
| General | Bleed | Sets the bleed on each side, from 0 to 72 pt. |
| General | Edit Artboards | Applies the settings, closes the dialog and switches to the Artboard tool. |
| General | Show Images in Outline Mode | Shows the pixels of placed images in Outline view. Off by default. |
| General | Highlight Substituted Glyphs | Highlights characters that the font does not have and that VectorCraft draws from a fallback font. Off by default. |
| Transparency | Grid Size and Grid Colors | Set the checkerboard that shows behind transparent areas. Grid Size is Small, Medium (the default) or Large. Grid Colors is Light (the default), Medium, Dark, Red, Orange, Green, Blue or Purple, or Custom after you type your own two colors. |
| Transparency | Simulate Colored Paper | Draws the artboards in the paper color, which is the first of the two grid colors. |
| Transparency | Preset under Export and Clipboard Transparency Flattener Settings | Chooses a flattener preset: High Resolution, Medium Resolution (the default), Low Resolution or one you saved. |
| Transparency | Discard White Overprint in Output | Makes white objects set to overprint knock out in PDF output, in print and in the overprint preview. On by default. |
| Type | Language | Sets the document’s language, English: USA by default. Choosing a language also sets its quote characters. |
| Type | Double Quotes and Single Quotes | Set the opening and closing quote characters. |
| Type | Use Typographer’s Quotes | Turns straight quotes you type into the document’s quote characters. On by default. |
| Type | Superscript and Subscript Size and Position | Set the size and the baseline shift of superscript and subscript characters, as a percentage of the font size. Both default to 58.3% size and 33.3% position. Size runs from 1% to 500%, and position from -500% to 500%. |
| Type | Small Caps | Sets the size of small capitals that VectorCraft makes from capitals, as a percentage of the font size: 70% by default, from 1% to 200%. |
| Type | Export | Preserve Text Editability (the default) writes type to SVG as text. Preserve Text Appearance writes it as outlines. |
To print one artboard on several sheets, see Print a large poster. For the flattener presets, see Manage color and proof for print.
Choose the color mode
Section titled “Choose the color mode”The color mode is set when you create the document. To change it later, choose File → Document Color Mode → CMYK Color or File → Document Color Mode → RGB Color. VectorCraft converts the colors in the document, including swatches, symbols, brushes and graphic styles, in one step.
Move around the canvas
Section titled “Move around the canvas”- The Hand tool (H) pans the view when you drag. With any tool, hold Space and drag, or drag with the middle mouse button.
- The Zoom tool (Z) zooms in with a click. Hold Alt (Option on macOS) and click to zoom out. With any tool, hold Ctrl+Space (Cmd+Space on macOS) and click to zoom in.
- Double-click the Hand tool to fit the artboard in the window. Double-click the Zoom tool to show the document at 100%.
- The mouse wheel scrolls the view. Hold Ctrl (Cmd on macOS) or Alt (Option on macOS) while you turn the wheel to zoom in or out at the pointer.
- On a trackpad, pinch to zoom and drag with two fingers to scroll. On a touch screen, pinch to zoom and drag with two fingers to pan.
- On a Mac trackpad, turn two fingers to rotate the view. Preferences → General → Trackpad Gesture to Rotate View turns this on and off. It is on by default.
To make the plain wheel zoom, turn on Zoom with Mouse Wheel in Preferences → General. The wheel and Alt-wheel then zoom, Shift-wheel scrolls up and down, and Ctrl-wheel (Cmd-wheel on macOS) scrolls sideways.
You can also move the view from the status bar at the bottom of the window:
- The zoom menu at the left end shows the zoom level. Pick a zoom from 3.13% to 64000%, or pick Fit on Screen or Fit All.
- The angle menu beside it turns the view to a preset angle.
- The artboard navigator has First Artboard, Previous Artboard, a list of the artboards by number and name, Next Artboard and Last Artboard. Going to an artboard fits it in the window, and it becomes the artboard that Fit Artboard in Window and Actual Size show.
| Command | Windows and Linux | macOS |
|---|---|---|
| Fit Artboard in Window | Ctrl+0 | Cmd+0 |
| Fit All in Window | Ctrl+Alt+0 | Cmd+Option+0 |
| Actual Size | Ctrl+1 | Cmd+1 |
| Zoom In | Ctrl+= | Cmd+= |
| Zoom Out | Ctrl+- | Cmd+- |
| Show Rulers | Ctrl+R | Cmd+R |
| Hide Guides | Ctrl+; | Cmd+; |
| Smart Guides | Ctrl+U | Cmd+U |
| Show Grid | Ctrl+’ | Cmd+’ |
| Snap to Grid | Ctrl+Shift+’ | Cmd+Shift+’ |
| Hide Artboards | Ctrl+Shift+H | Cmd+Shift+H |
| Outline | Ctrl+Y | Cmd+Y |
These commands are in the View menu and its Rulers and Guides submenus. Edit → Keyboard Shortcuts… changes them.
The Navigator panel and the Rotate View tool are described in Customize the workspace.
Use rulers, guides and grids
Section titled “Use rulers, guides and grids”Rulers measure positions on the canvas. Guides are lines that art snaps to. The grid is a pattern of lines behind the art.
- Choose View → Rulers → Show Rulers (Ctrl+R, or Cmd+R on macOS). The rulers appear along the top and the left of the canvas.
- To measure in another unit, right-click a ruler or the box where the rulers meet, and pick a unit. The document’s units change, as in Preferences → Units.
- To make a horizontal guide, drag from the top ruler onto the canvas. To make a vertical guide, drag from the left ruler. The guide is placed where you release the mouse button, and a readout shows its position.
- To move the zero point of the rulers, drag from the box where the rulers meet to a point on the canvas. Double-click the box to put the zero point back. Press Escape during the drag to cancel it.
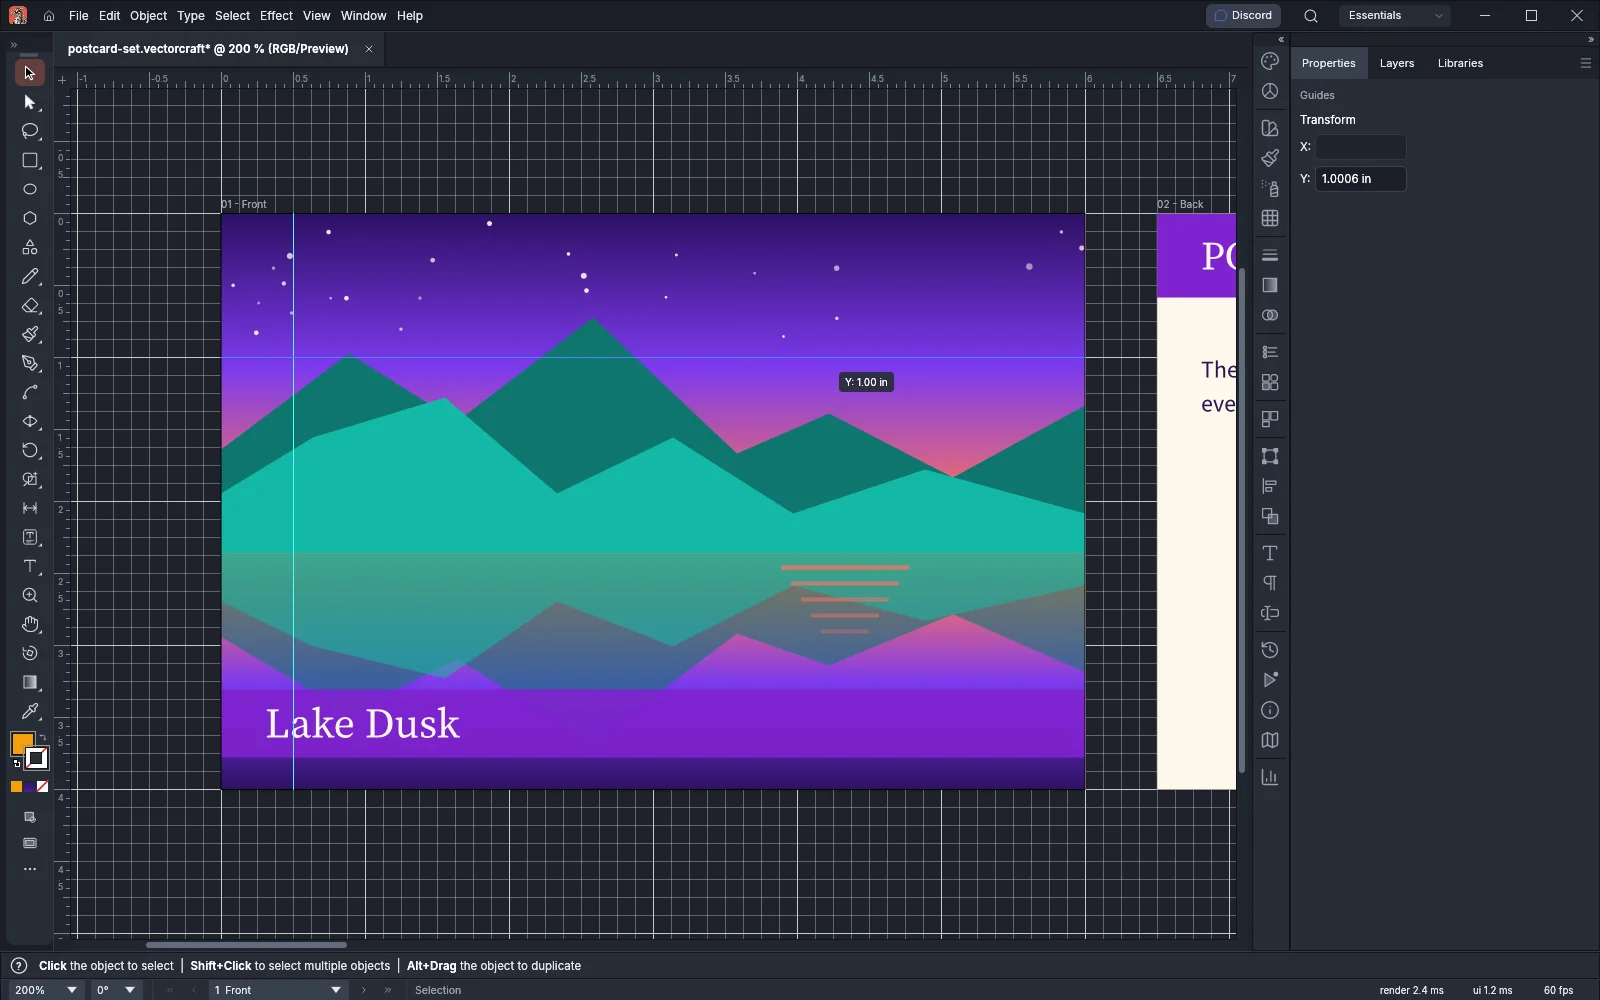
While you drag a guide out of a ruler, hold Shift to snap it to the ruler’s tick marks, or hold Alt (Option on macOS) to switch between a horizontal and a vertical guide. With the Artboard tool, the new guide belongs to the active artboard.
With the Selection tool, click a guide to select it and drag it to move it. Hold Alt (Option on macOS) while you drag to move a copy. Drop a guide on its ruler to delete it.
View → Rulers has three commands:
- Show Rulers shows the rulers. The command reads Hide Rulers while they show.
- Change to Global Rulers (Ctrl+Alt+R, or Cmd+Option+R on macOS) measures the whole document from one zero point. A new document uses artboard rulers, which measure from the top-left corner of the active artboard. While global rulers are on, the command reads Change to Artboard Rulers. The document keeps the setting when you save it.
- Show Video Rulers counts the active artboard in video pixels from its top-left corner. Each pixel is as wide as the artboard’s Video Ruler Pixel Aspect Ratio and one point tall.
View → Guides has five commands:
| Command | Windows and Linux | macOS | What it does |
|---|---|---|---|
| Hide Guides | Ctrl+; | Cmd+; | Hides all guides. The command then reads Show Guides |
| Lock Guides | Ctrl+Alt+; | Cmd+Option+; | Stops you from selecting or moving guides. The command then reads Unlock Guides |
| Make Guides | Ctrl+5 | Cmd+5 | Turns the selected paths into guides |
| Release Guides | Ctrl+Alt+5 | Cmd+Option+5 | Turns the selected guides into paths with no fill or stroke. With no guide selected, it releases every guide that was made from a path |
| Clear Guides | None | None | Deletes every guide in the document |
Make Guides is also in the menu that opens when you right-click selected objects. When you right-click an empty part of the canvas, the menu has Show Rulers, Show Grid, Hide Guides and Lock Guides.
The grid and the snapping commands are in the View menu:
| Command | Windows and Linux | macOS | What it does | Default |
|---|---|---|---|---|
| Show Grid | Ctrl+’ | Cmd+’ | Shows the grid. The command then reads Hide Grid | Off |
| Snap to Grid | Ctrl+Shift+’ | Cmd+Shift+’ | Snaps art you draw and move to the grid lines | Off |
| Snap to Pixel | None | None | Places art you draw and move on whole pixels | Off |
| Snap to Point | Ctrl+Alt+’ | Cmd+Option+’ | Snaps the pointer to anchor points | On |
| Snap to Glyph | None | None | Snaps art you draw to the bounds of live type, and on a single line of type to its baseline, x-height, character widths and glyph anchor points | Off |
| Smart Guides | Ctrl+U | Cmd+U | Shows temporary guides and snaps to the edges, centers and anchor points of art and artboards | On |
The Snapping menu at the left of the Control bar has Smart Guides, Snap to Point, Snap to Grid and Snap to Pixel, plus Snap to Tangent and Snap to Perpendicular. In a narrow window, the Control bar leaves this menu out while the Artboard tool is active.
The grid spacing, the grid and guide colors and the Smart Guides options are in Preferences: see Guides & Grid, Smart Guides and Units.