Adjust colors with effects
This guide covers the live color effects in VectorCraft: the six effects under Effect → Color Adjustments and the five under Effect → Color Effects. A color effect changes how an object’s fills, strokes, type, gradient meshes and embedded images draw, while the object keeps its own colors. You can change, hide or remove the effect later in the Appearance panel.
Change brightness, hue or temperature with a color adjustment
Section titled “Change brightness, hue or temperature with a color adjustment”- Select the art. To recolor several objects as one piece, group them first with Object → Group, Ctrl+G (Cmd+G on macOS).
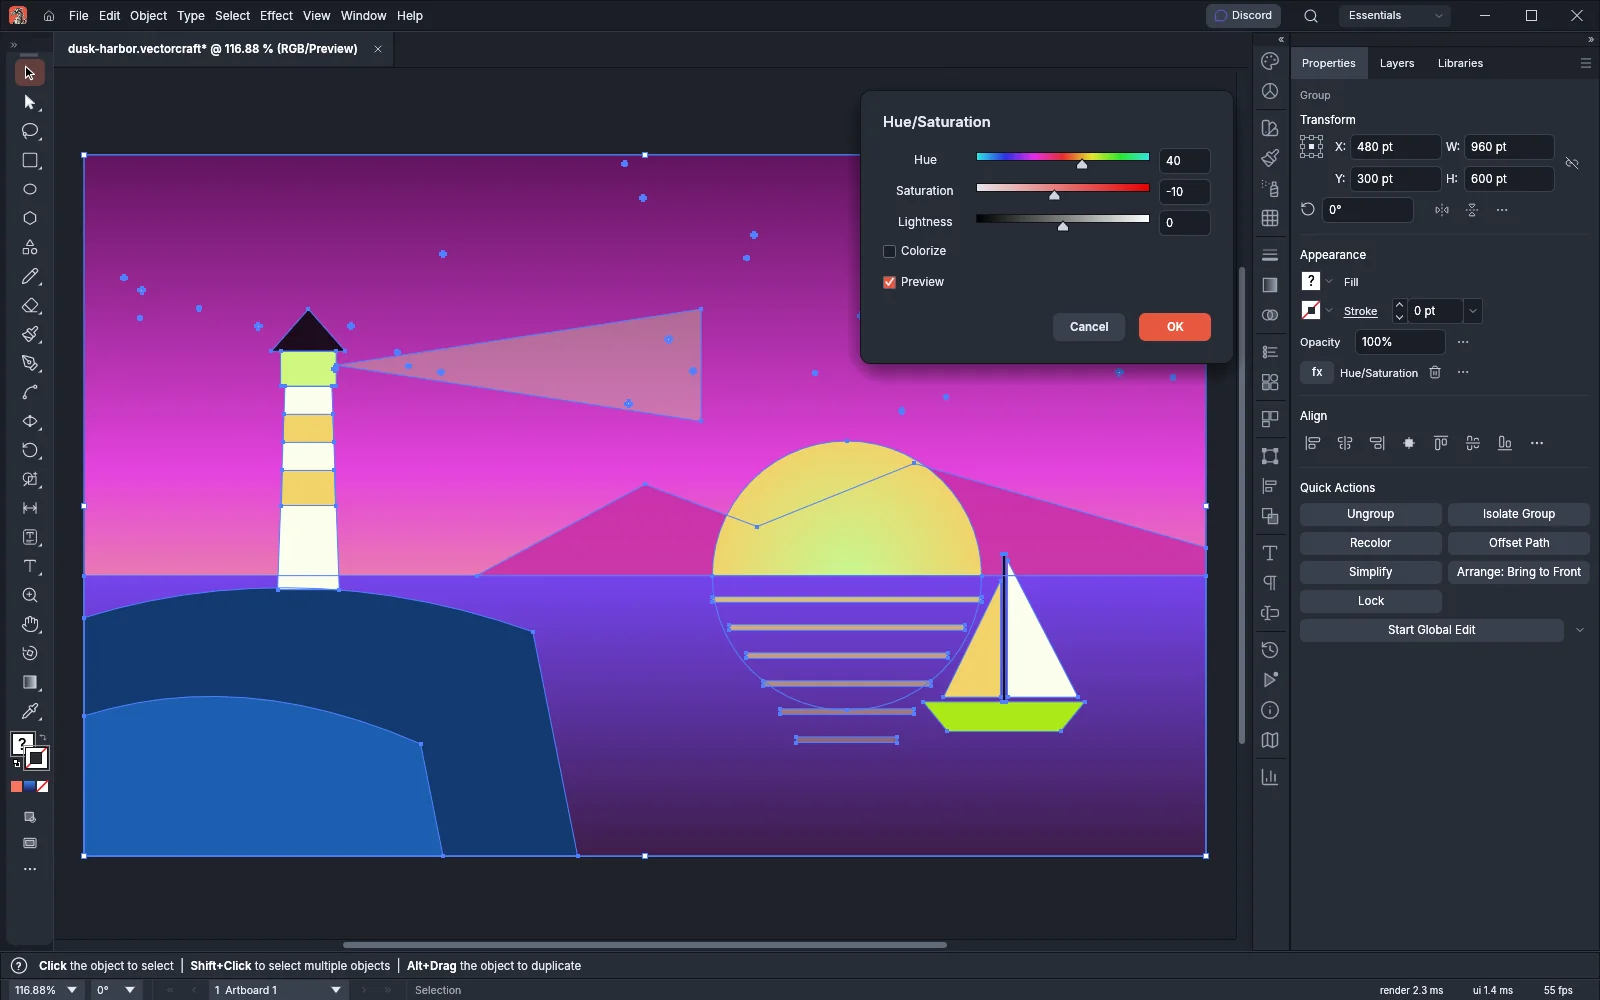
- Choose an effect from Effect → Color Adjustments: Brightness/Contrast…, Curves…, Hue/Saturation…, Levels…, Shift to Color… or Temperature/Tint….
- Drag the sliders or type values in the fields. Preview is on when the dialog opens, so the canvas shows the new colors while you work.
- Press OK. The effect appears as its own row in the Appearance panel and in the Appearance section of the Properties panel.
Each color keeps its color model: a CMYK color stays CMYK and an RGB color stays RGB.
Color adjustment options
Section titled “Color adjustment options”| Effect | Option | Range | Default | What it does |
|---|---|---|---|---|
| Brightness/Contrast… | Brightness | -100 to 100 | 0 | Lightens or darkens the middle tones; black and white stay as they are |
| Contrast | -100 to 100 | 0 | Raises or lowers the contrast | |
| Curves… | Channel | RGB, Red, Green, Blue | RGB | The channel that the curve changes |
| Curve graph and Points | 0 to 255 | 0,0 128,128 255,255 |
Input and output pairs; drag a point on the graph or type the pairs. The curve runs smoothly through the points and stays flat past the end points | |
| Hue/Saturation… | Hue | -180 to 180 | 0 | Turns every color around the color wheel by that many degrees |
| Saturation | -100 to 100 | 0 | Makes colors more or less vivid | |
| Lightness | -100 to 100 | 0 | Makes colors lighter or darker | |
| Colorize | On or off | Off | Gives every color the same hue at a saturation of (100 + Saturation) / 2 percent. With Colorize on, the Hue value sets that hue on the color wheel. A negative value counts back from 360, so -90 gives 270 | |
| Levels… | Input Black, Input White | 0 to 255 | 0, 255 | The input tones that become the darkest and the lightest output |
| Output Black, Output White | 0 to 255 | 0, 255 | The darkest and the lightest tones in the result | |
| Channel | RGB, Red, Green, Blue | RGB | The channel that the levels change | |
| Gamma | 0.1 to 10 | 1 | A value above 1 lightens the middle tones | |
| Shift to Color… | Amount | 0 to 100 | 50 | How far colors move toward the target color |
| Color | A hex color | #ff8000 |
The target color | |
| Preserve Lightness | On or off | On | On: colors take the target’s hue and saturation and keep their own lightness. Off: colors mix with the target | |
| Temperature/Tint… | Temperature | -100 to 100 | 0 | Negative values make colors cooler, positive values warmer |
| Tint | -100 to 100 | 0 | Negative values make colors greener, positive values more magenta |
Make art gray, inverted or two-tone with Color Effects
Section titled “Make art gray, inverted or two-tone with Color Effects”Effect → Color Effects holds Desaturate, Duotone…, Exposure…, Invert Colors and Vector Halftone…. Desaturate and Invert Colors have no settings, so they apply as soon as you choose them.
| Effect | What it does |
|---|---|
| Desaturate | Turns every color into the gray of its lightness |
| Invert Colors | Turns every color into its RGB inverse, for example amber into blue |
| Exposure… | Brightens or darkens in stops of light. See Exposure options |
| Duotone… | Prints the gray tone of each color with one to four inks. See Duotone options |
| Vector Halftone… | Draws the object as vector dots sized by its tone. See Turn art into a vector halftone |
Exposure options
Section titled “Exposure options”| Option | Range | Default | What it does |
|---|---|---|---|
| Exposure | -20 to 20 | 0 | Stops of light. Each stop doubles or halves the light, and the change shows mostly in the highlights |
| Offset | -0.5 to 0.5 | 0 | Lifts or sinks the shadows and middle tones |
| Gamma | 0.1 to 10 | 1 | A value above 1 lightens the middle tones |
| Preview | On or off | On | Shows the result on the canvas while the dialog is open |
Make a duotone
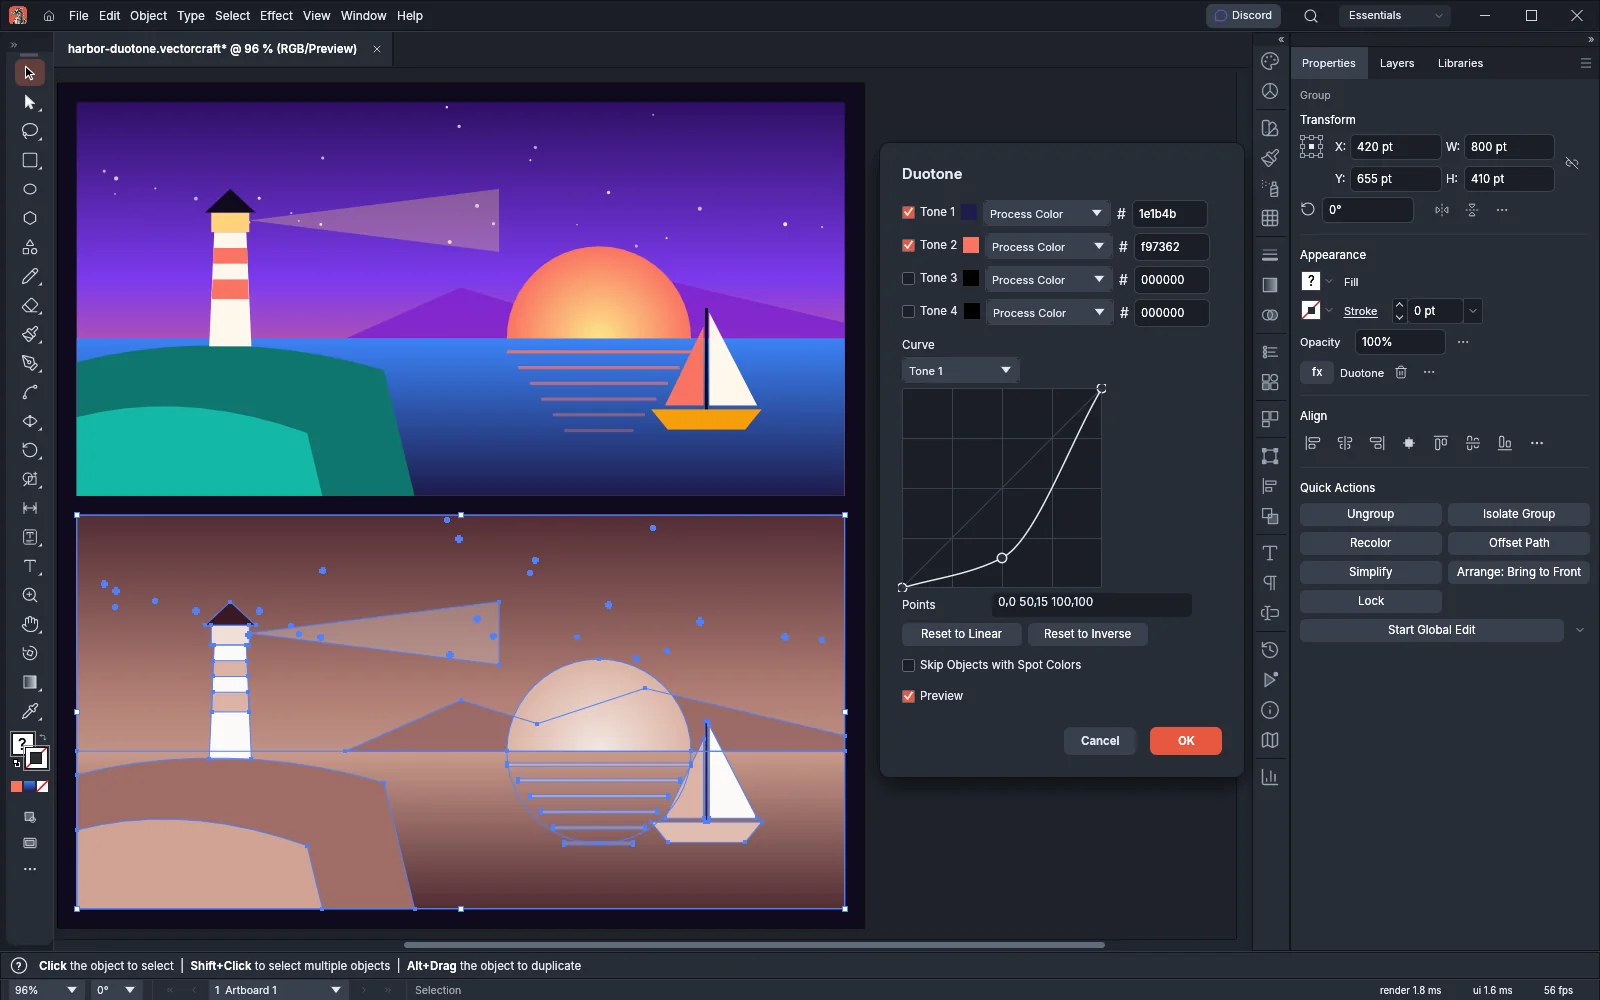
Section titled “Make a duotone”- Select the art and choose Effect → Color Effects → Duotone…. The dialog opens with one black tone.
- Turn on Tone 2. For each tone, choose Process Color and type a hex value, or pick a global or spot swatch of the document from the list.
- In Curve, choose a tone to show its curve. Drag the points on the graph, or type tint and ink pairs from 0 to 100 in Points. Reset to Linear sets the curve back to a straight rising line, and Reset to Inverse sets a falling line that reverses the tones.
- Turn on Skip Objects with Spot Colors to leave colors that use a spot swatch as they are.
- Press OK.
Duotone options
Section titled “Duotone options”| Option | Range | Default | What it does |
|---|---|---|---|
| Tone 1 to Tone 4 | On or off | Tone 1 on, Tone 2 to Tone 4 off | Turns each ink on or off. The color chip next to each check box shows the ink |
| Ink list | Process Color, or a global or spot swatch of the document | Process Color | Where the ink’s color comes from |
| # field | A hex color | 000000 |
The ink’s color when the list shows Process Color |
| Curve | Tone 1 to Tone 4 | Tone 1 | The tone whose curve the graph and Points show |
| Curve graph and Points | 0 to 100, at most 64 points | 0,0 100,100 |
Pairs of a gray tone and the ink’s tint for that tone. Drag a point on the graph or type the pairs |
| Reset to Linear | Sets the shown curve to 0,0 100,100 |
||
| Reset to Inverse | Sets the shown curve to 0,100 100,0, which reverses the tones |
||
| Skip Objects with Spot Colors | On or off | Off | Leaves colors that use a spot swatch as they are |
| Preview | On or off | On | Shows the result on the canvas while the dialog is open |
The inks overprint, so where two inks meet their tints multiply. With one tone that is a swatch, each color becomes a tint of that swatch, and a spot swatch prints on its own plate. With several tones, each color becomes the CMYK mix of their tints. Preview each ink with Separations Preview shows the plates.
Turn art into a vector halftone
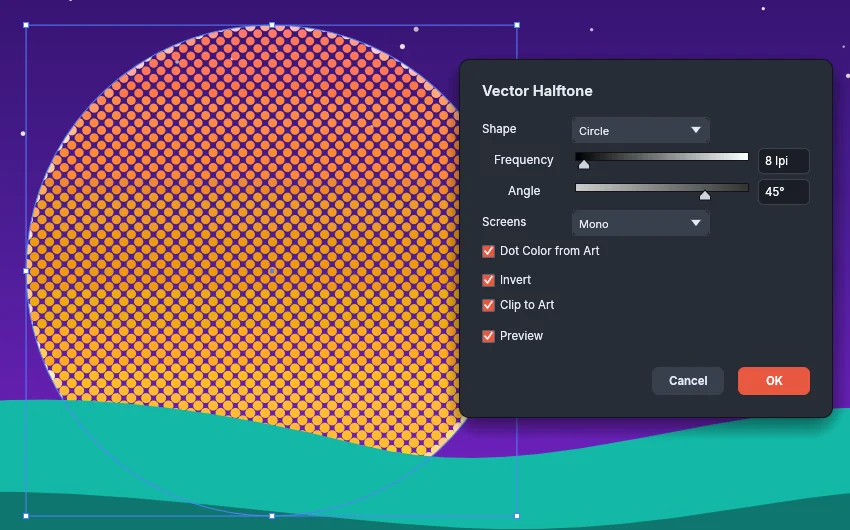
Section titled “Turn art into a vector halftone”- Select the art and choose Effect → Color Effects → Vector Halftone….
- Set the options below. While Preview is on, the canvas shows the dots as you change the options.
- Press OK.
| Option | Default | What it does |
|---|---|---|
| Shape | Circle | The dot shape: Circle, Ellipse, Square, Diamond or Line |
| Frequency | 20 lpi | Rows of dots per inch, from 1 to 150 on the slider. A lower value gives larger dots |
| Angle | 45° | The angle of the rows, from -90° to 90° |
| Screens | Mono | Mono draws one screen in one color. CMYK draws a screen for each ink: black at the Angle, cyan 30° less, magenta 30° more and yellow 45° less |
| Dot Color from Art | Off | Mono only. Gives each dot the color of the art under it |
| Color | #000000 |
Mono only, when Dot Color from Art is off. The color of the dots |
| Invert | Off | Draws dots for the light tones instead of the dark ones |
| Clip to Art | On | Clips the dots to the outline of the art |
| Preview | On | Shows the result on the canvas while the dialog is open |
The effect samples the object as it draws with its other effects. When a screen would need more than 100,000 dots, the object draws without the halftone. Lower the Frequency to bring the count down.
Object → Vector Halftone… makes the same dots as paths instead of a live effect. Object → Expand Appearance turns a live Vector Halftone into a group of dot paths, one path for each ink.
Adjust one fill or stroke only
Section titled “Adjust one fill or stroke only”A color effect can recolor a single fill or stroke and leave the rest of the object as it is.
- Select the object and press Shift+F6 to open the Appearance panel.
- Click the fill or stroke row you want to change.
- Choose the effect from Effect → Color Adjustments or Effect → Color Effects.
- Click the arrow at the left of the row to expand it. The effect is listed under that row.
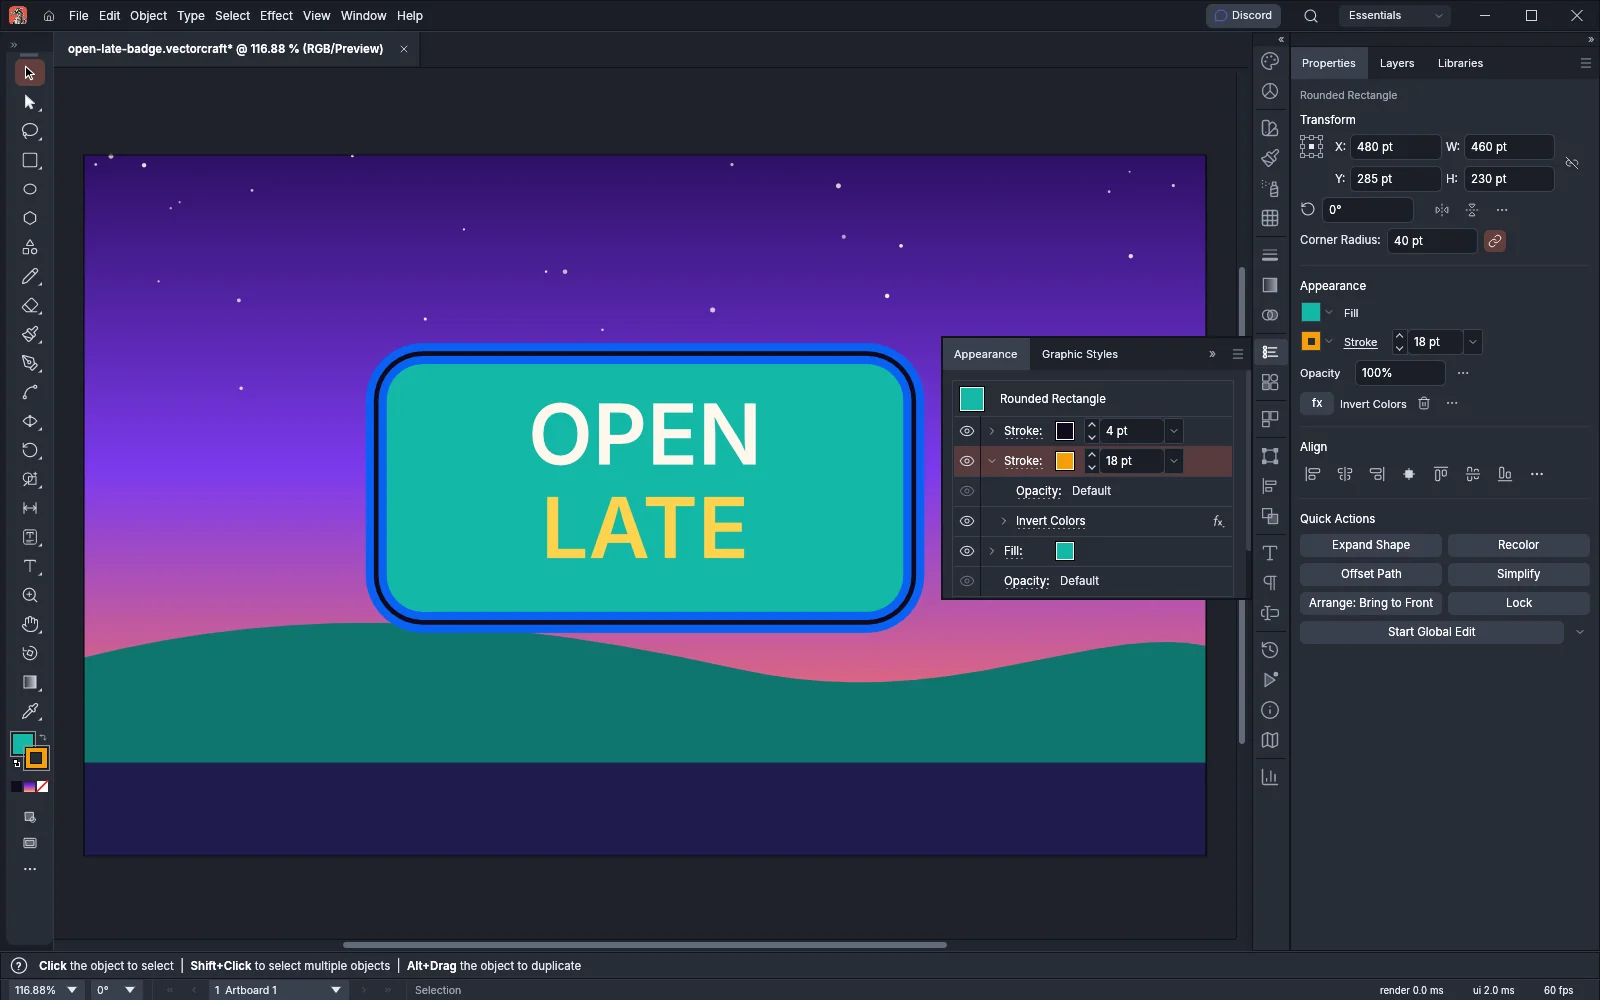
In this example only the wide stroke changes. Its color chip in the Appearance panel keeps the stroke’s own amber, while the canvas draws the inverted color, a bright blue. The fill and the thin stroke keep their colors. Without a selected row, the effect applies to the whole object.
The inverse of amber is close to the blue of the selection outline. To see the result clearly, choose View → Hide Edges, Ctrl+H (Cmd+H on macOS), which hides the selected object’s paths, anchor points and bounding box.
Get the original colors back
Section titled “Get the original colors back”A color effect never changes the colors stored in the object, so you can return to them at any time:
- To hide the effect, click the eye on its row in the Appearance panel. Click the eye again to show it.
- To change the values, click the effect’s name in the Appearance panel, or double-click its row. The dialog opens with the current values.
- To remove the effect, select its row in the Appearance panel and click Delete Selected Item, the trash icon at the bottom of the panel. When the object has one effect, you can also click the trash icon next to the effect’s name in the Properties panel.
Object → Expand Appearance drops hidden effects. To change the stored colors themselves, use Apply as Filter in the Color Effects panel (Object → Plug-ins → Color Effects → Color Effects Panel). Adjust colors describes the panel.
To swap one set of colors for another, for example to fit a palette, use Edit → Edit Colors → Recolor Artwork… instead. It changes the colors stored in the art. Change the colors of finished art describes Recolor Artwork and the other Edit Colors commands.