
Right-click menus
This page lists what the canvas menu offers when you right-click, case by case, and where each item sits in the menu bar.
Open the menu
Section titled “Open the menu”- Right-click the canvas. If you right-click an object that is not selected, VectorCraft selects it first. VectorCraft skips a locked or hidden object and selects the object under it instead. The selection stays as it is only when no object that can be selected lies under the pointer.
- Click an item to run it. Point to an item with an arrow to open its submenu.
- To close the menu without choosing anything, press Esc or click the canvas.
The menu leaves out any item that cannot run on the current selection. Undo and Redo are always in the menu. They are grayed out when there is nothing to undo or redo, and they name the change they undo or redo, for example Undo Move. An item that has a shortcut shows it after its name, and Keyboard shortcuts lists them all.
With nothing selected
Section titled “With nothing selected”With nothing selected, right-click an empty part of the canvas, such as the area around the artboard, to get the menu for the view. A right-click on an empty area does not clear the selection, so while objects are selected the menu for the selection opens there instead.
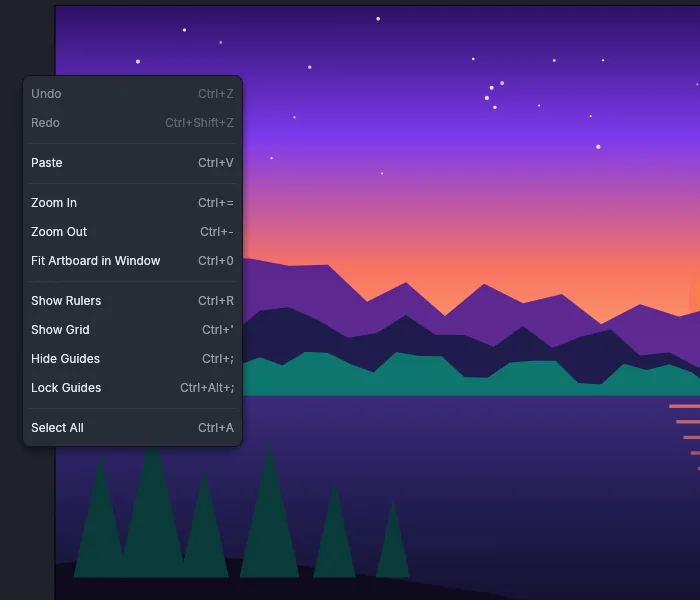
| Item | Same as |
|---|---|
| Undo, Redo | Edit → Undo, Edit → Redo |
| Paste | Edit → Paste. It appears when VectorCraft’s clipboard or the system clipboard holds something to paste |
| Zoom In, Zoom Out, Fit Artboard in Window | The same commands in the View menu |
| Show Rulers | View → Rulers → Show Rulers |
| Show Grid | View → Show Grid |
| Hide Guides, Lock Guides | View → Guides → Hide Guides, View → Guides → Lock Guides |
| Select All | Select → All |
The four view items change their names to match what they will do. When the rulers are showing, the menu has Hide Rulers, and when the guides are locked, it has Unlock Guides. Set up documents and artboards describes rulers, guides and the grid.
With a selection
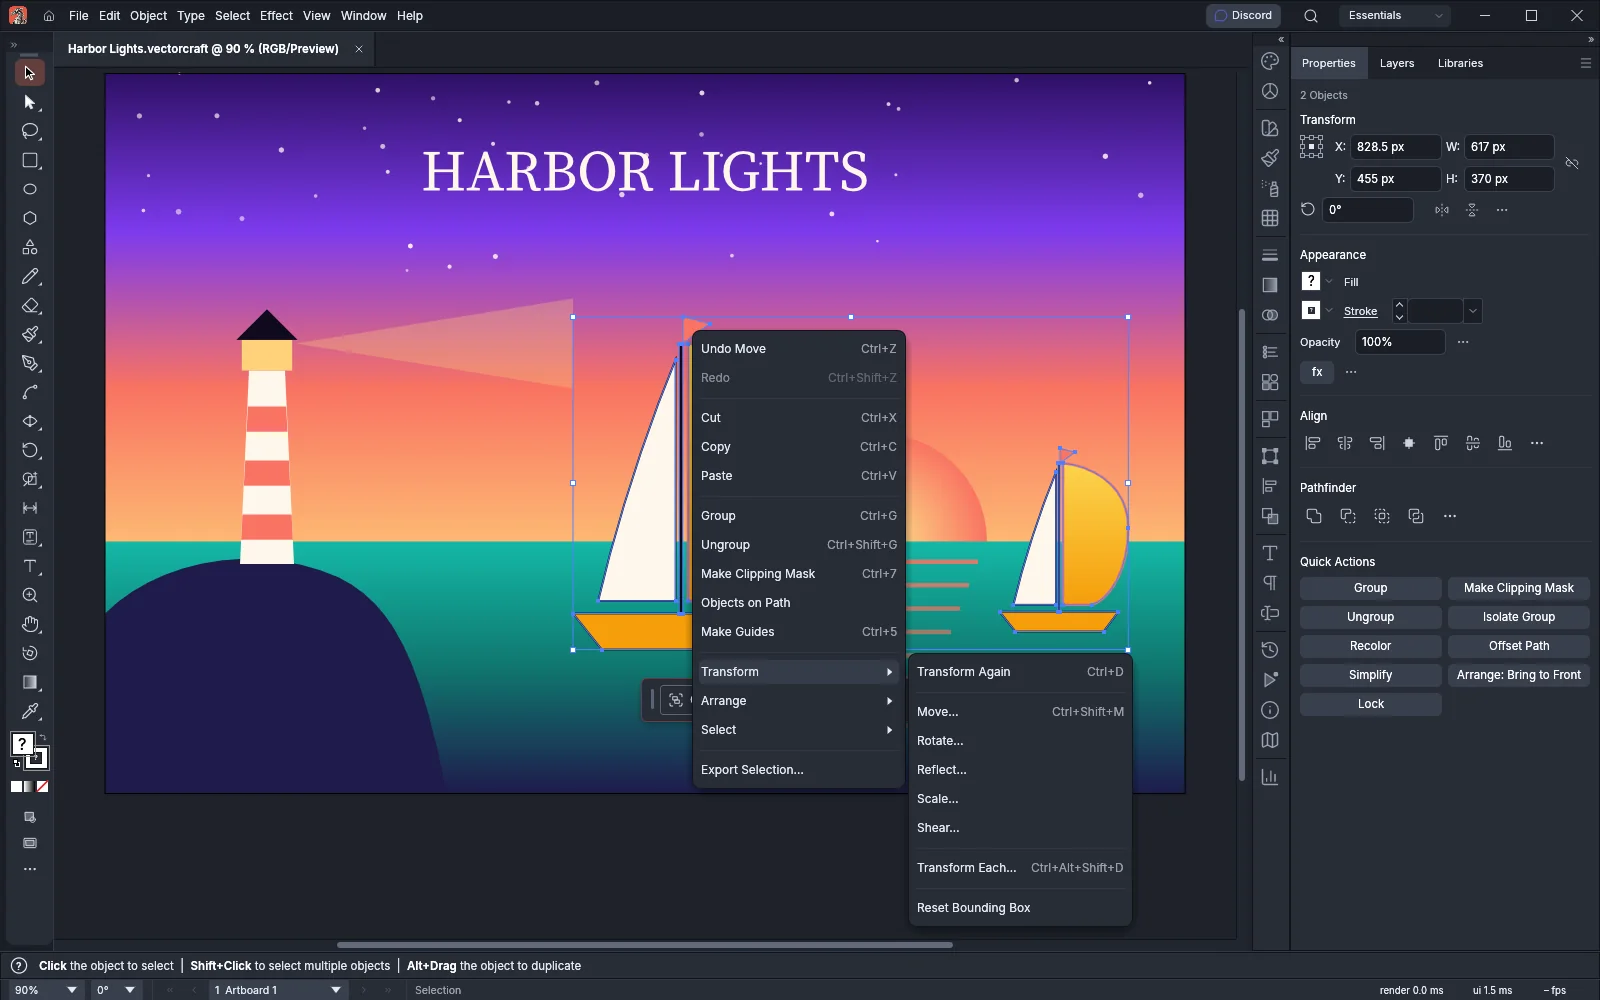
Section titled “With a selection”With objects selected, the menu starts with Cut, Copy and Paste (Edit → Cut, Copy and Paste). The items after them depend on what is selected, and they appear in the order of this table.
| Item | Shown when | Same as | Guide |
|---|---|---|---|
| Isolate Selected Group | One object is selected and it holds other objects: a group, a clipping group, a compound path or an Intertwine group | Double-clicking the group with the Selection tool | Arrange, group and align |
| Group | Two or more objects are selected | Object → Group | Arrange, group and align |
| Ungroup | The selection includes a group that is not a clipping group | Object → Ungroup | Arrange, group and align |
| Join, Average… | The selection includes a path | Object → Path → Join, Object → Path → Average… | Draw and edit paths |
| Remove Anchor Points, Cut Path at Selected Anchor Points | Anchor points are selected with the Direct Selection tool | Object → Path → Remove Anchor Points. Cut Path at Selected Anchor Points has no menu-bar item; the Control bar has a button for it | Draw and edit paths |
| Make Clipping Mask | Two or more objects are selected | Object → Clipping Mask → Make | Combine and cut shapes |
| Release Clipping Mask | The selection includes a clipping group | Object → Clipping Mask → Release | Combine and cut shapes |
| Make Compound Path | Two or more objects are selected, and at least one of them is a path | Object → Compound Path → Make | Combine and cut shapes |
| Objects on Path | Two or more objects are selected. The item chooses the Objects on Path tool; click a path with it to attach the selection to that path | Object → Objects on Path → Attach | Make patterns, blends and repeats |
| Release Compound Path | The selection includes a compound path | Object → Compound Path → Release | Combine and cut shapes |
| Bullets and Numbering | Type is selected. See Over type and misspelled words | Type → Bullets and Numbering | Make lists and fit type |
| Spelling | Type is selected | Edit → Spelling | Check spelling |
| Make Guides | Always | View → Guides → Make Guides | Set up documents and artboards |
| Transform | Always. The submenu holds Transform Again, Move…, Rotate…, Reflect…, Scale…, Shear…, Transform Each… and Reset Bounding Box | Object → Transform | Draw and transform shapes |
| Arrange | Always, except in the Intertwine menu. The submenu holds Bring to Front, Bring Forward, Send Backward, Send to Back and Send to Current Layer | Object → Arrange | Arrange, group and align |
| Select | Always. The submenu holds Next Object Above, Next Object Below and Deselect | The same commands in the Select menu | Select artwork |
| Export Selection… | Always | File → Export Selection… | Slice artwork for the web |
For example, with two groups selected, the menu has Group, Ungroup, Make Clipping Mask and Objects on Path. With one path selected, it has Join and Average… but not Group.
Over locked objects and in isolation mode
Section titled “Over locked objects and in isolation mode”When you right-click over one or more locked objects, an Unlock submenu appears after Undo and Redo. It lists each locked object under the pointer by the name the Layers panel shows for it. Choose an object to unlock it, as the lock column of the Layers panel does. Because a locked object cannot be selected, a right-click on it selects the unlocked object underneath, if there is one.
In isolation mode, Exit Isolation Mode appears after Undo and Redo, whether or not anything is selected. The rest of the menu follows the rules above for the objects inside the isolated group. You can also press Esc to leave isolation mode, as Arrange, group and align describes.
Over type and misspelled words
Section titled “Over type and misspelled words”When type is selected, or when you right-click while you edit type with the Type tool, the menu adds two submenus:
- Bullets and Numbering holds Apply Bullets and Apply Numbers, which make the selected paragraphs a list, as Type → Bullets and Numbering does.
- Spelling holds Auto Spell Check, with a check mark while it is on. It turns the red underline under misspelled words on or off, as Edit → Spelling → Auto Spell Check does.
While Auto Spell Check is on, a right-click on an underlined word puts the dictionary’s suggestions at the top of the menu. Click a suggestion to replace the word in one undo step. When the dictionary has no suggestion, the menu shows No Suggestions. Ignore All and Add to Dictionary follow, then the rest of the menu. Check spelling explains each choice and the custom dictionary.
With the Intertwine tool
Section titled “With the Intertwine tool”With an Intertwine group selected and the Intertwine tool chosen, right-click an area where three or more of the group’s objects overlap. The menu then has Bring to Front, Bring Forward, Send Backward and Send to Back after Undo and Redo. Each one moves the object nearest to the pointer, in that overlap area only. The Arrange submenu, which moves objects in the whole stack, is left out of this menu.
Where only two objects overlap, the menu is the ordinary menu for the selection, with the Arrange submenu. Ungroup is not offered for an Intertwine group. Make patterns, blends and repeats describes how to make and edit an Intertwine group.
With the Artboard tool
Section titled “With the Artboard tool”With the Artboard tool, the menu acts on artboards instead of objects. A right-click on an artboard that is not selected selects only that artboard first. The menu can hold these items, in this order:
- Cut, Copy and Paste
- Undo and Redo
- New Artboard, Duplicate Artboards, Rename, Delete Artboards and Delete Empty Artboards
- Select All Artboards, and the Lock Artboards and Unlock Artboards submenus
- Rearrange, Fit to Artwork Bounds, Switch Orientation and Artboard Options
- Export, which opens Export for Screens with the selected artboards chosen
In isolation mode, Exit Isolation Mode follows them, and over locked objects the Unlock submenu comes last. Manage artboards describes each item and when it appears.
On the rulers
Section titled “On the rulers”Right-click either ruler, or the box where the two rulers meet, to change the document’s units. The menu lists Points, Picas, Inches, Millimeters, Centimeters, Pixels, Feet & Inches, Meters, Yards and Feet, with a check mark next to the current unit. Choosing a unit changes the document’s units, as Preferences → Units does.
To show the rulers, choose View → Rulers → Show Rulers (Ctrl+R, or Cmd+R on macOS).