
Rotate, reflect, scale and shear objects
This guide shows how to rotate, reflect, scale and shear objects with the four transform tools and the Object → Transform dialogs: setting the reference point, rotating about a corner, making a mirrored copy, scaling by an exact amount, shearing a shadow, transforming selected anchor points, and varying many objects at once with Transform Each.
Shortcuts are written for Windows and Linux first, then macOS.
Set the reference point
Section titled “Set the reference point”Every transform tool turns, flips, resizes or slants the selection about a reference point. The point starts at the center of the selection and shows as a cyan target.
- Select the objects. See Select and move objects.
- Pick a tool: R for the Rotate tool, O for the Reflect tool or S for the Scale tool. The Reflect tool shares a slot with the Rotate tool. The Shear tool has no key and shares a slot with the Scale tool.
- Click where the point should go. When Smart Guides or Snap to Point is on and you click close to an anchor point or center of the selection or of the object under the pointer, the point snaps to it. A click away from those points keeps the clicked position. While you hover, a label shows whether the point would snap to an anchor or a center. With both turned off, the point stays where you click.
- To open the tool’s dialog with the point set, Alt-click (Option-click on macOS) instead. Double-click or press Enter to open the dialog with the current point.
The status bar shows the tool’s keys: Click to set the reference point, Drag to transform, and Alt+Click for exact values.
The point applies only to the selection you set it for. When you select other objects, the point returns to the center of the new selection.
Rotate about a point
Section titled “Rotate about a point”To turn a windmill sail about the hub:
- Select the sail and press R.
- Click the hub. The cyan target snaps to the nearest anchor point or center there.
- Drag the far end of the sail. A dashed line runs from the reference point to the pointer, and a readout beside the pointer shows the angle.
- Hold Shift while you drag to turn in 45° steps.
- Release the mouse button. To keep the original and rotate a copy, hold Alt (Option on macOS) as you release.
Press Esc before you release to cancel the drag. The Transform Tools setting in the Smart Guides preferences turns the readout on and off. It is on by default.
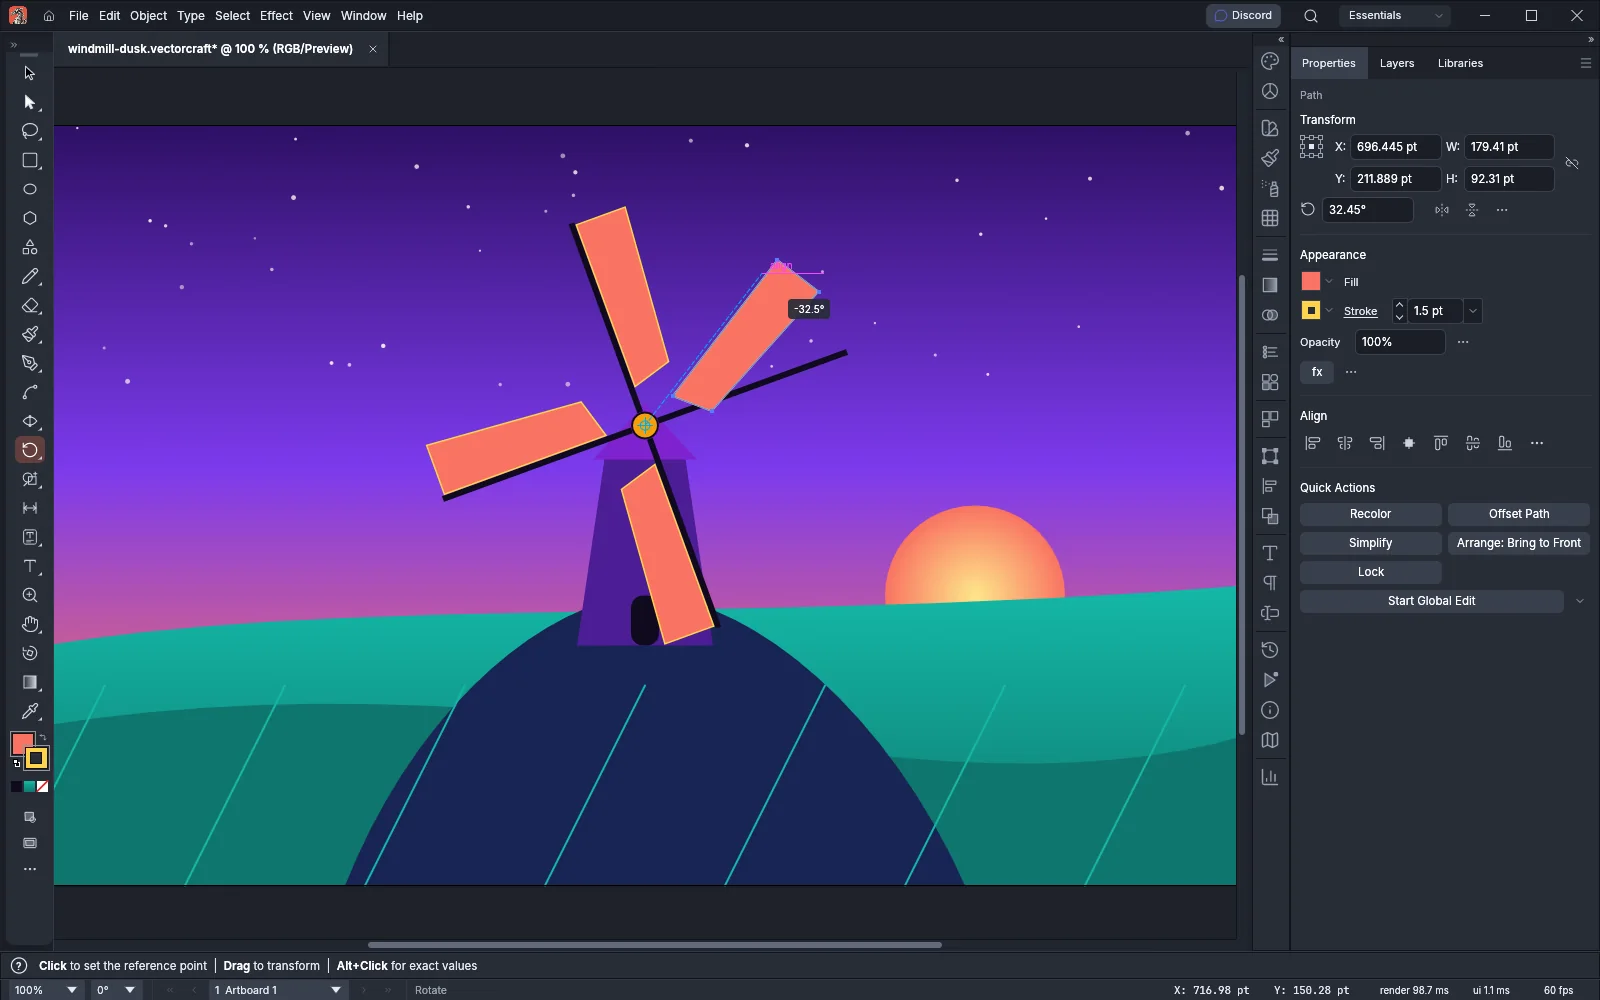
To rotate by an exact angle, Alt-click (Option-click on macOS) the hub instead of dragging. The Rotate dialog opens with the hub as the reference point. Type the Angle, which turns the selection counterclockwise, and click OK. Object → Transform → Rotate… opens the same dialog and rotates about the center of the selection.
Make a mirrored copy
Section titled “Make a mirrored copy”To finish a symmetric drawing, draw one half and reflect a copy of it across the center line:
- Draw the left half, for example the left wings of a butterfly, and select it.
- Press O for the Reflect tool.
- Alt-click (Option-click on macOS) the center line. The Reflect dialog opens with that point as the reference point.
- Leave Axis at Vertical (Angle 90°). A vertical axis mirrors the selection left to right.
- Select Copy (make a transformed copy), then select Preview to see the mirrored half on the canvas. The preview selects the copy, so the cyan target moves to the center of the copy. The dialog still reflects across the point you clicked.
- Click OK. The copy is selected.
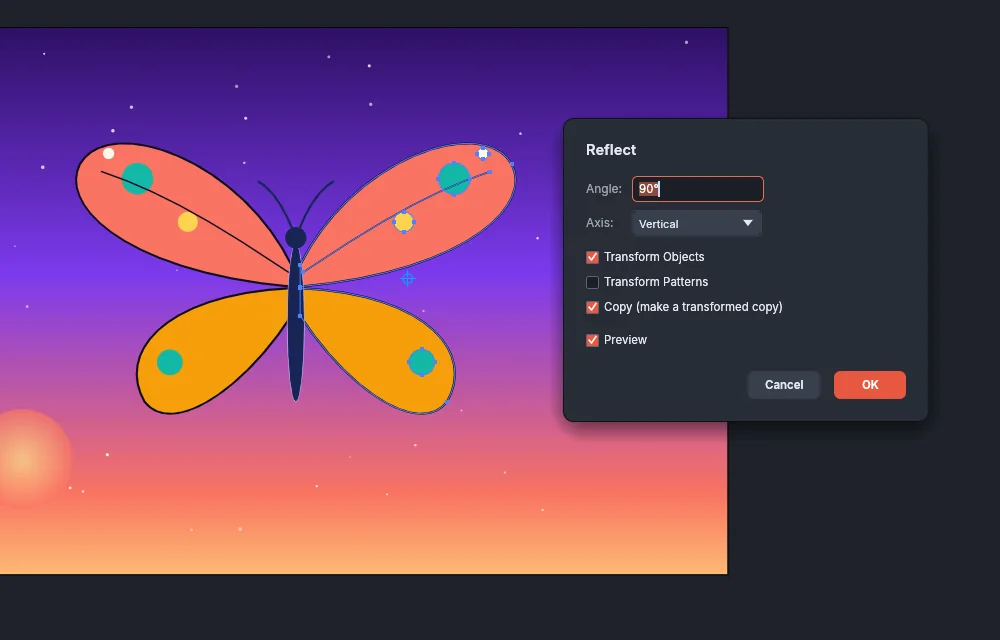
Axis also takes Horizontal, which flips the selection top to bottom, and Angle, which reflects across a line at the angle you type. To join the two halves into one path, see Cut, join and refine paths.
You can also drag with the Reflect tool. The axis runs through the reference point toward the pointer. Hold Shift to turn the axis in 45° steps, and hold Alt (Option on macOS) as you release to reflect a copy.
Scale by an exact amount
Section titled “Scale by an exact amount”- Select the objects and press S.
- Alt-click (Option-click on macOS) the point that should stay in place, for example the bottom-left corner. The Scale dialog opens with that point as the reference point. Object → Transform → Scale… opens the same dialog and scales about the center of the selection.
- To scale both directions by the same amount, leave Uniform selected and type the percentage in Horizontal %.
- To stretch or squash the selection, clear Uniform and type different values in Horizontal % and Vertical %.
- Click OK.
Scale Corners and Scale Strokes & Effects start from the preferences, and OK saves your choice back to them. See Transform strokes, corners and patterns.
To scale by dragging, drag away from the reference point or toward it. Hold Shift to scale uniformly. The readout shows the width and height as percentages. The pointer snaps to the anchor points, centers and edges of other objects when Smart Guides is on, so a corner dragged onto another object’s anchor point lands on it exactly.
Shear a shadow
Section titled “Shear a shadow”A cast shadow is a flattened copy of a figure, slanted along the ground:
- Select the figure and press Ctrl+C, then Ctrl+B (Cmd+C, then Cmd+B on macOS). Edit → Paste in Back puts the copy just behind the figure, in the same place.
- Give the copy a dark fill and set Opacity to 40% in the Properties panel.
- Press O, Alt-click (Option-click on macOS) the feet, choose Axis Horizontal and click OK. The copy now hangs below the feet.
- Press S, Alt-click (Option-click on macOS) the feet, clear Uniform, set Vertical % to 45% and click OK. The copy lies flat on the ground.
- Pick the Shear tool from the Scale tool’s slot, and click the feet to set the reference point there.
- Drag the far end of the shadow sideways. A mostly horizontal drag shears horizontally, and a mostly vertical drag shears vertically. The readout shows the shear angle.
- Hold Shift to keep the drag on that axis and keep the height of the shadow (horizontal shear) or its width (vertical shear).
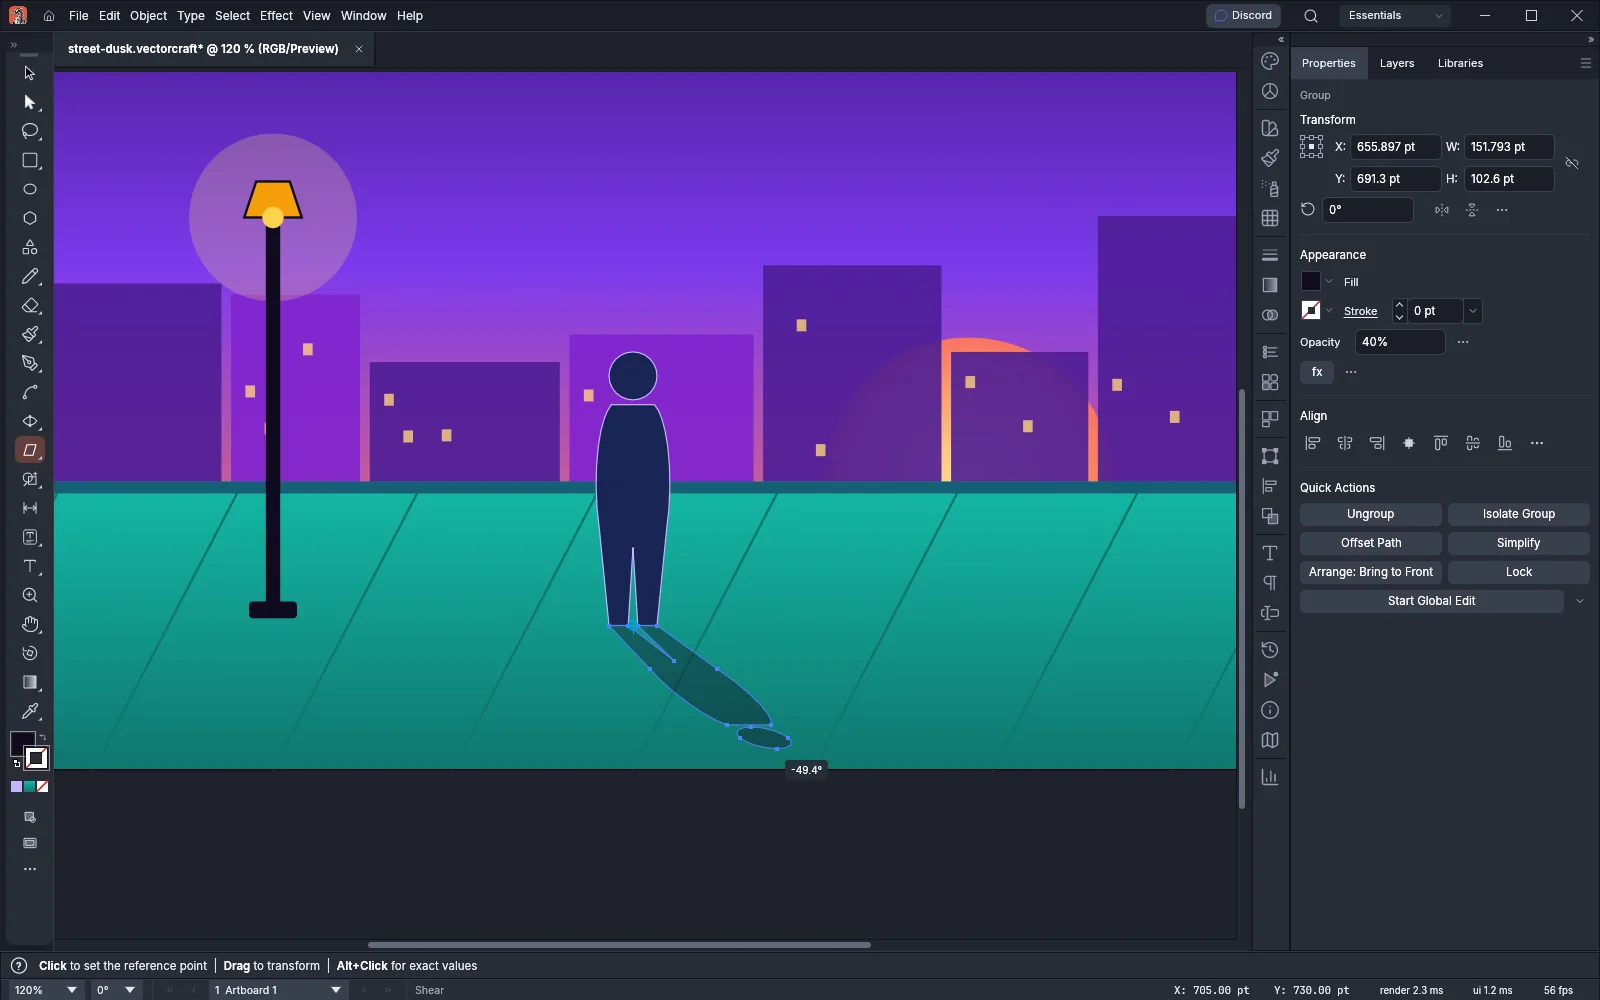
To shear by an exact angle, Alt-click with the Shear tool, or choose Object → Transform → Shear…. The Shear dialog has Angle and Axis (Horizontal or Vertical).
Transform selected anchor points
Section titled “Transform selected anchor points”When anchor points are selected with the Direct Selection tool (A), the transform tools move those anchor points and their handles alone. The reference point starts at the center of the selected anchor points.
- Press A and select some anchor points, for example the two top anchors of a rectangle. See Draw and edit paths.
- Press S and drag one of the selected anchor points sideways, away from the center of the top edge. The top edge widens and the bottom edge stays where it was, so the rectangle becomes a trapezoid.
The Rotate, Reflect and Shear tools work on selected anchor points the same way.
Vary many objects with Transform Each
Section titled “Vary many objects with Transform Each”Transform Each transforms every selected object about a point of its own bounding box. With Random, each object gets its own values.
- Select the objects, for example fifteen fireflies.
- Choose Object → Transform → Transform Each… or press Ctrl+Alt+Shift+D (Cmd+Option+Shift+D on macOS).
- Set Scale Horizontal and Vertical to 140% and the Rotate Angle to 30°.
- Select Random. Each object then gets a horizontal scale and a vertical scale between 100% and 140%, each drawn separately, so an object can also stretch more one way than the other. Each object also gets an angle between −30° and 30°. Move values vary between the negative and the positive of the value.
- Select Preview, at the left of the buttons, to see the result.
- Click OK, or click Copy to transform a copy of each object and leave the originals in place.
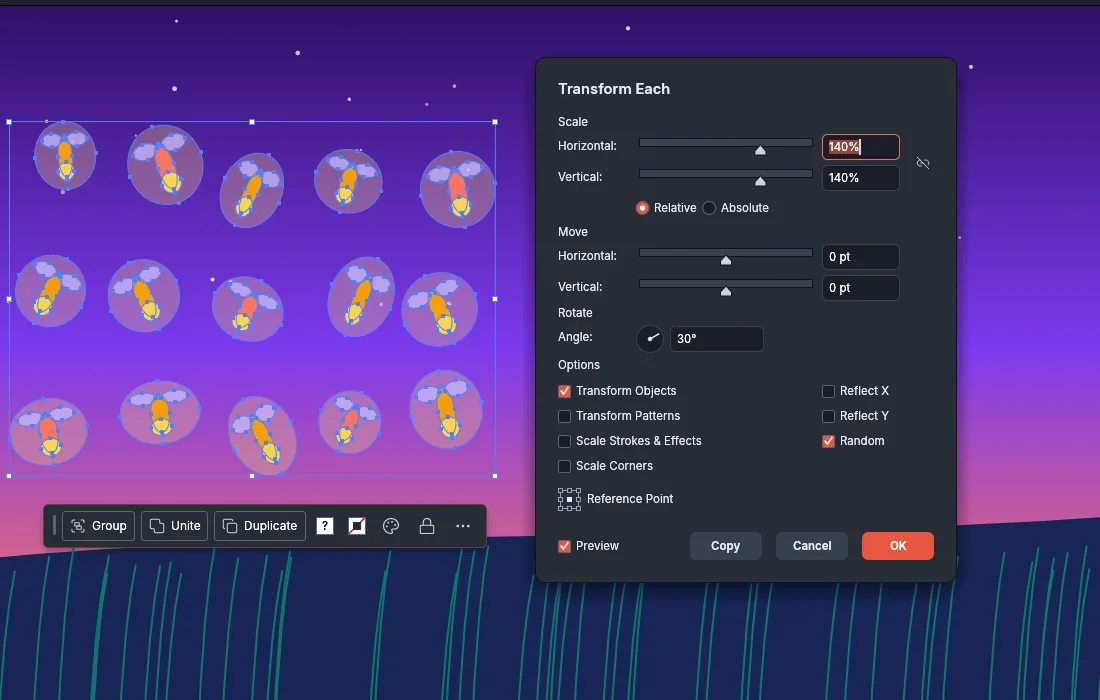
Reflect X flips each object left to right, and Reflect Y flips each one top to bottom. The Reference Point grid picks the point of each bounding box that the object transforms about. The dialog opens with the scale, move, rotate, reflect, Random, Reference Point, Transform Objects and Preview values you last confirmed with OK or Copy. Transform Patterns, Scale Strokes & Effects and Scale Corners start from the preferences each time it opens. The full list of options is in Draw and transform shapes.
Options in every transform dialog
Section titled “Options in every transform dialog”Each dialog has its own fields. The dialogs open with these values each time, whether you open them from Object → Transform or with a tool:
| Dialog | Option | Default | What it does |
|---|---|---|---|
| Rotate | Angle | 0° | Turns the selection counterclockwise by this angle. |
| Reflect | Axis | Vertical | Vertical mirrors the selection left to right, Horizontal flips it top to bottom, and Angle reflects it across a line at the angle you type. |
| Reflect | Angle | 90° | The angle of the reflection axis. |
| Scale | Uniform | On | Scales both directions by the Horizontal % value. |
| Scale | Horizontal % and Vertical % | 100 | The width and height as a percentage of the current size. |
| Scale | Scale Corners and Scale Strokes & Effects | From the preferences | Scale live corner radii, and stroke weights and effects, with the objects. |
| Shear | Angle | 0° | The shear angle. |
| Shear | Axis | Horizontal | Horizontal slants the selection sideways, and Vertical slants it up or down. |
The four dialogs also share these options:
| Option | Default | What it does |
|---|---|---|
| Transform Objects | On | Transforms the objects. When you clear it and leave Transform Patterns on, only the pattern tiles transform. With both cleared, nothing transforms. |
| Transform Patterns | From the Transform Pattern Tiles preference | Transforms pattern fills and strokes with the objects. |
| Copy (make a transformed copy) | Off | Transforms a copy and leaves the original in place. |
| Preview | Off | Shows the result on the canvas as you change the values. |
In an angle or percentage field, Up Arrow and Down Arrow change the value by 1, and Shift+Up Arrow and Shift+Down Arrow change it by 10. With Preview on, the canvas follows each step.
Cancel removes the preview. OK applies the transform as one undo step. To repeat it on the current selection, choose Object → Transform → Transform Again or press Ctrl+D (Cmd+D on macOS). To build a rosette or a ring of copies with Transform Again, see Draw and transform shapes. For repeats that stay live and editable, see Make patterns, blends and repeats.
Shortcuts
Section titled “Shortcuts”| Command or tool | Windows and Linux | macOS |
|---|---|---|
| Rotate Tool | R | R |
| Reflect Tool | O | O |
| Scale Tool | S | S |
| Direct Selection Tool | A | A |
| Open the tool’s dialog at a point | Alt-click | Option-click |
| Open the tool’s dialog at the current point | Enter, or double-click | Return, or double-click |
| Transform a copy | Alt while you release | Option while you release |
| Constrain to 45° or uniform scale | Shift while you drag | Shift while you drag |
| Cancel a drag | Esc | Esc |
| Move… | Ctrl+Shift+M | Cmd+Shift+M |
| Transform Again | Ctrl+D | Cmd+D |
| Transform Each… | Ctrl+Alt+Shift+D | Cmd+Option+Shift+D |
| Paste in Back | Ctrl+B | Cmd+B |
All shortcuts are listed in Keyboard shortcuts.