Lay out pages with guides
This page shows how to build margin, column and row guides for a page layout, place single guides at exact positions, keep guides on their own layer, change how they look, and turn them back into paths or delete them.
To drag guides out of the rulers, see Use rulers, guides and grids.
Make margin guides from a rectangle
Section titled “Make margin guides from a rectangle”View → Guides → Make Guides turns the selected paths into guides that keep their shape. A rectangle becomes a margin guide around the page.
- Choose the Rectangle tool and click the artboard once without dragging. In the Rectangle dialog, type the page width less two margins for Width and the page height less two margins for Height, and click OK. For a 540 × 540 pt page with 36 pt margins, type 468 pt for both.
- Place the rectangle at the margins. In the Transform panel (Window → Transform, or Shift+F8), set the top-left reference point and type the margin for X and Y, for example 36 pt.
- Choose View → Guides → Make Guides (Ctrl+5, or Cmd+5 on macOS). You can also right-click the selected rectangle and choose Make Guides.
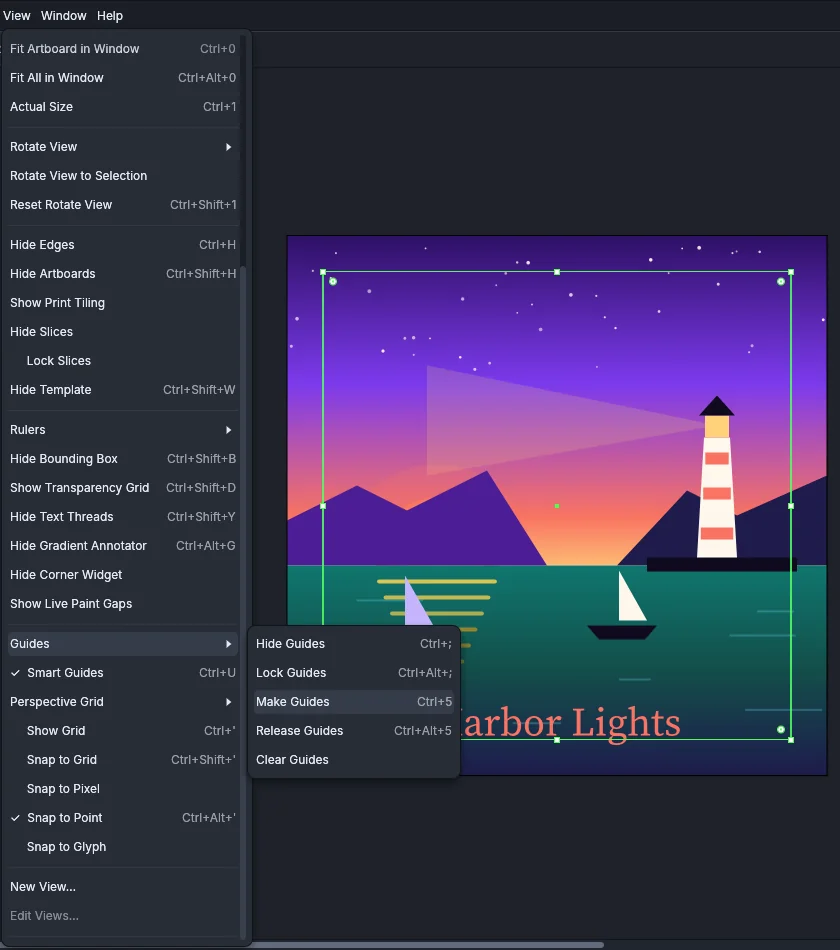
The rectangle becomes a guide in the guide color, and nothing stays selected. Make Guides also converts the paths inside a selected group. It does not convert clipping paths or type. If the selection holds no path that it can convert, no guide is made.
Make column and row guides
Section titled “Make column and row guides”Object → Path → Split Into Grid… divides a rectangle into rows and columns. With Add Guides on, it also places a ruler guide along each edge of the rows and columns, so the grid and its margins become guides.
- Draw a rectangle at the margins of the page, as in the previous section. The cells that Split Into Grid makes keep the rectangle’s fill and stroke.
- Choose Object → Path → Split Into Grid….
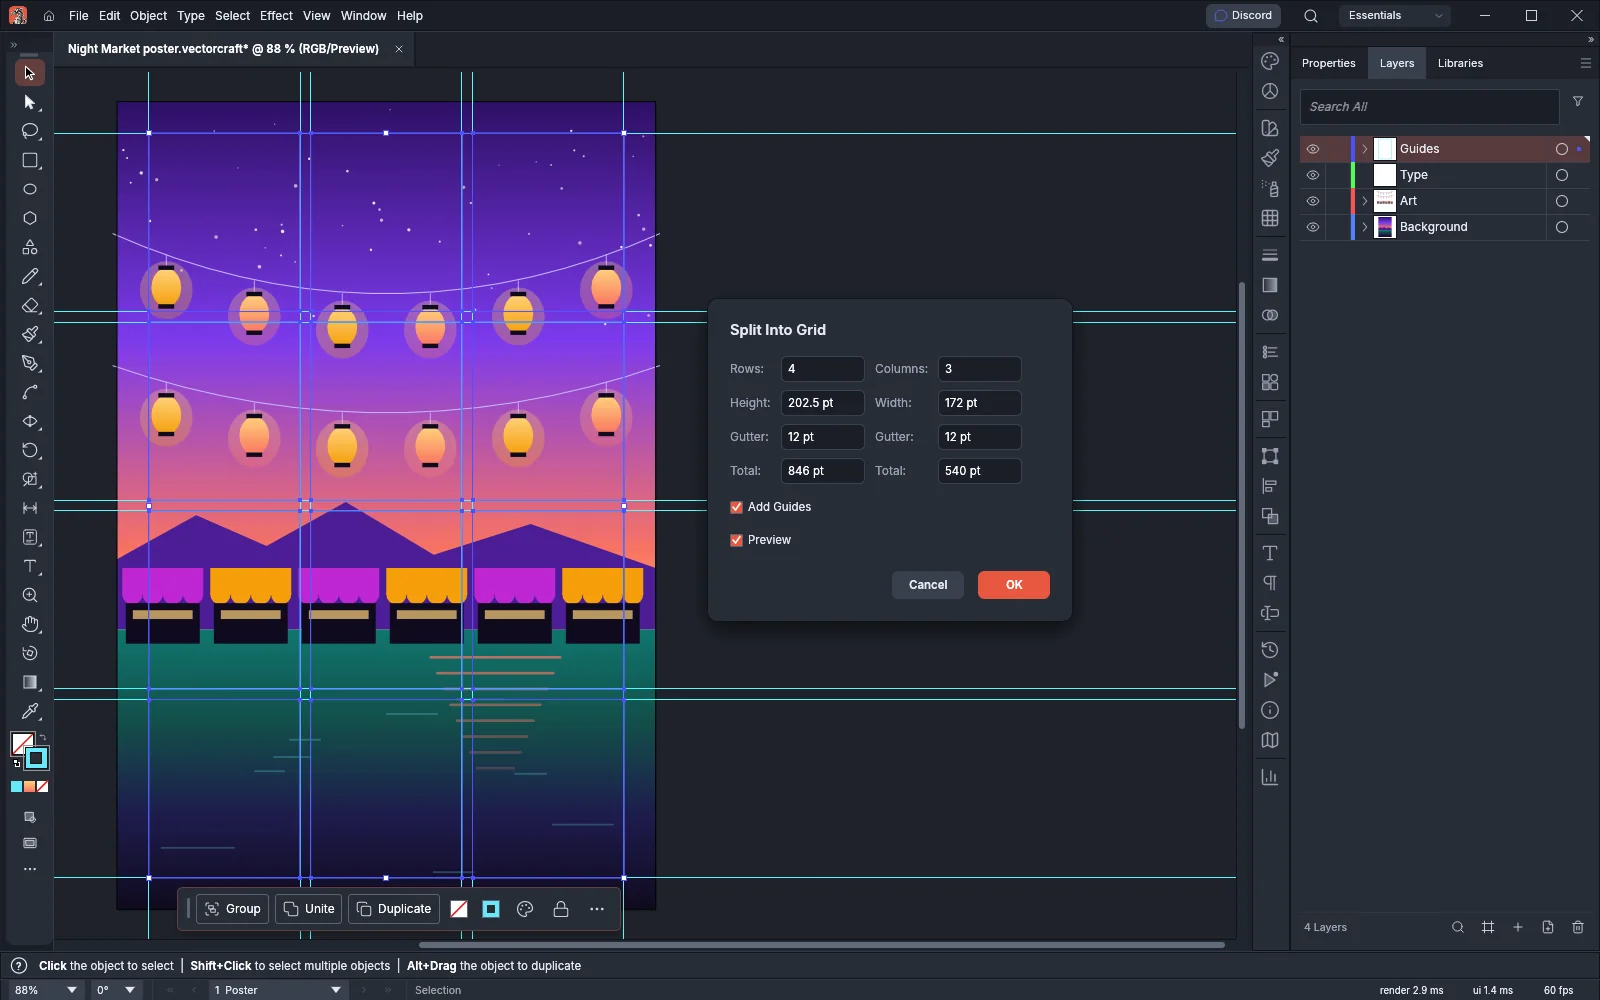
- Set Rows and Columns, and the Gutter for each, as the following table describes.
- Turn on Add Guides.
- Turn on Preview to see the cells on the canvas.
- Click OK. The rectangle is replaced by one rectangle for each cell, and the cells are selected.
- To keep only the guides, press Delete. The cells are deleted and the guides stay.
| Option | Default | What it sets |
|---|---|---|
| Rows and Columns | 2 | The number of rows and columns, from 1 to 500 |
| Height and Width | Set by the totals | The size of each row and each column. Typing a value changes the total |
| Gutter | 12 pt | The space between rows, and the space between columns |
| Total | The height and width of the selection | The size of the whole grid, measured from its top-left corner |
| Add Guides | Off | Places a ruler guide along each row edge and each column edge. With a gutter of 0, two neighboring cells share one guide |
For example, a 540 × 846 pt rectangle with 4 rows, 3 columns and 12 pt gutters makes 172 pt columns and 202.5 pt rows. Add Guides places 6 vertical guides and 8 horizontal guides.
The guides that Split Into Grid adds are canvas guides on the layer of the rectangle. They run across the whole canvas, past the edges of the artboard.
Put guides at exact positions
Section titled “Put guides at exact positions”The Transform panel and the Transform section of the Properties panel show the position of selected ruler guides.
- With the Selection tool, click a guide. Shift-click more guides to add them, or drag a marquee across the guides you want.
- Make sure no art is selected. The guide fields show only while guides alone are selected.
- In the Transform panel, type a value for X to move the selected vertical guides, or for Y to move the selected horizontal guides, and press Enter.
The positions are measured on the rulers, from the ruler origin. With several guides selected, X shows the leftmost vertical guide and Y shows the topmost horizontal guide. A new value moves every selected guide of that direction by the same distance. A field is unavailable when no guide of its direction is selected.
Artboard guides and canvas guides
Section titled “Artboard guides and canvas guides”A canvas guide runs across the whole canvas. An artboard guide runs across one artboard only, and it moves, is copied and is deleted with that artboard. Use artboard guides when a document has several pages that need their own layouts.
- A guide that you drag out of a ruler is a canvas guide.
- With the Artboard tool, a guide that you drag out of a ruler belongs to the active artboard.
- With Artboard Guides with Cmd/Ctrl + Ruler Drag turned on in Preferences → Guides & Grid, hold Ctrl (Cmd on macOS) as you start the drag to make the other kind.
- Guides from Split Into Grid are canvas guides.
Keep guides on their own layer and lock them
Section titled “Keep guides on their own layer and lock them”Each ruler guide is on a layer. When you hide, lock or delete the layer, its guides are hidden, locked or deleted with it. A guide on a hidden or locked layer can’t be selected or moved.
- In the Layers panel, create a layer, name it Guides and drag it to the top of the list.
- Click the Guides layer to make it the current layer. New guides go on the current layer, and Split Into Grid puts its guides on the layer of the rectangle you split.
- To move guides that are already on another layer, drag their <Horizontal Guide> and <Vertical Guide> rows onto the Guides layer’s row.
- Click the lock column of the Guides layer to lock it.
To lock every guide in the document at once, choose View → Guides → Lock Guides (Ctrl+Alt+;, or Cmd+Option+; on macOS). The command then reads Unlock Guides. Locking deselects any selected guides. A guide that you drag out of a ruler while guides are locked is still made. Lock Guides by Default in Preferences → Guides & Grid starts VectorCraft with the guides locked.
To hide every guide, choose View → Guides → Hide Guides (Ctrl+;, or Cmd+; on macOS). The command then reads Show Guides.
For more about layers, see Organize with layers and symbols.
Place art on the guides
Section titled “Place art on the guides”- Make sure the guides are shown. If the View → Guides submenu shows Show Guides, choose View → Guides → Show Guides.
- With the Selection tool, drag the art toward a guide.
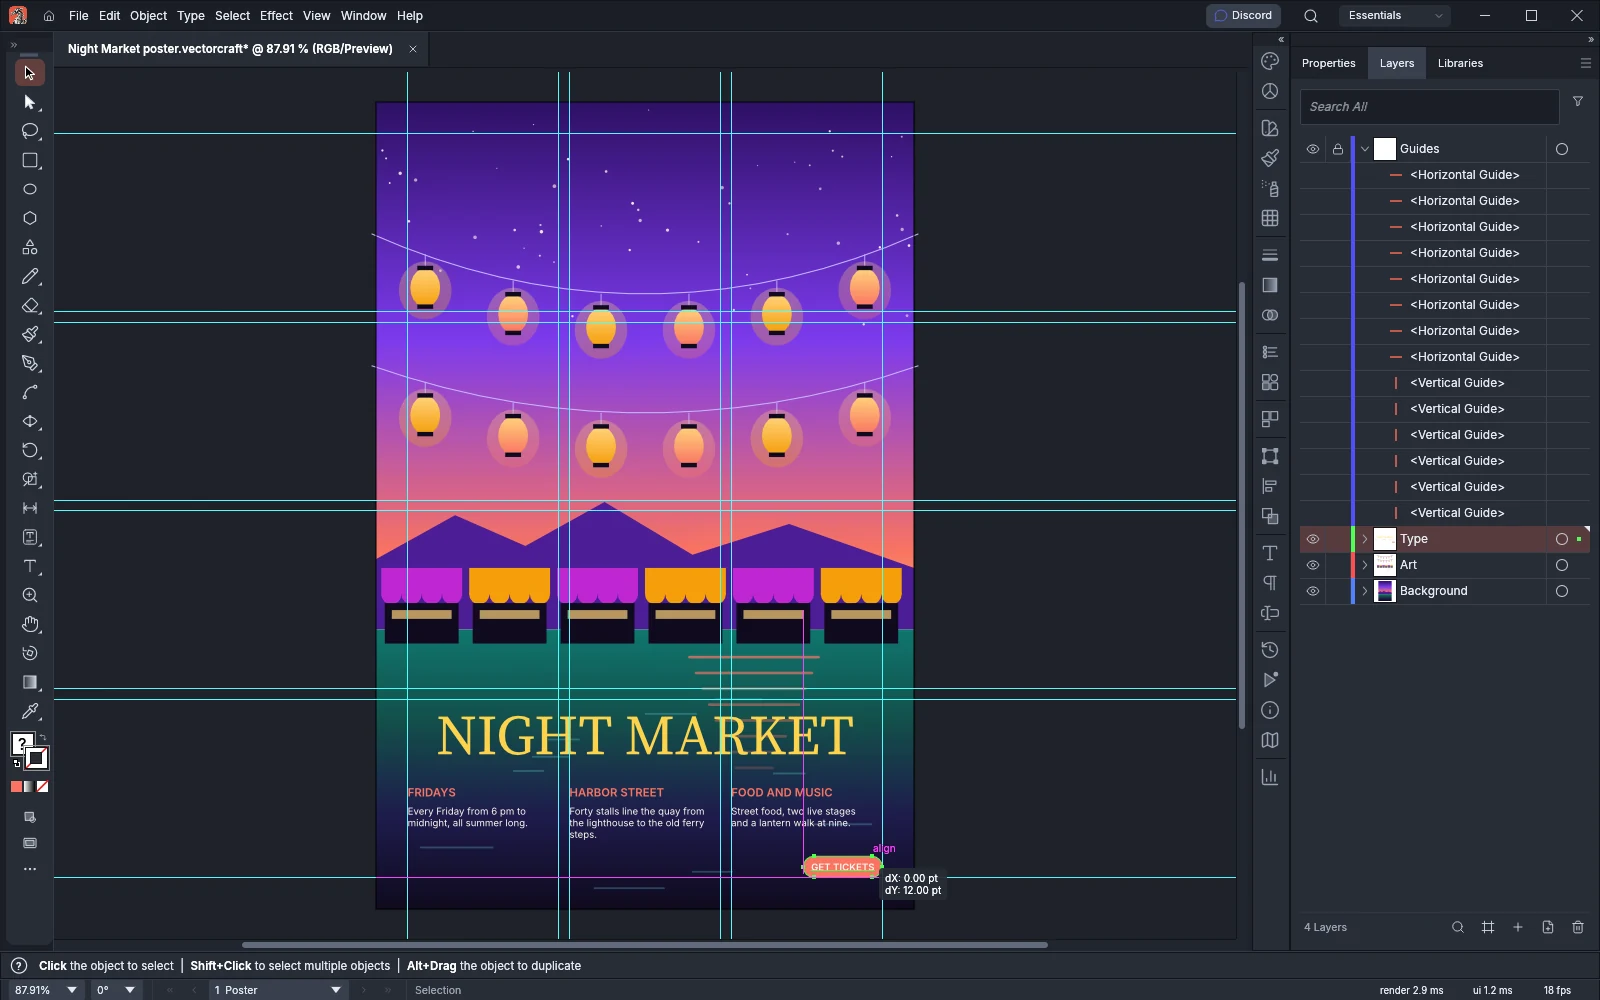
- When an edge or the center of the art comes close to a guide, it snaps to the guide, and the Smart Guides show an alignment line and the label align. Release the mouse button.
By default, View → Smart Guides and View → Snap to Point are on and View → Snap to Grid is off. With these settings, the edges and the center of the dragged art snap to the guides, and the label align shows. If another object’s edge lines up with the art at the same time, the art snaps to that object instead. If you turn View → Smart Guides off and leave View → Snap to Point on, the edges and center no longer snap. The point that you grab snaps to the guide instead. While View → Snap to Grid is on, art does not snap to the guides at all. Art still snaps to guides on a locked layer, but not to guides on a hidden layer. While View → Guides → Lock Guides is on, art does not snap to the guides. For more about snapping, see Snap and align with Smart Guides.
Change the look of guides
Section titled “Change the look of guides”- Choose Edit → Preferences… (Ctrl+K). On macOS, choose VectorCraft → Settings → General… (Cmd+K).
- Click the Guides & Grid page.
- Under Guides, click the Color button and pick a color. The default is #4affff, a light cyan.
- Set Style to Lines for solid guides or Dots for dotted guides. The default is Lines.
- Click OK.
The color and style apply to the guides in every open document.
Release or clear guides
Section titled “Release or clear guides”View → Guides → Release Guides (Ctrl+Alt+5, or Cmd+Option+5 on macOS) turns guides back into paths, in one undo step.
- With guides selected, it releases those guides.
- With no guide selected, it releases every guide that was made from a path with Make Guides. Ruler guides stay as they are.
- Guides on a locked layer are not released.
- A guide made from a path gets its shape back as a path.
- A ruler guide becomes a straight path with no fill or stroke. An artboard guide’s path runs across its artboard, and a canvas guide’s path runs across all the artboards.
- The released paths are selected afterward.
To release one guide, hold Ctrl+Shift (Cmd+Shift on macOS) and double-click it with the Selection tool. This works while guides are shown and unlocked.
View → Guides → Clear Guides deletes every ruler guide and every guide made from a path in the document. It has no shortcut. To delete one ruler guide, select it and press Delete, or drag it back onto its ruler.