
Manage graphic styles
This guide covers the Graphic Styles panel beyond applying a style: naming and renaming styles, changing a style so that every object that uses it updates, duplicating, merging and deleting styles, unlinking objects, the panel’s views, and the graphic style libraries. Apply effects and appearance shows how to build a look and save it as a style for the first time.
Open the panel with Window → Graphic Styles (Shift+F5). A new document starts with four styles: Default Graphic Style, Black Outline, Heavy Ink and Sunshine.
Make a named graphic style
Section titled “Make a named graphic style”- Select the object whose look you want to save. A style stores the object’s fills, strokes, effects, opacity, blend mode, isolate and knockout settings.
- Choose New Graphic Style… from the panel menu, or Alt-click the New Graphic Style button at the bottom of the panel (Option-click on macOS).
- In Graphic Style Options, type a name in Style Name:. The Style Name: field starts with “Graphic Style” and a number.
- Press OK. The style appears at the end of the panel, and the selected object is linked to it.
A plain click on the New Graphic Style button makes the style at once with the proposed name. You can also drag art from the canvas, or the thumbnail at the top of the Appearance panel, onto the Graphic Styles panel.
To rename a style, double-click it, or select it in the panel and choose Graphic Style Options… from the panel menu. Type the new name and press OK. Each name must be unique: when another style already has the name, VectorCraft shows an error and the dialog stays open. Objects linked to the style stay linked after a rename.
Apply a style
Section titled “Apply a style”| To | Do this |
|---|---|
| Apply a style and link the selection to it | Click the style |
| Add a style’s fills, strokes and effects on top of the selection’s own appearance | Alt-click the style (Option-click on macOS). The objects are not linked |
| Apply a style to one object | Drag the style from the panel onto the object |
| Set the style for the next object you draw | Deselect everything (Select → Deselect), then click the style |
| See a style at a larger size | Hold the right mouse button on the style. The preview uses the selected object when there is one |
| Apply a style from the Control bar | Open the Style picker on the Control bar and click a style |
Change a style and every object that uses it
Section titled “Change a style and every object that uses it”You can change a style by changing one object that uses it and then redefining the style from that object.
- Select an object that is linked to the style.
- Open the Appearance panel with Window → Appearance (Shift+F6) and change the object’s fills, strokes, effects or opacity.
- Open the Appearance panel menu and choose Redefine Graphic Style “name”, where name is the style that the object was last linked to.
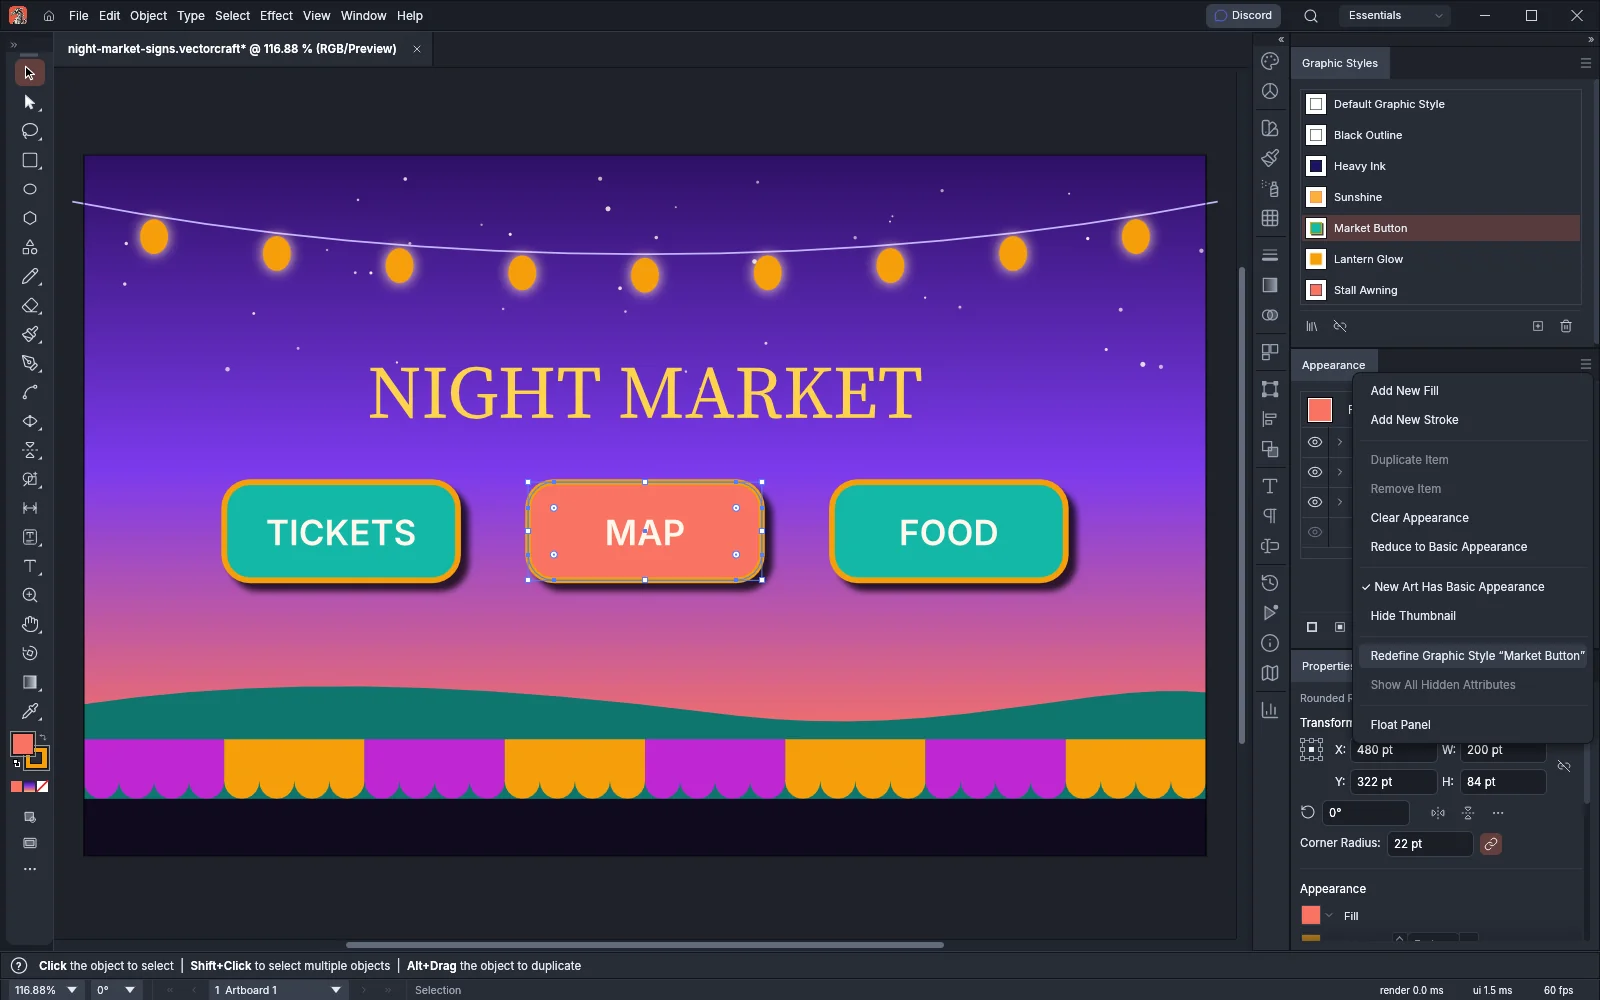
The style takes the selected object’s new look. Every other object that is linked to the style and still matches it changes to the new look. In this example TICKETS and FOOD turn coral as well. A linked object that you had edited on its own is unlinked instead and keeps its look.
The top row of the Appearance panel names the style when the selected object is linked to it and still matches it, for example “Rounded Rectangle: Market Button”.
Duplicate, merge and delete styles
Section titled “Duplicate, merge and delete styles”First select styles in the Graphic Styles panel without applying them. Ctrl-click a style (Cmd-click on macOS) to add it to the panel’s selection or remove it. Shift-click a style to add to the panel’s selection every style from the last style you clicked without Shift through that one. A plain click also selects a style, but it applies the style to any selected art as well.
- Duplicate Graphic Style copies the one selected style. The copy is named “name copy” and appears right after the original.
- Merge Graphic Styles needs two or more selected styles. In Graphic Style Options, type a name for the result and press OK. The new style appears at the end of the panel. It has the fills, strokes and effects of every selected style. VectorCraft stacks them in panel order, so each style’s rows go on top of the rows of the styles before it. It takes its opacity, blend mode, isolate and knockout settings from the selected style that comes first in the panel, whatever order you clicked them in.
- Delete Graphic Style removes the selected styles. Choose it from the panel menu or click the trash icon at the bottom of the panel. VectorCraft asks you to confirm, naming the style or giving the number of styles. Alt-click the trash icon (Option-click on macOS) to delete without the question. Objects that used a deleted style keep their look and are no longer linked.
To clean up a document, choose Select All Unused from the panel menu. It selects every style that no object is linked to. Then choose Delete Graphic Style.
Sort by Name puts the styles in alphabetical order. Default Graphic Style stays first. To move one style, drag it to a new place in the list.
Unlink an object from its style
Section titled “Unlink an object from its style”An object stays linked to a style until you break the link. When you redefine the style, VectorCraft also changes every linked object that still matches the old look.
- Select the objects.
- Choose Break Link to Graphic Style from the panel menu, or click the Break Link to Graphic Style button at the bottom of the panel.
The objects keep their look. Later changes to the style no longer change them.
To find every object that uses a style, select one of them and choose Select → Same → Graphic Style. VectorCraft selects the objects that are linked to the same style as the first selected object. Select artwork describes the other Select → Same commands.
Change how the panel shows styles
Section titled “Change how the panel shows styles”The panel menu has three views and two preview shapes. Each one is a check item, and the current choice has a check mark.
| Menu item | What the panel shows |
|---|---|
| Thumbnail View | A grid of thumbnails. This is the default |
| Small List View | One row per style with a small thumbnail and the style’s name |
| Large List View | One row per style with a larger thumbnail and the style’s name |
| Use Square for Previews | Each style drawn on a square. This is the default |
| Use Text for Previews | Each style drawn on the letters “Aa” |
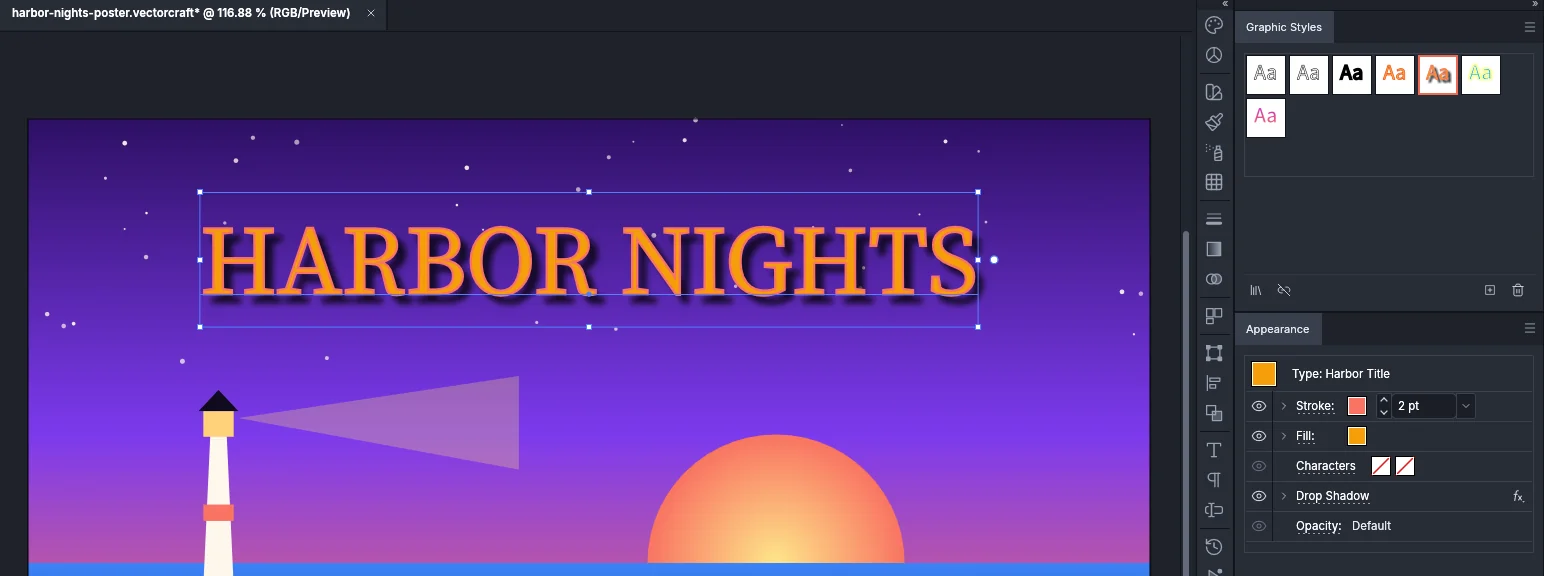
Override Character Color in the panel menu controls how a style applies to type. It is on by default. While it is on, a style with a fill removes the characters’ own fill, and a style with a stroke removes their own stroke. In the HARBOR NIGHTS example, the Characters row in the Appearance panel shows no fill and no stroke, and the style’s fill and stroke paint the title. Turn it off to keep the characters’ own fill and stroke.
Graphic Styles panel menu
Section titled “Graphic Styles panel menu”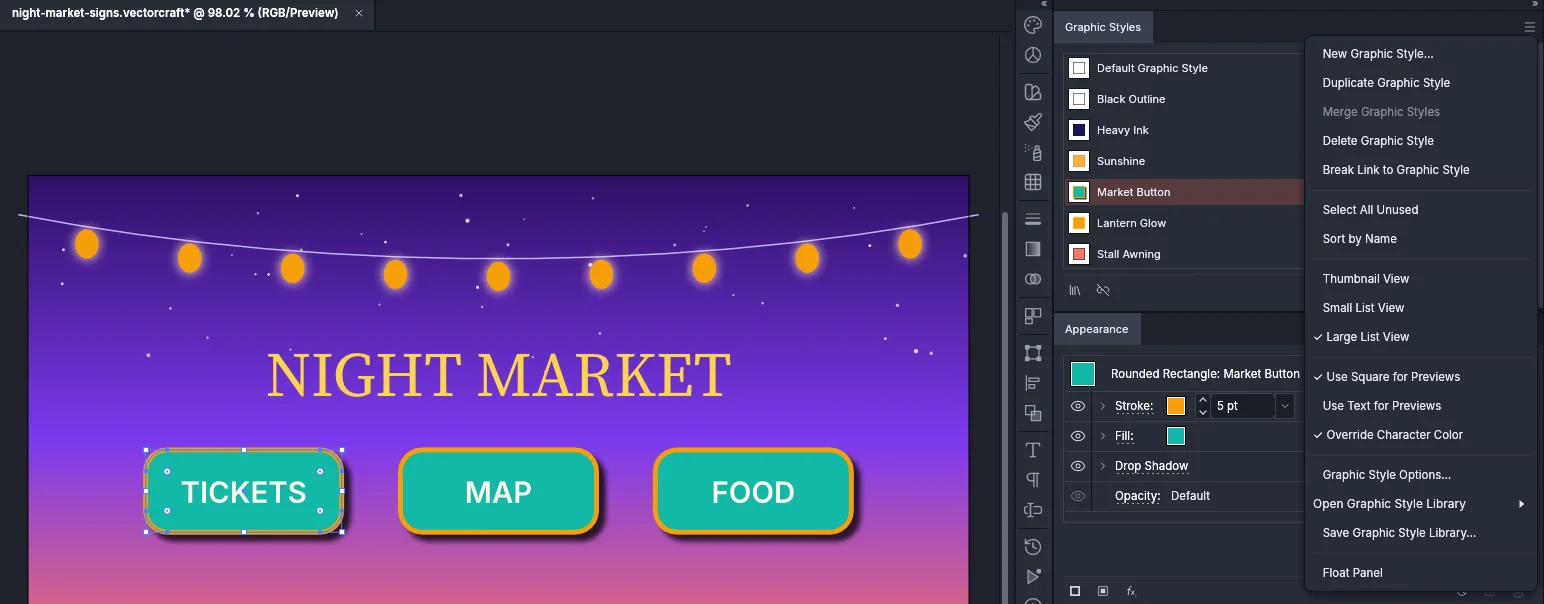
| Item | What it does | Available when |
|---|---|---|
| New Graphic Style… | Makes a style from the selected object and asks for its name | Art is selected |
| Duplicate Graphic Style | Copies the selected style | One style is selected in the panel |
| Merge Graphic Styles | Combines the selected styles into a new style | Two or more styles are selected |
| Delete Graphic Style | Deletes the selected styles after asking | One or more styles are selected |
| Break Link to Graphic Style | Unlinks the selected objects from their style | The selection uses a style |
| Select All Unused | Selects the styles that no object uses | A document is open |
| Sort by Name | Sorts the styles alphabetically | A document is open |
| Thumbnail View, Small List View, Large List View | Change the view | Always |
| Use Square for Previews, Use Text for Previews | Change the preview shape | Always |
| Override Character Color | Lets a style replace the character colors of type | Always |
| Graphic Style Options… | Renames the selected style | One style is selected |
| Open Graphic Style Library | Opens a library in its own panel | Always |
| Save Graphic Style Library… | Saves the document’s styles as a library | A document is open |
The buttons at the bottom of the panel are, from left to right: Graphic Style Libraries Menu, Break Link to Graphic Style, New Graphic Style and Delete Graphic Style.
Use and save graphic style libraries
Section titled “Use and save graphic style libraries”VectorCraft comes with eight graphic style libraries. Open one from Window → Graphic Style Libraries, from Open Graphic Style Library in the panel menu, or from the Graphic Style Libraries Menu button at the bottom of the panel.
| Library | Styles |
|---|---|
| Shadows and Glows | 9 |
| Outlines and Rules | 10 |
| Hand-Drawn | 8 |
| Gradient Finishes | 8 |
| Shape Effects | 9 |
| Blends and Transparency | 9 |
| Game HUD | 6 |
| Status Effects | 6 |
Each library opens in its own panel. To use a style from it:
- Select the art.
- Click the style in the library panel. VectorCraft adds the style to the document’s Graphic Styles panel and applies it, as one step that Edit → Undo reverses. Alt-click (Option-click on macOS) to add the style’s fills, strokes and effects on top of the art’s appearance instead.
To add styles without applying them:
- Ctrl-click (Cmd-click on macOS) or Shift-click the styles in the library panel. These clicks select styles without applying them.
- Click Add to Graphic Styles, the button at the bottom right of the library panel, or choose Add to Graphic Styles from the library panel’s menu.
A style that the document already has, with the same name and the same look, is not added again. When another style in the document already has the name, the added style gets a number, for example “Halo 2”. Patterns that the styles paint with are added too.
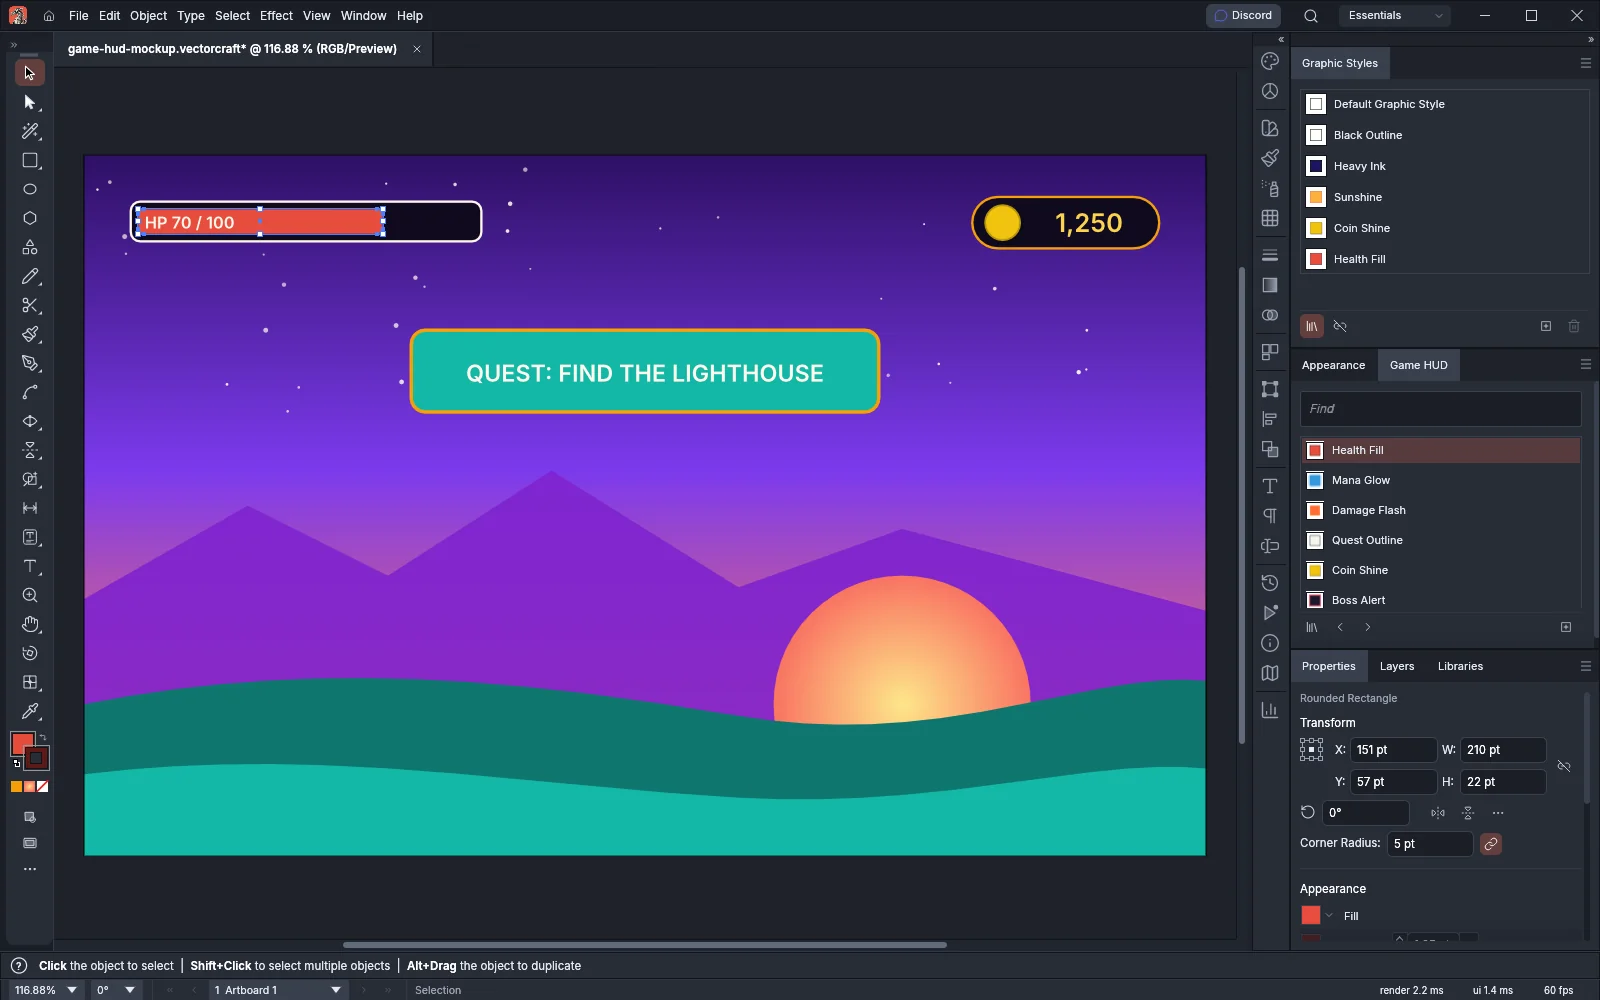
The library panel’s menu has Add to Graphic Styles; Small Thumbnail View, Medium Thumbnail View, Large Thumbnail View, Small List View and Large List View; Show Find Field; Previous Library and Next Library; Persistent; and Close Library. Type in the Find field to show only the styles whose names contain that text.
Save your own library
Section titled “Save your own library”- Optional: select the styles you want to save in the Graphic Styles panel.
- Choose Save Graphic Style Library… from the panel menu, or from Window → Graphic Style Libraries.
- Set the options and press OK.
| Option | What it does |
|---|---|
| Name: | The library’s name. The document’s name is filled in |
| Save To: User Defined Libraries | Saves the library in your user library folder. It is then listed under Window → Graphic Style Libraries → User Defined |
| Save To: A File… | Saves a .vcstyles file wherever you choose |
| Selected Styles Only | Saves only the styles selected in the panel. The number in parentheses is how many are selected |
To open a library that is not in the list, choose Window → Graphic Style Libraries → Other Library…. It opens a .vcstyles file, or the graphic styles of any document that VectorCraft can open. The library stays in the menu until you quit VectorCraft.