Warp and distort with effects
This guide covers the Effect → Warp styles and every effect in Effect → Distort & Transform. These effects change the outline of an object as you see it, while the object keeps its original path. You can change the values or remove the effect later in the Appearance panel, and Object → Expand Appearance makes the result permanent.
Warp an object with a warp style
Section titled “Warp an object with a warp style”A warp bends the whole object, type included, into a preset shape such as an arc, a wave or a flag.
- Select the object or group. To warp type with its background, group them first: choose Object → Group or press Ctrl+G (Cmd+G on macOS).
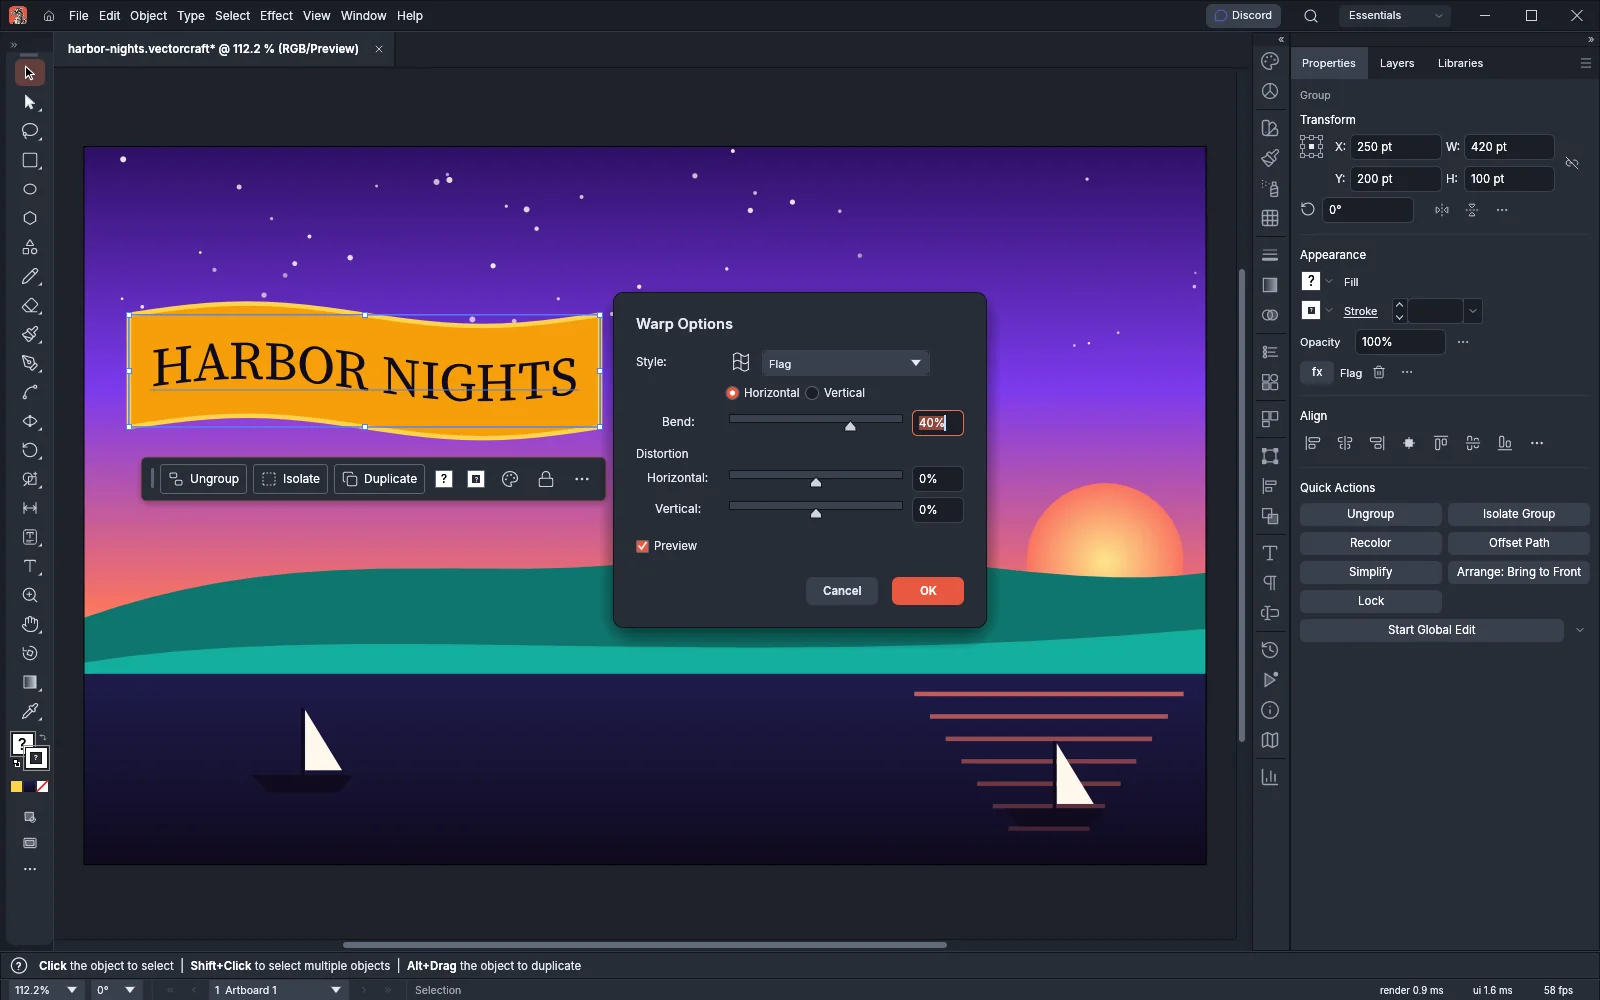
- Choose a style from Effect → Warp, for example Effect → Warp → Flag…. The Warp Options dialog opens.
- Choose Horizontal or Vertical, and drag the Bend slider. With Preview on, the canvas shows the warp as you change the values.
- To lean the result, drag the Horizontal and Vertical sliders under Distortion.
- Click OK.
The type inside a warped group stays editable, and VectorCraft redraws the warp when you change it.
Warp options
Section titled “Warp options”All 15 styles open the same Warp Options dialog. The Style menu shows a small preview of each style, and choosing a different style there changes the effect to that style.
| Option | Default | What it does |
|---|---|---|
| Style | The style you chose | Arc, Arc Lower, Arc Upper, Arch, Bulge, Shell Lower, Shell Upper, Flag, Wave, Fish, Rise, Fisheye, Inflate, Squeeze or Twist. |
| Horizontal / Vertical | Horizontal | Sets the direction in which the style bends the object. |
| Bend | 50% | Sets how far the object bends, from -100% to 100%. A negative value bends the other way. |
| Distortion: Horizontal | 0% | Makes one side of the object taller and the other side shorter, from -100% to 100%. |
| Distortion: Vertical | 0% | Makes the top of the object wider and the bottom narrower, or the other way round, from -100% to 100%. |
After you confirm a warp, the next Warp Options dialog you open starts with the same Bend, distortion and direction values, until you quit VectorCraft.
Distort the outline: Pucker & Bloat, Roughen, Tweak, Twist and Zig Zag
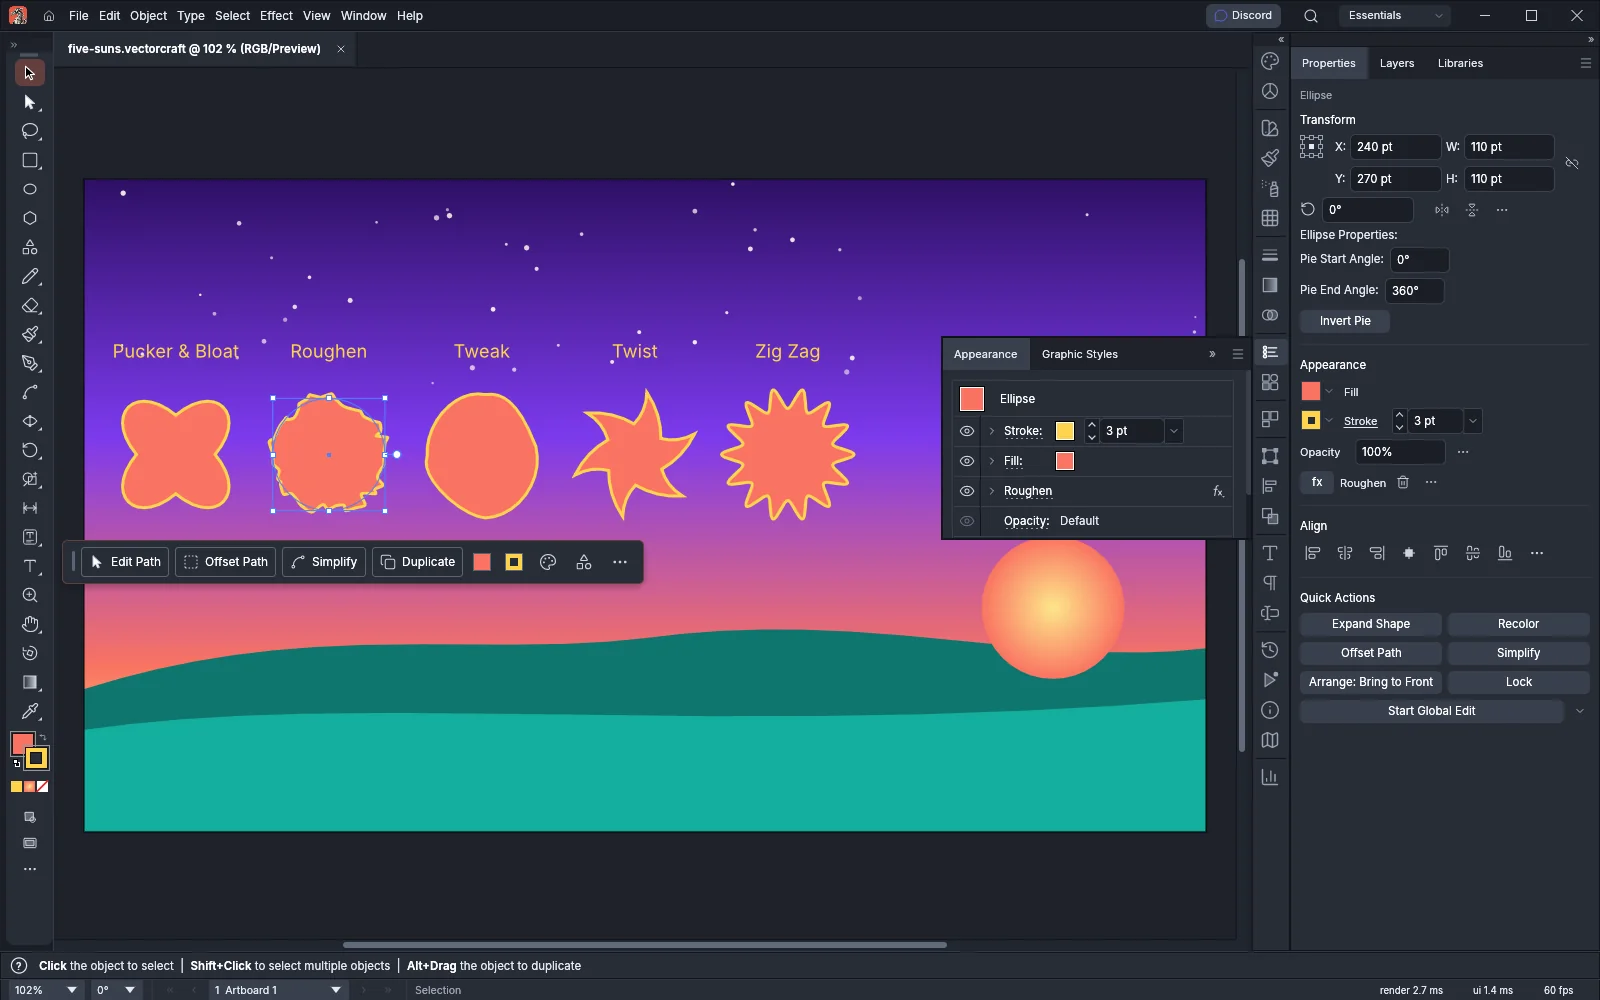
Section titled “Distort the outline: Pucker & Bloat, Roughen, Tweak, Twist and Zig Zag”These five effects move the points of an object’s path. Each one has its own dialog under Effect → Distort & Transform.
- Select the object. To distort only one fill or stroke, click that row in the Appearance panel (Window → Appearance, Shift+F6) first.
- Choose the effect, for example Effect → Distort & Transform → Roughen….
- Set the values while the canvas previews the result.
- Click OK. The effect appears as a row in the Appearance panel.
| Effect | Options and defaults |
|---|---|
| Pucker & Bloat… | Amount 0%, from -200% to 200%. A negative value (Pucker) moves the anchor points out and curves the segments in. A positive value (Bloat) moves the anchor points in and curves the segments out. |
| Roughen… | Size 5%, as Relative (a share of the object’s size) or Absolute (a distance). Detail 10 per inch, from 0 to 100. Points: Smooth (default) gives a wavy edge and Corner a jagged one. |
| Tweak… | Horizontal 10% and Vertical 10%, as Relative or Absolute. Under Modify, choose which points move: Anchor Points, “In” Control Points and “Out” Control Points, all on by default. |
| Twist… | Angle 10°, from -3600° to 3600°. A positive angle turns clockwise. The object turns most at its center, and the turn fades to nothing toward its outer edge. |
| Zig Zag… | Size 10 pt as Absolute (default) or a share of the size as Relative. Ridges per segment 4, from 0 to 100. Points: Smooth for waves or Corner for sharp zigzags. |
In the Roughen, Tweak and Zig Zag dialogs, the Size, Horizontal and Vertical sliders run from 0 to 100. With Relative the value is a percentage of the object’s size, and with Absolute it is a distance.
Move the corners with Free Distort
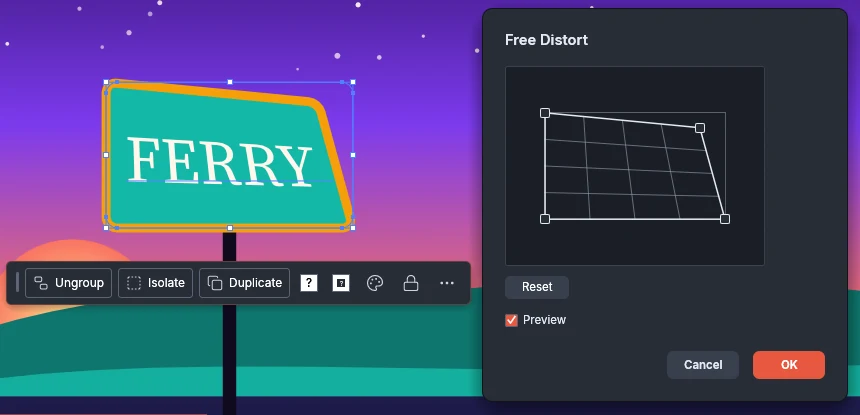
Section titled “Move the corners with Free Distort”Effect → Distort & Transform → Free Distort… drags the four corners of an object’s bounding box to new places, for example to lean a sign in perspective.
- Select the object.
- Choose Effect → Distort & Transform → Free Distort…. The dialog shows a box in the proportions of the object, with a handle on each corner.
- Drag a corner handle to move that corner. To move a handle in small steps, click it and press the arrow keys. Each press moves it 1% of the box, or 10% with Shift held.
- To start again, click Reset.
- Click OK.
Make rows and rings of copies with the Transform effect
Section titled “Make rows and rings of copies with the Transform effect”Effect → Distort & Transform → Transform… scales, moves, rotates and reflects an object, and can repeat that change on copies. The copies stay live. When you change the object or the effect, VectorCraft redraws every copy.
To make a ring of stars around a badge:
- Draw a small star above the center of the badge.
- Draw a circle centered on the badge that reaches past the star, and remove its fill and stroke so it does not print. Select the circle and the star, and group them with Ctrl+G (Cmd+G on macOS). The group’s center is now the badge’s center.
- With the group selected, choose Effect → Distort & Transform → Transform….
- Under Rotate, set Angle to 30°.
- Set Copies to 11, and leave the center of the Reference Point selected.
- Click OK. Eleven rotated copies and the original make a ring of twelve stars.
For a row instead of a ring, set Move values and leave the angle at 0°. Each copy moves by the same amount again.
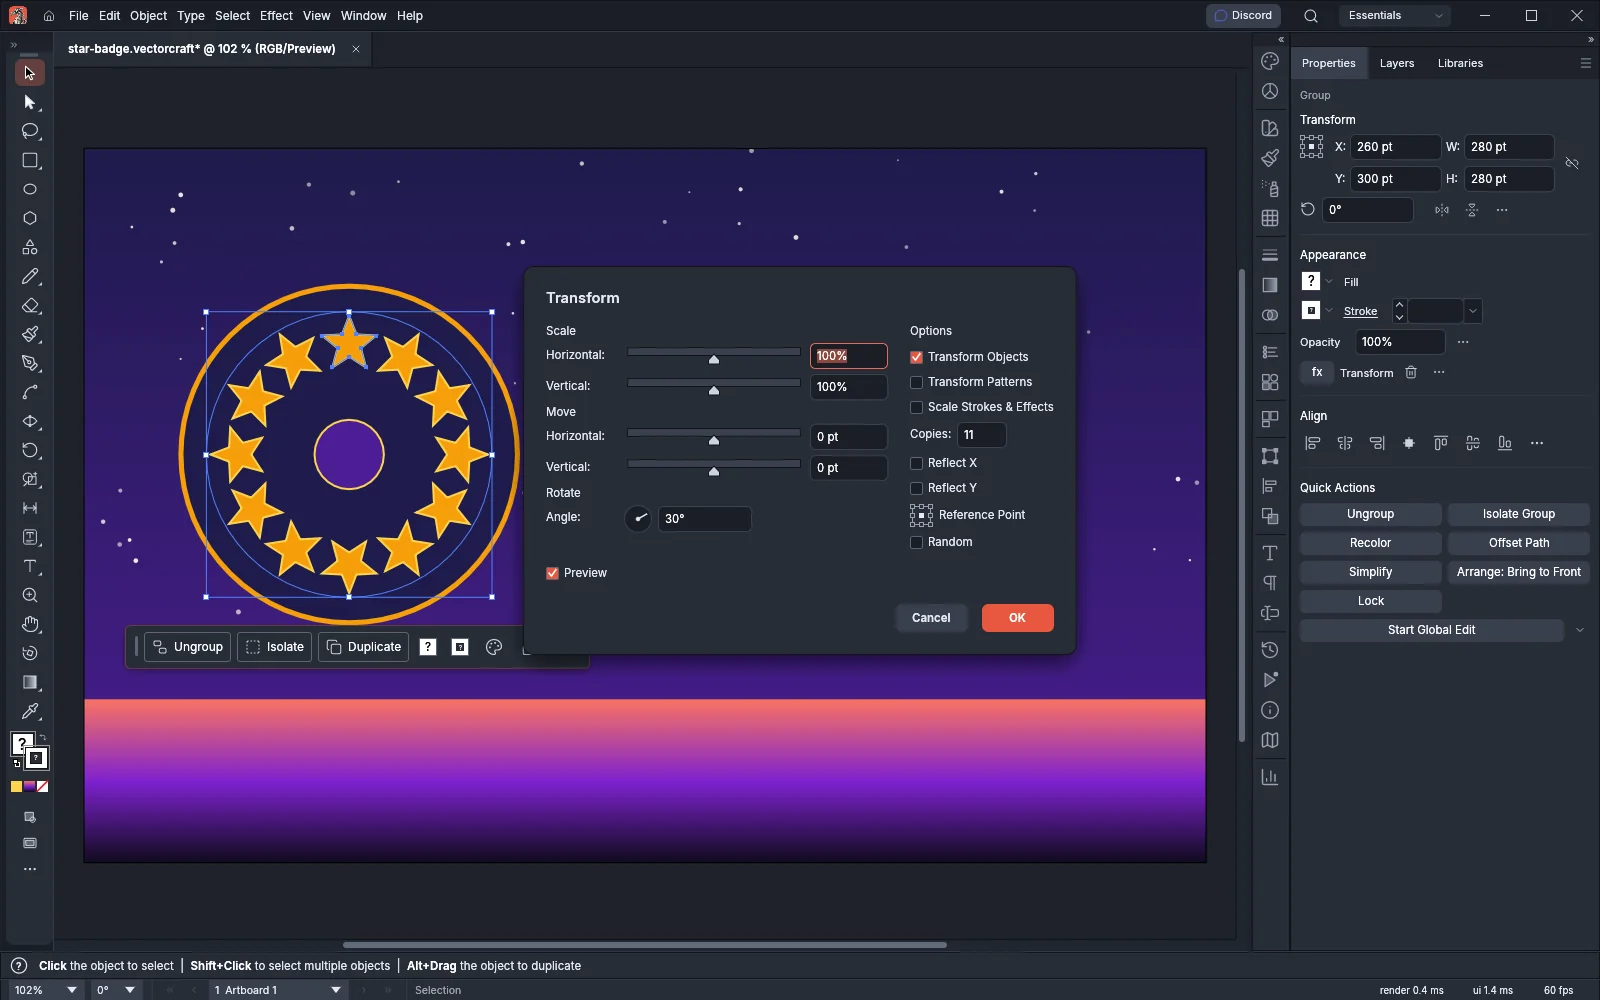
Transform effect options
Section titled “Transform effect options”| Option | Default | What it does |
|---|---|---|
| Scale: Horizontal and Vertical | 100% | Scales the object across and down. The sliders run from 0% to 200%. |
| Move: Horizontal and Vertical | 0 pt | Moves the object right (positive) or left, and down (positive) or up. The sliders run from -1000 pt to 1000 pt, and the fields take larger values. |
| Rotate: Angle | 0° | Rotates the object counterclockwise. Drag the dial or type an angle. |
| Transform Objects | On | Transforms the shape itself. When it is off, the shape stays where it is, no copies are made, and only the two options below apply. |
| Transform Patterns | Off | Transforms pattern fills and strokes with the object. |
| Scale Strokes & Effects | Off | Scales stroke weights, dashes and the distances in other effects along with the object. |
| Copies | 0 | Makes from 0 to 1000 copies. Each copy applies the transformation to the one before it and sits behind it, so the original stays on top. |
| Reflect X | Off | Flips the object from left to right. |
| Reflect Y | Off | Flips the object from top to bottom. |
| Reference Point | Center | Sets the point of the object’s bounding box that it scales, rotates and reflects around. |
| Random | Off | Applies a random share of each scale, move and angle value, different for each object. The result stays the same every time the canvas redraws. |
Warp effect or envelope
Section titled “Warp effect or envelope”The warp effects and Object → Envelope Distort → Make with Warp… use the same Warp Options dialog, but they work differently:
- A warp effect is a row in the Appearance panel. You can apply it to one fill or stroke, save it in a graphic style, and remove it without changing the object.
- An envelope is an object that holds your artwork. You can also make one from a mesh or from a shape on top, and edit the artwork inside it with Edit Contents.
Reshape with the warp tools covers envelopes in full.