
Select and move objects
This guide covers how the Selection tool selects objects and how to move them: clicks and marquees, the bounding box, dragging with snapping and distance guides, nudging with the arrow keys, the Move dialog, and evenly spaced copies with Transform Again.
Select with the Selection tool
Section titled “Select with the Selection tool”- Press V, or click the Selection tool at the top of the Tools panel.
- Click an object to select it. The previous selection is cleared.
- Shift+click another object to add it to the selection. Shift+click a selected object to take it out of the selection.
- To select an object that is hidden behind another one, Ctrl+click it (Cmd+click on macOS). Each Ctrl+click at the same place selects the next object down, and after the bottom object the topmost one is selected again.
- Click an empty part of the canvas to deselect everything.
The Command Click to Select Objects Behind preference turns step 4 on or off. It is on by default.
By default, a click anywhere inside a filled object selects it. Turn on Object Selection by Path Only to select an object only when you click its path. Both settings are on the Selection & Anchor Display page of Preferences (Edit → Preferences…, Ctrl+K). See Preferences for the macOS menu.
Drag a marquee
Section titled “Drag a marquee”- With the Selection tool, press on an empty part of the canvas.
- Drag a rectangle over the objects. A label next to the pointer shows which rule the marquee uses, for example “Touching · E: Fully Enclosed”.
- Release the mouse button. The objects that match the rule are selected.
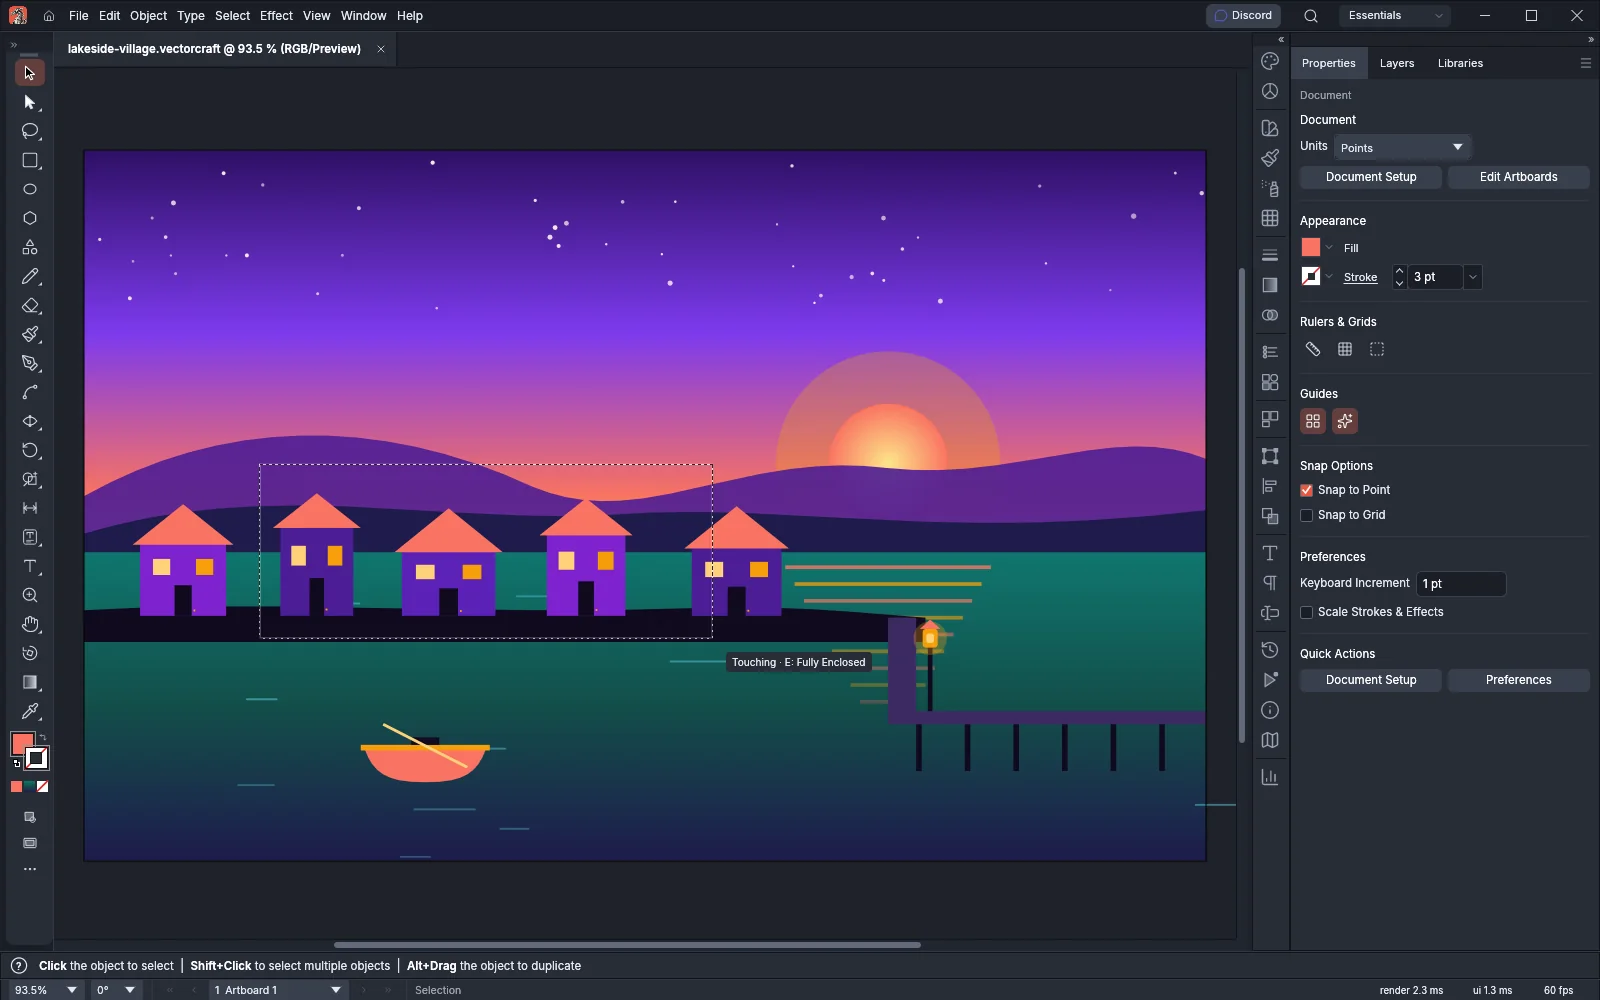
The Marquee Selection preference on the Selection & Anchor Display page sets the rule:
| Marquee Selection | Selects |
|---|---|
| Touching (default) | Every object the marquee touches. The marquee is drawn as a dashed rectangle. |
| Fully Enclosed | Only the objects that lie entirely inside the marquee. The marquee is drawn as a solid outline. |
| Drag Direction | Fully enclosed objects when you drag from left to right on the screen, and touched objects when you drag from right to left. |
While you drag, you can change the result:
- Press E to switch to the other rule for the current drag. Press E again to switch back. The label shows the rule in use.
- Hold Shift as you start the drag to toggle the objects the marquee reaches: selected objects are deselected and the others are selected.
- Press Esc to cancel the marquee. The selection stays as it was before you pressed.
Work with the bounding box
Section titled “Work with the bounding box”A selection shows a bounding box with eight handles. Drag a handle to scale the selection, or drag just outside a corner to rotate it. Draw and transform shapes describes those drags.
After you rotate a selection, its bounding box stays at the rotated angle, and the handles scale the objects along their own axes. To square the box to the page again, choose Object → Transform → Reset Bounding Box. The objects keep their shape and angle, and the reset is one undo step.
To hide the bounding box, choose View → Hide Bounding Box (Ctrl+Shift+B, Cmd+Shift+B on macOS). The menu item then reads Show Bounding Box.
Move objects by dragging
Section titled “Move objects by dragging”- With the Selection tool, press on a selected object, or on an unselected one to select it.
- Drag to move the selection. Release the mouse button to drop it.
While you drag:
- Hold Shift to constrain the move to steps of 45°. The steps are counted from the Constrain Angle on the General page of Preferences, which is 0° by default.
- Hold Alt (Option on macOS) to leave the original in place and move a copy. You can press or release Alt at any time during the drag.
- Press Esc to cancel the move. The art returns to where it was when you pressed.
The selection snaps as it moves. With View → Smart Guides (Ctrl+U, Cmd+U on macOS) on, its bounds line up with the other objects. With Smart Guides off, View → Snap to Point (Ctrl+Alt+‘, Cmd+Option+’ on macOS) lands the point you grabbed on an anchor point or a ruler guide. Both are on by default. When View → Snap to Grid (Ctrl+Shift+‘, Cmd+Shift+’ on macOS) is on, the selection’s edges snap to the grid instead.
Show the distance to another object
Section titled “Show the distance to another object”- Make sure View → Smart Guides is on.
- With an object selected, hold Alt (Option on macOS) and point at another object.
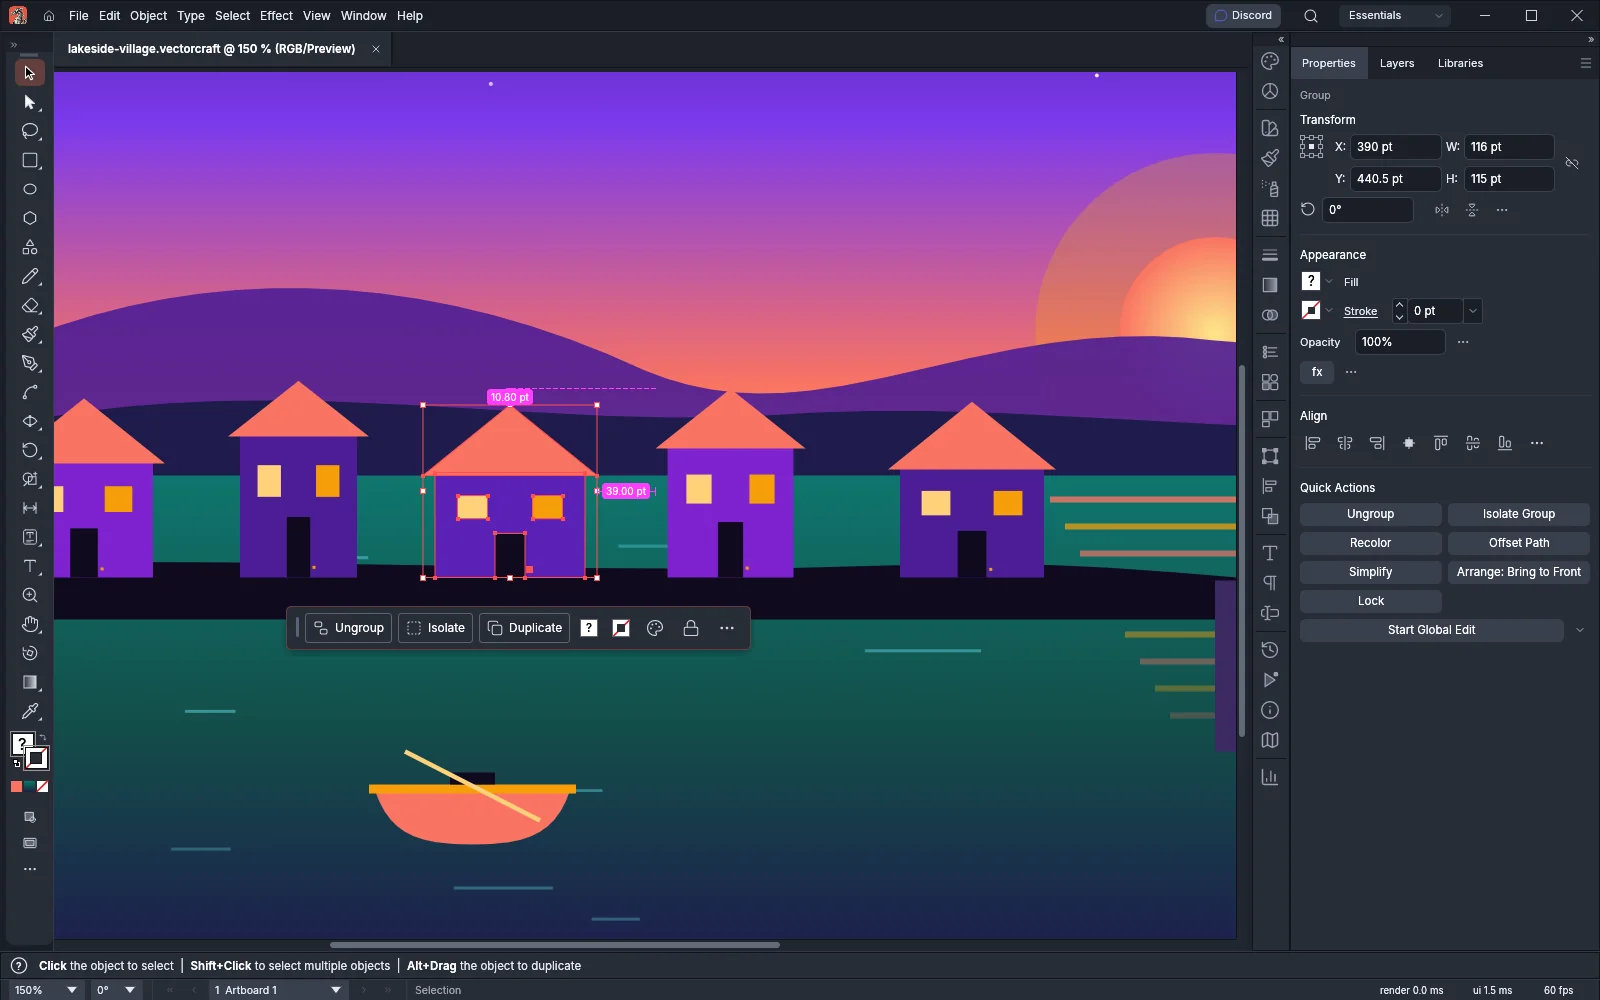
Pink guides and labels show the distance from the selection to that object. Over an empty part of an artboard, they show the distance from the selection to the artboard’s edges. The Invoke Distance Guides setting on the Smart Guides page of Preferences turns this on or off. It is on by default.
Nudge with the arrow keys
Section titled “Nudge with the arrow keys”Select one or more objects and press an arrow key. The selection moves by the Keyboard Increment on the General page of Preferences. The default is 1 pt, and the setting accepts values from 0.001 pt to 1296 pt.
- Shift+arrow moves the selection ten times the increment.
- Alt+arrow (Option+arrow on macOS) moves a copy and leaves the original in place.
When the Constrain Angle is not 0°, the arrow keys move the selection along axes turned by that angle.
Move by an exact distance
Section titled “Move by an exact distance”- Select the objects.
- Open the Move dialog in one of these ways:
- Press Enter with the Selection tool active.
- Double-click the Selection, Direct Selection or Group Selection tool in the Tools panel.
- Choose Object → Transform → Move… (Ctrl+Shift+M, Cmd+Shift+M on macOS).
- Enter the offset, either as Horizontal and Vertical values, or as a Distance and an Angle. When you change one pair, the dialog updates the other.
- Turn on Preview to see the result on the canvas as you type.
- Click OK to move the objects, or turn on Copy first to move a copy and leave the originals in place.
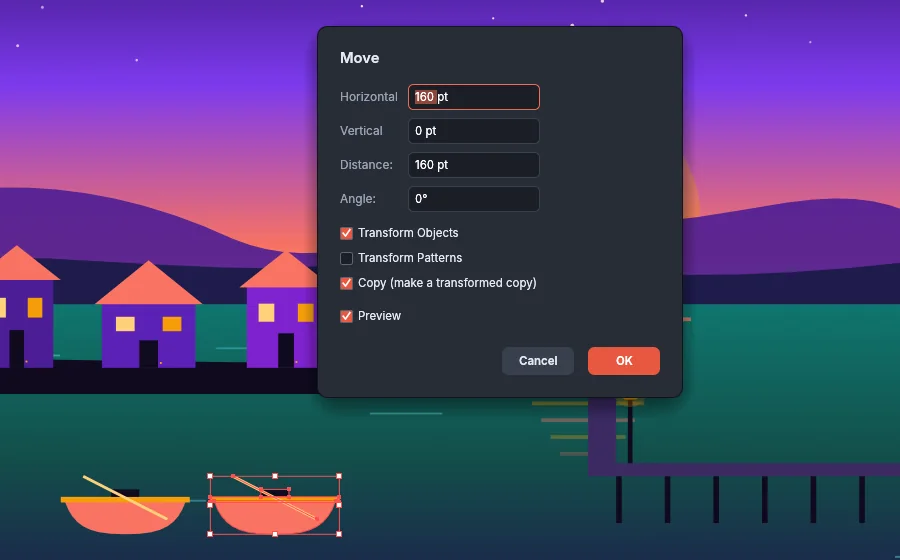
| Option | What it does |
|---|---|
| Horizontal | Moves the objects right for a positive value and left for a negative one. |
| Vertical | Moves the objects down for a positive value and up for a negative one. |
| Distance | Sets the length of the move. |
| Angle | Sets the direction of the move, counterclockwise from the right. 0° moves right and 90° moves up. An angle past 180° is shown as its negative equivalent, so 270° reads as -90°. |
| Transform Objects | Moves the objects. Turn it off with Transform Patterns on to move only the pattern tiles inside them. |
| Transform Patterns | Moves pattern fills and strokes with the objects. It starts from the Transform Pattern Tiles setting on the General page of Preferences. |
| Copy (make a transformed copy) | Moves a copy and leaves the originals in place. |
| Preview | Shows the move on the canvas while the dialog is open. |
The dialog opens with the offset of the last move, whether you dragged the objects or used the dialog, and with the checkboxes as you last confirmed them. To read off how far you just dragged an object, open Move… straight after the drag. Because the dialog opens on the last offset, pressing Enter twice repeats the last move, or the last copy when Copy was on: the first Enter opens the dialog and the second works as OK.
Make evenly spaced copies
Section titled “Make evenly spaced copies”- Select the object to repeat.
- Make the first copy at the spacing you want: Alt+drag it (Option+drag on macOS), or choose Object → Transform → Move…, enter the offset, turn on Copy and click OK.
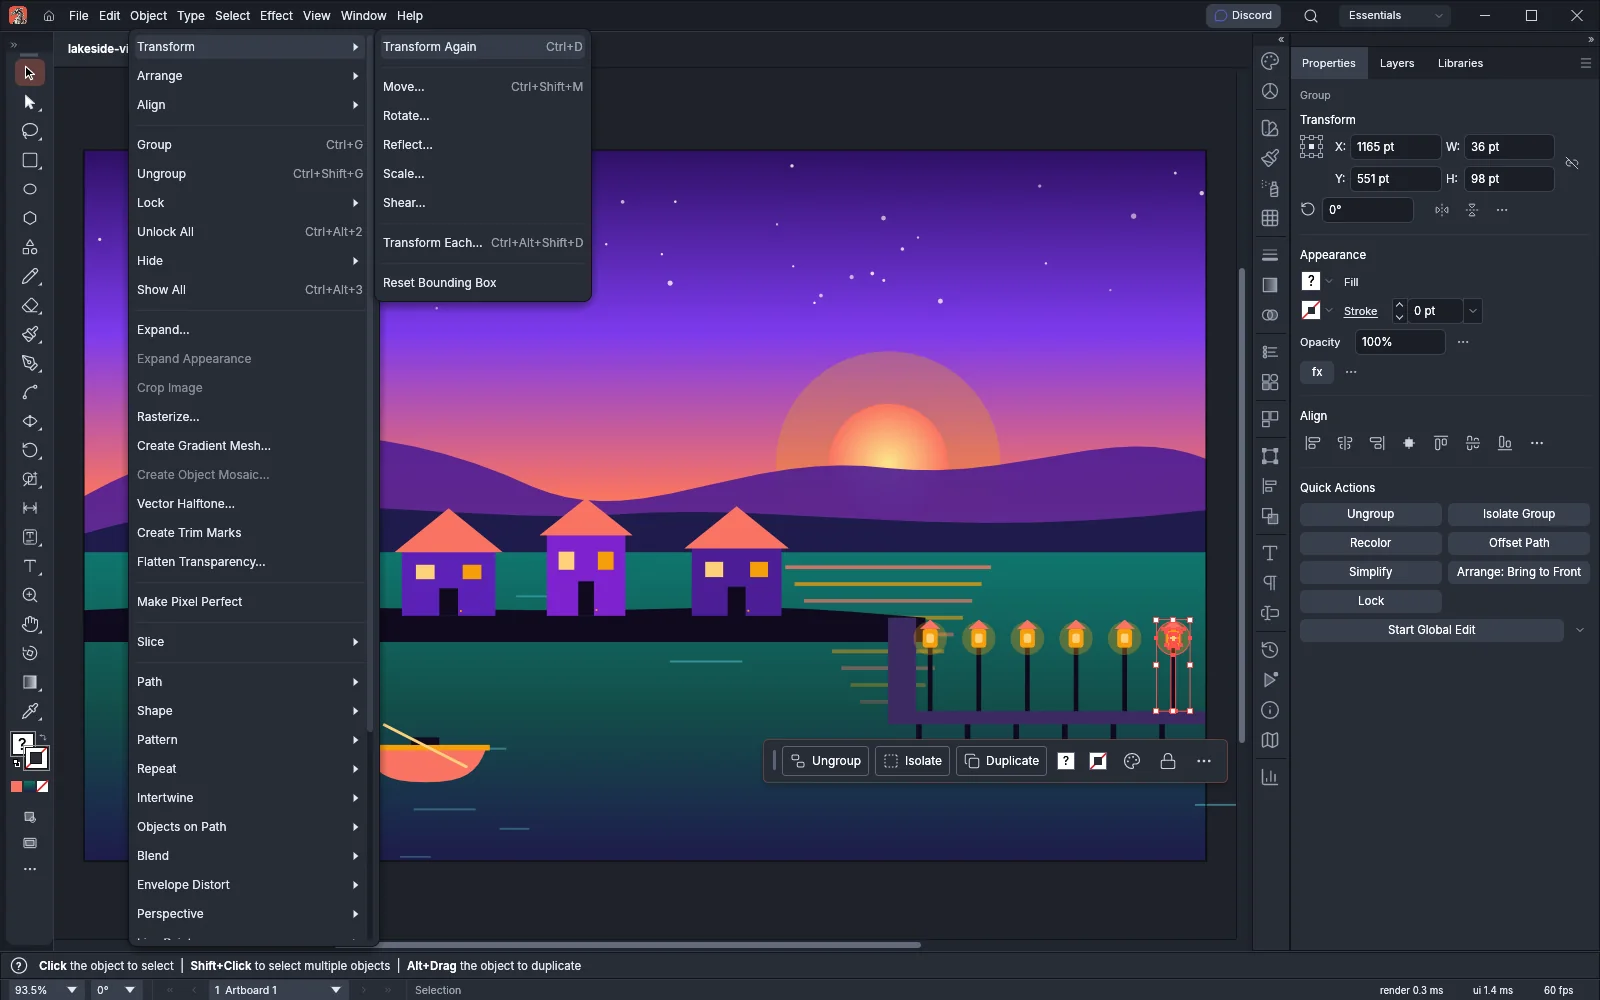
- Choose Object → Transform → Transform Again (Ctrl+D, Cmd+D on macOS). VectorCraft repeats the last move on the new copy and makes another copy at the same spacing.
- Press Ctrl+D (Cmd+D on macOS) again for each further copy.
If you made the first copy in the Move dialog, you can also press Enter twice with the Selection tool active for each further copy. The dialog opens on the same offset with Copy still on, and the second Enter makes the copy.
Transform Again repeats the last transform of any kind, so the same steps also work with a rotation or a scale.
Shortcuts
Section titled “Shortcuts”| Command | Windows and Linux | macOS |
|---|---|---|
| Selection tool | V | V |
| Select the object behind | Ctrl+click | Cmd+click |
| Reverse the marquee rule during a drag | E | E |
| Cancel a drag | Esc | Esc |
| Move a copy while dragging | Alt+drag | Option+drag |
| Nudge by the Keyboard Increment | Arrow keys | Arrow keys |
| Nudge by ten times the increment | Shift+arrow | Shift+arrow |
| Nudge a copy | Alt+arrow | Option+arrow |
| Open the Move dialog with the Selection tool | Enter | Enter |
| Object → Transform → Move… | Ctrl+Shift+M | Cmd+Shift+M |
| Object → Transform → Transform Again | Ctrl+D | Cmd+D |
| View → Hide Bounding Box | Ctrl+Shift+B | Cmd+Shift+B |
| View → Smart Guides | Ctrl+U | Cmd+U |
| View → Snap to Point | Ctrl+Alt+’ | Cmd+Option+’ |
| View → Snap to Grid | Ctrl+Shift+’ | Cmd+Shift+’ |