Object menu
This page lists every item of the Object menu and its submenus, in menu order, with what it does, its default shortcut and the guide that covers it. The File and Edit menus, the Type, Select and Effect menus and the View, Window and Help menus have their own pages.
Where Windows and Linux use Ctrl, macOS uses Cmd, and where they use Alt, macOS uses Option. A shortcut cell that reads “None” means the item has no default shortcut. You can give any item a shortcut in Edit → Keyboard Shortcuts…, and Keyboard shortcuts lists every default.
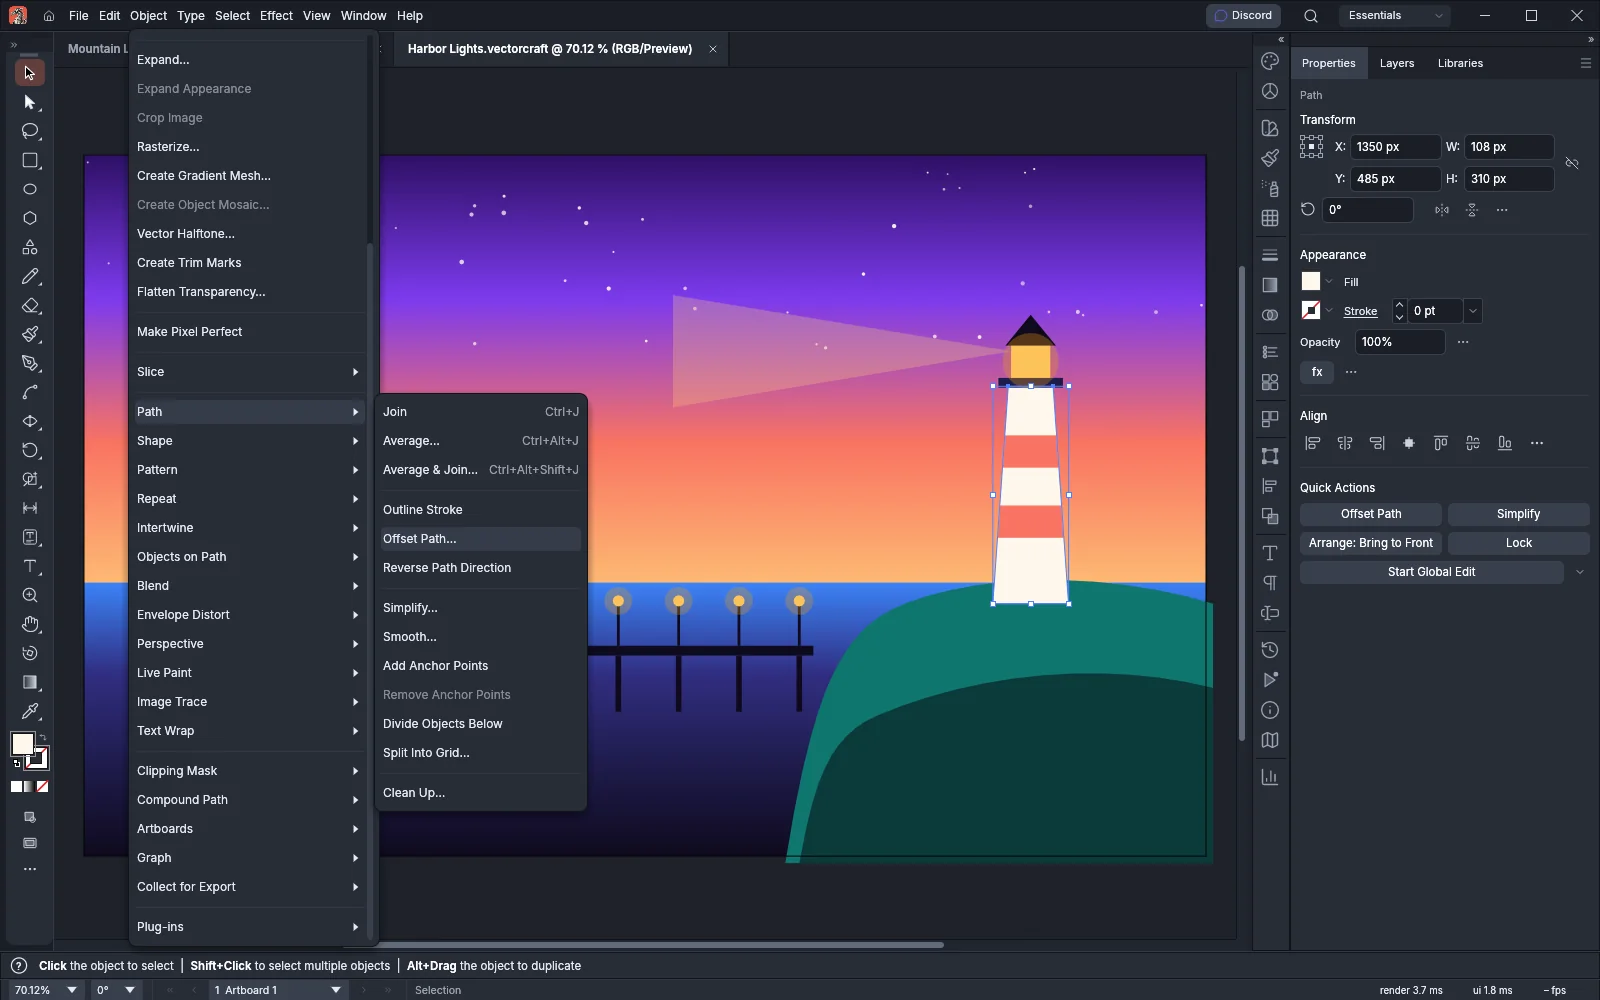
An item that cannot act on the current selection is grayed out. For example, Object → Crop Image and Object → Create Object Mosaic… are grayed out while no image is selected, and Object → Blend → Release is grayed out while no blend is selected. In a window 1000 px tall or shorter, the Object menu scrolls: move the pointer over it and turn the mouse wheel to reach the items at the end.
Items that end in “…” open a dialog before they change anything. Create Gradient Mesh…, Create Object Mosaic… and Path → Clean Up… open a dialog filled in with their default values.
Transform, Arrange and Align
Section titled “Transform, Arrange and Align”| Item | What it does | Windows and Linux | macOS | Guide |
|---|---|---|---|---|
| Transform → Transform Again | Repeats the last move, rotation, reflection, scale or shear on the selection. | Ctrl+D | Cmd+D | Draw and transform shapes |
| Transform → Move… | Moves the selection by the distance you enter, or moves a copy. | Ctrl+Shift+M | Cmd+Shift+M | Draw and transform shapes |
| Transform → Rotate… | Rotates the selection by the angle you enter. | None | None | Draw and transform shapes |
| Transform → Reflect… | Flips the selection across a horizontal, vertical or angled axis. | None | None | Draw and transform shapes |
| Transform → Scale… | Scales the selection by a percentage, uniformly or separately in width and height. | None | None | Draw and transform shapes |
| Transform → Shear… | Slants the selection by the angle you enter. | None | None | Draw and transform shapes |
| Transform → Transform Each… | Scales, moves, rotates and reflects each selected object around its own reference point. | Ctrl+Alt+Shift+D | Cmd+Option+Shift+D | Draw and transform shapes |
| Transform → Reset Bounding Box | Squares the bounding box of rotated objects with the page again. The objects do not move. | None | None | Draw and transform shapes |
| Arrange → Bring to Front | Moves the selection to the top of its layer or group. | Ctrl+Shift+] | Cmd+Shift+] | Arrange, group and align |
| Arrange → Bring Forward | Moves the selection up one object. | Ctrl+] | Cmd+] | Arrange, group and align |
| Arrange → Send Backward | Moves the selection down one object. | Ctrl+[ | Cmd+[ | Arrange, group and align |
| Arrange → Send to Back | Moves the selection to the bottom of its layer or group. | Ctrl+Shift+[ | Cmd+Shift+[ | Arrange, group and align |
| Arrange → Send to Current Layer | Moves the selection to the current layer. | None | None | Arrange, group and align |
| Align → Horizontal Align Left, Horizontal Align Center, Horizontal Align Right | Lines up the left edges, centers or right edges of the selected objects. | None | None | Arrange, group and align |
| Align → Horizontal & Vertical Align Center | Centers the selected objects on each other in both directions. | None | None | Arrange, group and align |
| Align → Vertical Align Top, Vertical Align Center, Vertical Align Bottom | Lines up the top edges, centers or bottom edges of the selected objects. | None | None | Arrange, group and align |
Group, lock and hide
Section titled “Group, lock and hide”| Item | What it does | Windows and Linux | macOS | Guide |
|---|---|---|---|---|
| Group | Puts the selected objects in a group. | Ctrl+G | Cmd+G | Arrange, group and align |
| Ungroup | Takes the objects out of the selected groups. | Ctrl+Shift+G | Cmd+Shift+G | Arrange, group and align |
| Lock → Selection | Locks the selected objects so that you cannot select or change them. | Ctrl+2 | Cmd+2 | Arrange, group and align |
| Lock → All Artwork Above | Locks the objects in the same layer that are above the selection and overlap it. | None | None | Arrange, group and align |
| Lock → Other Layers | Locks every layer that holds no selected object. | None | None | Arrange, group and align |
| Unlock All | Unlocks every locked object and selects the objects it unlocked. | Ctrl+Alt+2 | Cmd+Option+2 | Arrange, group and align |
| Hide → Selection | Hides the selected objects. | Ctrl+3 | Cmd+3 | Arrange, group and align |
| Hide → All Artwork Above | Hides the objects in the same layer that are above the selection and overlap it. | None | None | Arrange, group and align |
| Hide → Other Layers | Hides every layer that holds no selected object. | None | None | Arrange, group and align |
| Hide → Unselected Artwork | Hides every object that is not selected. | Ctrl+Alt+Shift+3 | Cmd+Option+Shift+3 | Arrange, group and align |
| Show All | Shows every hidden object and selects the objects it showed. | Ctrl+Alt+3 | Cmd+Option+3 | Arrange, group and align |
If you hold Shift+Alt (Shift+Option on macOS) while you choose Unlock All or Show All, the command acts only inside the groups that hold the selected objects.
Ctrl+Alt+Shift+2 (Cmd+Option+Shift+2 on macOS) locks every object that is not selected. This shortcut has no menu item.
Expand, rasterize and convert
Section titled “Expand, rasterize and convert”None of these items has a default shortcut. No guide covers the Expand… dialog.
| Item | What it does | Guide |
|---|---|---|
| Expand… | Turns live objects into ordinary paths. You choose whether to expand the object, its fill and its stroke, and whether gradients become separate objects or a gradient mesh. | None |
| Expand Appearance | Turns each fill, stroke and effect of the selected objects into ordinary objects. | Apply effects and appearance |
| Crop Image | Shows a crop box on the selected image. Drag its handles, then press Enter or click Apply on the Control bar to crop the image. | Work with placed images |
| Rasterize… | Replaces the selection with an embedded image at the resolution and background you choose. | Work with placed images |
| Create Gradient Mesh… | Turns the selected filled paths into gradient meshes in their fill color. The dialog starts at 4 rows, 4 columns, Flat appearance and 100% highlight. | Fill, stroke and color |
| Create Object Mosaic… | Turns the selected image into a group of rectangles colored by the image. The dialog starts at 10 columns and 10 rows. | Work with placed images |
| Vector Halftone… | Redraws the selected objects as vector dots sized by their tone. | Work with placed images |
| Create Trim Marks | Draws trim marks around the selection, or around every artboard when nothing is selected. The marks are part of the artwork. | Manage color and proof for print |
| Flatten Transparency… | Flattens the transparency of the selection with a flattener preset and the resolutions you set. | Manage color and proof for print |
| Make Pixel Perfect | Snaps the edges of the selected objects to the pixel grid and rounds their stroke weights. | Export for screens and the web |
None of the Slice items has a default shortcut. Each one is covered in Slice artwork for the web.
| Item | What it does |
|---|---|
| Slice → Make | Makes each selected object an object slice, which follows the object’s bounds. |
| Slice → Release | Releases the selected slices. An object slice leaves its object as it was, and a user slice becomes an unpainted rectangle. |
| Slice → Create from Guides | Replaces the user slices with the grid that the ruler guides cut the artboards into. |
| Slice → Create from Selection | Makes one user slice over the selected objects. |
| Slice → Duplicate Slice | Copies the selected slices, offset by 10 pt. |
| Slice → Combine Slices | Replaces two or more selected slices with one slice over their bounds. |
| Slice → Divide Slices… | Cuts each selected slice into a grid of slices, by count or by size. |
| Slice → Delete All | Deletes every user slice and releases every object slice. |
| Slice → Slice Options… | Sets the selected slices’ name, link, alternate text, background and alignment. |
| Slice → Clip to Artboard | Turns clipping of slices to the artboards on or off. A check mark shows when it is on. |
Path and Shape
Section titled “Path and Shape”| Item | What it does | Windows and Linux | macOS | Guide |
|---|---|---|---|---|
| Path → Join | Joins two or more open paths into one path, or closes a single open path. | Ctrl+J | Cmd+J | Draw and edit paths |
| Path → Average… | Moves the selected anchor points to their average position, horizontally, vertically or both. | Ctrl+Alt+J | Cmd+Option+J | Draw and edit paths |
| Path → Average & Join… | Moves two open ends to the point between them and joins them there, in one step. | Ctrl+Alt+Shift+J | Cmd+Option+Shift+J | Draw and edit paths |
| Path → Outline Stroke | Replaces each stroked path with a filled shape the size of its stroke. | None | None | Draw and edit paths |
| Path → Offset Path… | Adds a new path above each selected path, larger or smaller by the offset you enter. | None | None | Draw and edit paths |
| Path → Reverse Path Direction | Reverses the direction of the selected paths. | None | None | Draw and edit paths |
| Path → Simplify… | Removes anchor points from the selected paths while keeping their shape close to the original. | None | None | Draw and edit paths |
| Path → Smooth… | Smooths the selected paths by an amount you set with a slider. | None | None | Draw and edit paths |
| Path → Add Anchor Points | Adds an anchor point halfway along each segment without changing the shape. | None | None | Draw and edit paths |
| Path → Remove Anchor Points | Removes the anchor points you selected with the Direct Selection tool, without opening the path. | None | None | Draw and edit paths |
| Path → Divide Objects Below | Cuts the objects below with the selected path, and removes that path. | None | None | Draw and edit paths |
| Path → Split Into Grid… | Replaces the selected paths with a grid of rectangles. The dialog starts at 2 rows and 2 columns with a 12 pt gutter. | None | None | Draw and edit paths |
| Path → Clean Up… | Deletes stray points, unpainted objects and empty text paths. Each of the three is on when the dialog opens. | None | None | Draw and edit paths |
| Shape → Convert to Shape | Turns paths that are rectangles at any rotation, or ellipses that are not rotated, into live shapes. | None | None | Draw and transform shapes |
| Shape → Expand Shape | Turns live shapes into ordinary paths. | None | None | Draw and transform shapes |
Pattern, Repeat, Intertwine, Objects on Path and Blend
Section titled “Pattern, Repeat, Intertwine, Objects on Path and Blend”Each of these items is covered in Make patterns, blends and repeats.
| Item | What it does | Windows and Linux | macOS |
|---|---|---|---|
| Pattern → Make | Makes a pattern swatch from the selection and opens pattern editing mode. | None | None |
| Pattern → Edit Pattern | Opens the selected object’s fill pattern in pattern editing mode. | Ctrl+Shift+F8 | Cmd+Shift+F8 |
| Pattern → Tile Edge Color… | Sets the color of the tile edge and the swatch bounds in pattern editing mode. | None | None |
| Repeat → Radial | Repeats the selection around a circle, 8 times by default, or switches the selected repeat to radial. | None | None |
| Repeat → Grid | Repeats the selection in a grid, 3 rows by 3 columns by default. | None | None |
| Repeat → Mirror | Repeats the selection as a mirror image across an axis. | None | None |
| Repeat → Release | Releases the selected repeats into their source art, without the copies. | None | None |
| Repeat → Options… | Sets the options of the selected repeats. | None | None |
| Intertwine → Make | Puts the selected objects in an Intertwine group and chooses the Intertwine tool. | None | None |
| Intertwine → Edit | Chooses the Intertwine tool for the selected Intertwine group. | None | None |
| Intertwine → Release | Releases the selected Intertwine groups into their objects, as they were before. | None | None |
| Objects on Path → Attach | Chooses the Objects on Path tool. Click a path to attach the selected objects to it. | None | None |
| Objects on Path → Expand | Turns the selected Objects on Path groups into plain groups of the path and the objects. | None | None |
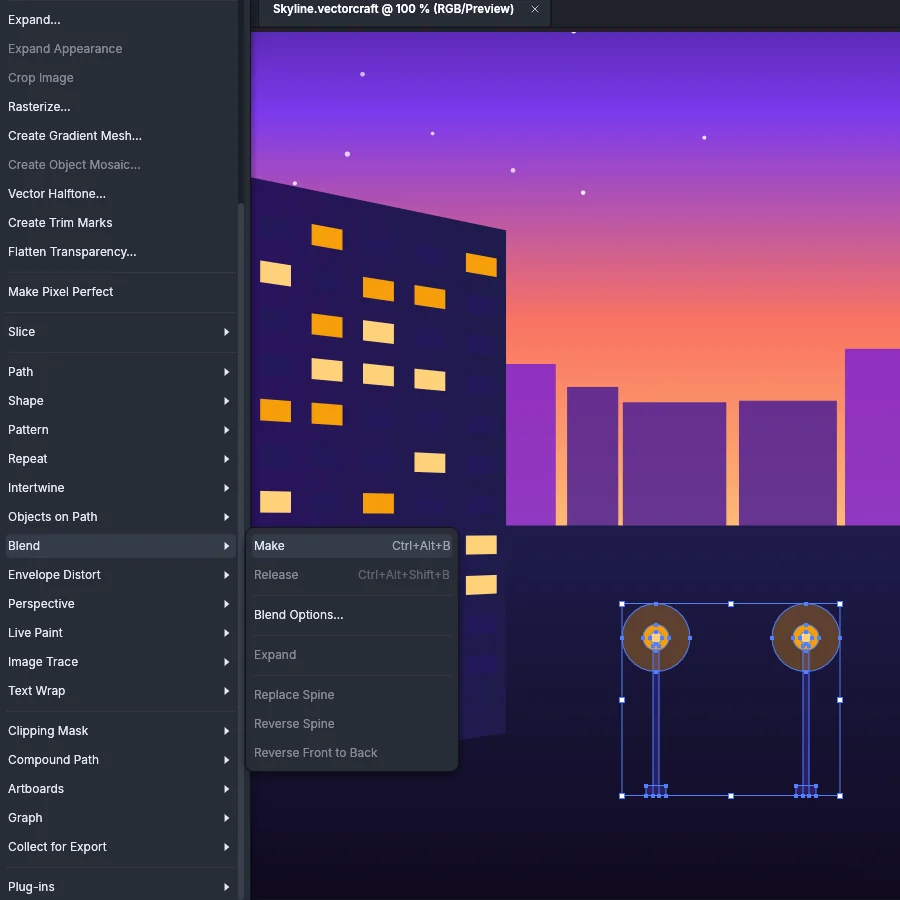
| Blend → Make | Makes a blend between the selected objects. | Ctrl+Alt+B | Cmd+Option+B |
| Blend → Release | Releases the selected blends into their key objects. The spine stays as a path with no fill or stroke. | Ctrl+Alt+Shift+B | Cmd+Option+Shift+B |
| Blend → Blend Options… | Sets the spacing and orientation of the selected blends. With no blend selected, it sets the options for new blends. | None | None |
| Blend → Expand | Turns the selected blends into groups of their key objects and steps. | None | None |
| Blend → Replace Spine | Makes the selected path the spine of the selected blend. | None | None |
| Blend → Reverse Spine | Reverses the order of the key objects along the spine. | None | None |
| Blend → Reverse Front to Back | Reverses the stacking order of the selected blends. | None | None |
Envelope Distort and Perspective
Section titled “Envelope Distort and Perspective”| Item | What it does | Windows and Linux | macOS | Guide |
|---|---|---|---|---|
| Envelope Distort → Make with Warp… | Distorts the selected objects with a warp style, such as Arc or Wave. | Ctrl+Alt+Shift+W | Cmd+Option+Shift+W | Reshape with warp tools |
| Envelope Distort → Make with Mesh… | Distorts the selected objects with a mesh of rows and columns, 4 by 4 by default. | Ctrl+Alt+M | Cmd+Option+M | Reshape with warp tools |
| Envelope Distort → Make with Top Object | Uses the topmost selected path as the envelope of the other selected objects. | Ctrl+Alt+C | Cmd+Option+C | Reshape with warp tools |
| Envelope Distort → Release | Releases the selected envelopes into their content and their shape, as separate objects. | None | None | Reshape with warp tools |
| Envelope Distort → Envelope Options… | Sets the fidelity and the other options of the selected envelopes. | None | None | Reshape with warp tools |
| Envelope Distort → Expand | Turns the selected envelopes into groups of their distorted content. | None | None | Reshape with warp tools |
| Envelope Distort → Edit Contents | Switches between editing the envelope’s content and editing the envelope. | None | None | Reshape with warp tools |
| Perspective → Attach to Active Plane | Projects the selected objects onto the active plane of the perspective grid. | None | None | Draw in perspective |
| Perspective → Release with Perspective | Detaches the selected objects from the grid. Their shape does not change. | None | None | Draw in perspective |
| Perspective → Move Plane to Match Object | Moves the plane the selected object is attached to onto the object, and makes it the active plane. | None | None | Draw in perspective |
| Perspective → Edit Text | Shows the selected type in perspective flat, in isolation mode, so you can edit it. Exit isolation mode to project it again. | None | None | Draw in perspective |
While an envelope is selected, two items change. Reset with Warp… takes the place of Make with Warp…, and Reset with Mesh… takes the place of Make with Mesh…. Each Reset item turns the selected envelopes into warp or mesh envelopes and keeps their content. The Reset items have no default shortcut.
Live Paint, Image Trace and Text Wrap
Section titled “Live Paint, Image Trace and Text Wrap”| Item | What it does | Windows and Linux | macOS | Guide |
|---|---|---|---|---|
| Live Paint → Make | Makes a Live Paint group from the selected paths. | Ctrl+Alt+X | Cmd+Option+X | Combine and cut shapes |
| Live Paint → Merge | Adds the other selected paths to the selected Live Paint group. | None | None | Combine and cut shapes |
| Live Paint → Release | Replaces the selected Live Paint groups with their original paths. | None | None | Combine and cut shapes |
| Live Paint → Gap Options… | Sets how large a gap the paint stops at, and the color that previews the gaps. | None | None | Combine and cut shapes |
| Live Paint → Expand | Turns the selected Live Paint groups into plain groups of their painted faces and edges. | None | None | Combine and cut shapes |
| Image Trace → Make | Traces the selected image with the Default preset. | None | None | Trace an image |
| Image Trace → Make and Expand | Traces the selected image with the Default preset and expands the result into paths. | None | None | Trace an image |
| Image Trace → Release | Replaces the selected trace with its source image. | None | None | Trace an image |
| Image Trace → Expand | Turns the selected trace into editable paths. | None | None | Trace an image |
| Text Wrap → Make | Makes the area type below the selected objects, in the same layer, wrap around them. | None | None | Work with styles and long text |
| Text Wrap → Release | Stops the text wrapping around the selected objects. | None | None | Work with styles and long text |
| Text Wrap → Text Wrap Options… | Sets the offset of the wrap and whether it is inverted. | None | None | Work with styles and long text |
To trace with another preset, use the Image Trace panel or the arrow next to Image Trace on the Control bar.
Clipping Mask and Compound Path
Section titled “Clipping Mask and Compound Path”| Item | What it does | Windows and Linux | macOS | Guide |
|---|---|---|---|---|
| Clipping Mask → Make | Uses the topmost selected object to clip the other selected objects. | Ctrl+7 | Cmd+7 | Combine and cut shapes |
| Clipping Mask → Release | Turns the selected clip groups into plain groups. The clipping path stays. | Ctrl+Alt+7 | Cmd+Option+7 | Combine and cut shapes |
| Clipping Mask → Edit Contents | Selects the clipped art of the selected clip groups. | None | None | Combine and cut shapes |
| Clipping Mask → Edit Clipping Path | Selects the clipping paths of the selected clip groups. | None | None | Combine and cut shapes |
| Compound Path → Make | Joins the selected paths into one object with one paint. Where a path in front overlaps the backmost path, it cuts a hole. | Ctrl+8 | Cmd+8 | Combine and cut shapes |
| Compound Path → Release | Splits the selected compound paths into separate paths, each with the compound path’s paint. | Ctrl+Alt+Shift+8 | Cmd+Option+Shift+8 | Combine and cut shapes |
Artboards, Graph and Collect for Export
Section titled “Artboards, Graph and Collect for Export”None of these items has a default shortcut.
| Item | What it does | Guide |
|---|---|---|
| Artboards → Convert to Artboards | Makes a new artboard from the bounds of each selected object, and removes the objects. | Set up a document and artboards |
| Artboards → Rearrange All Artboards… | Lays out every artboard in a grid, a row or a column, with the spacing you set. | Set up a document and artboards |
| Artboards → Fit to Artwork Bounds | Resizes the active artboard, or the artboards selected with the Artboard tool, to fit the visible art on each. | Set up a document and artboards |
| Artboards → Fit to Selected Art | Resizes the active artboard to fit the selected art. | Set up a document and artboards |
| Graph → Type… | Sets the selected graph’s type and its options, such as column width, legend and value axis. | Make graphs and data-driven art |
| Graph → Data… | Opens the selected graph’s data. | Make graphs and data-driven art |
| Graph → Design… | Makes, renames, pastes and deletes graph designs. | Make graphs and data-driven art |
| Graph → Column… | Draws the columns or bars of the graph with a graph design. | Make graphs and data-driven art |
| Graph → Marker… | Draws the data points of line, scatter and radar graphs with a graph design. | Make graphs and data-driven art |
| Collect for Export → As Single Asset | Adds the selected objects as one asset for export. | Export for screens and the web |
| Collect for Export → As Multiple Assets | Adds each selected object as its own asset for export. | Export for screens and the web |
The assets appear in the Asset Export panel and on the Assets tab of File → Export → Export for Screens….
Plug-ins
Section titled “Plug-ins”Object → Plug-ins starts with a submenu for each built-in add-on: 3D Box, Arrange Tools, Artwork Cleanup, Color Effects, Compound Shapes, Contour, Document Tools, Enclosing Lasso, Path Precision Tools, Selection Tools, Smart Pen and Type Tools. Built-in plug-ins describes the tools and commands in each one.
Below them, the menu lists the filter plug-ins you have installed, each with its own commands. While no filter plug-in is installed, it shows “No filter plug-ins installed”. The last two items manage plug-ins. Neither has a default shortcut.
| Item | What it does | Guide |
|---|---|---|
| Plug-ins → Install Plug-in… | Installs a plug-in from a .wasm file. If the plug-in asks for permissions, VectorCraft shows them and asks you first. |
Install and manage plug-ins |
| Plug-ins → Reload Plug-ins | Installs every .wasm file in the folder set in the Additional Plug-ins Folder preference. |
Install and manage plug-ins |
Related
Section titled “Related”- Keyboard shortcuts
- Right-click menus
- File and Edit menus
- Type, Select and Effect menus
- View, Window and Help menus
- Draw and transform shapes
- Arrange, group and align
- Draw and edit paths
- Cut, join and refine paths
- Combine and cut shapes
- Make patterns, blends and repeats
- Reshape with warp tools
- Draw in perspective
- Trace an image
- Work with placed images
- Slice artwork for the web
- Manage artboards
- Make graphs and data-driven art
- Export for screens and the web
- Built-in plug-ins
- Install and manage plug-ins
- Apply effects and appearance
- Fill, stroke and color
- Manage color and proof for print
- Work with styles and long text
- Set up a document and artboards
- Workflows