
Expand objects into paths
This guide covers Object → Expand…, Object → Expand Appearance for art with effects, and the expand commands of other kinds of live objects. Object → Expand… turns live art into plain art: live shapes and type become paths, gradient and pattern fills become separate objects, and strokes become filled shapes.
Expand fills, strokes and live objects
Section titled “Expand fills, strokes and live objects”- With the Selection tool, select the objects to expand.
- Choose Object → Expand…. The Expand dialog opens with Object, Fill and Stroke turned on. An option that has nothing to expand in the selection is dimmed.
- Turn off any of Object, Fill and Stroke that you want to keep as they are.
- If the selection has a gradient fill, choose what it becomes under Expand Gradient To: Gradient Mesh, or Specify and the number of objects.
- Click OK.
Expand is one undo step, so Edit → Undo (Ctrl+Z, or Cmd+Z on macOS) brings the objects back as they were. The expanded objects stay selected.
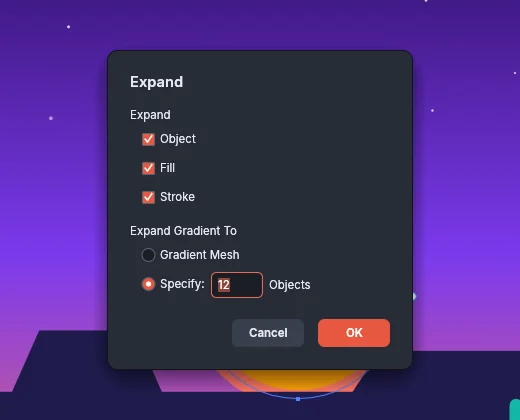
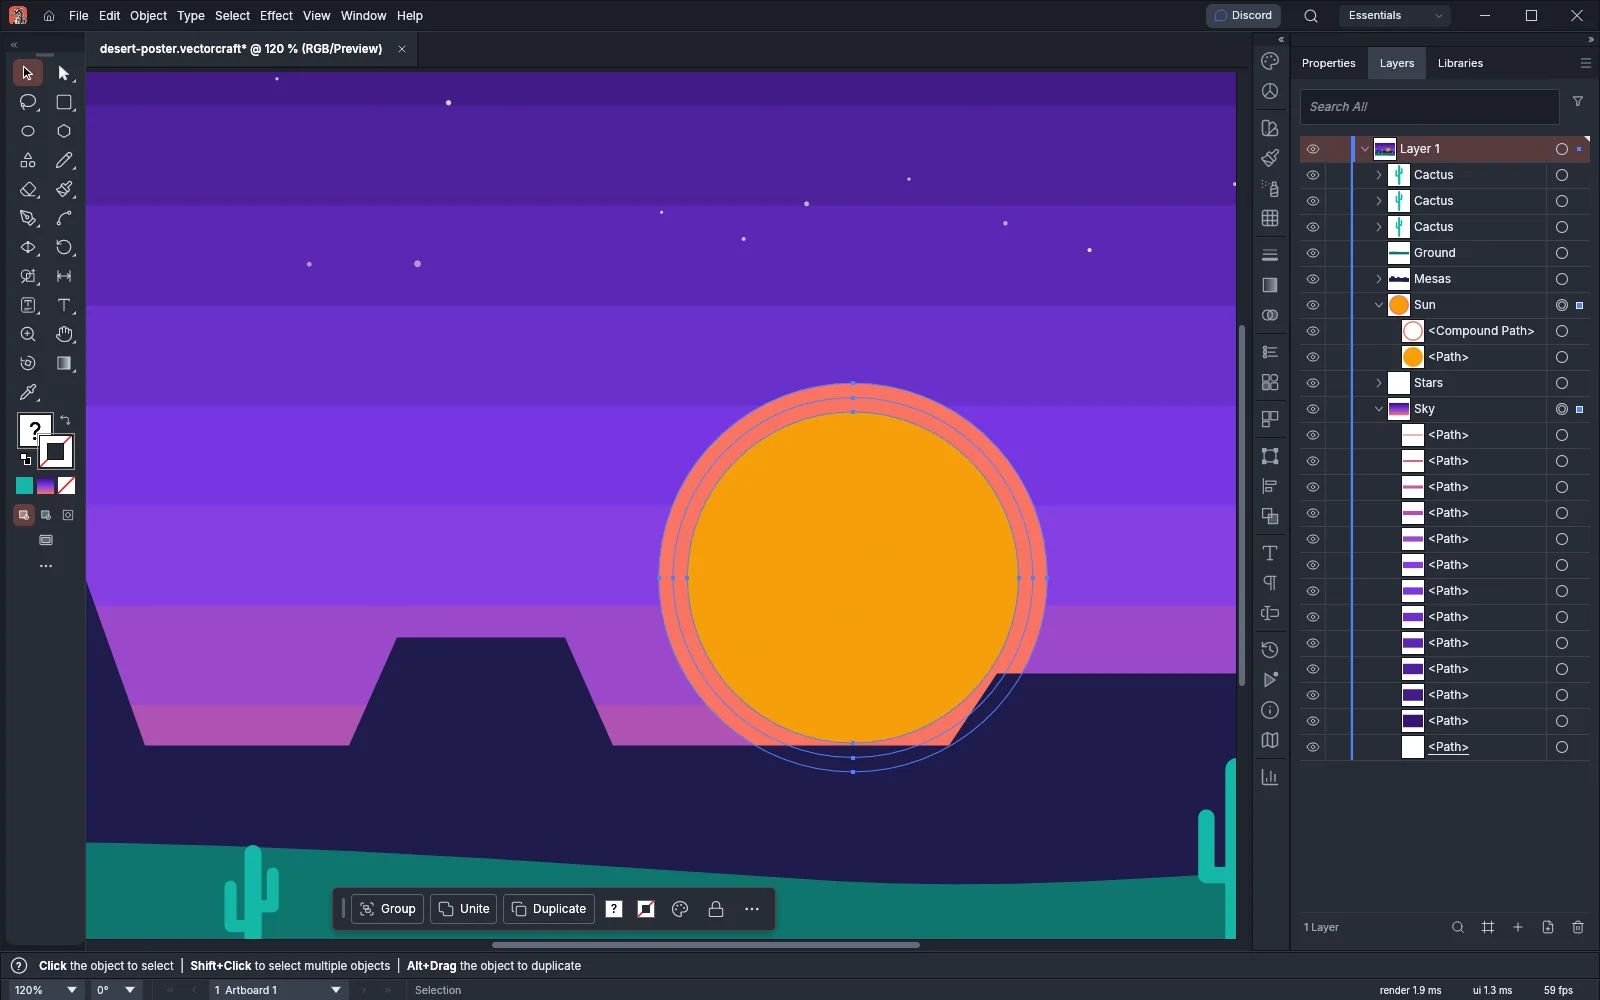
In the following image, the sky rectangle had a violet-to-coral linear gradient and the sun had an amber fill with a thick coral stroke. With Specify set to 12 objects, the sky became 12 bands of solid color inside a clip group shaped like the rectangle. The sun’s stroke became a filled ring, a compound path, grouped with the sun’s fill path. In the Layers panel, the Sky clip group lists its 12 band paths and its clipping path, which is the underlined row at the bottom.
Expand options
Section titled “Expand options”| Option | What it expands |
|---|---|
| Object | Live shapes become paths and type becomes outlines. Blends become groups of their steps, repeats become groups of their copies, Intertwine groups become groups of their objects, and envelopes become their distorted content. Placed documents become editable copies of the art they show. Symbol instances without effects and not in perspective become the art of their symbol. |
| Fill | Gradient fills become the objects that Expand Gradient To sets. Pattern fills become the pattern’s tiles inside a clip group shaped like the object. A solid fill has nothing to expand. |
| Stroke | Strokes become filled shapes the size of the stroke, the same result as Object → Path → Outline Stroke. |
| Expand Gradient To: Gradient Mesh | Each linear, radial or conic gradient fill becomes a gradient mesh inside a clip group shaped like the object. |
| Expand Gradient To: Specify … Objects | Each gradient fill becomes that many objects of solid color inside a clip group shaped like the object: strips for a linear gradient, concentric ellipses for a radial gradient, and wedges around the center for a conic gradient. The default is 255, and the box takes 1 to 1000. |
An option is dimmed when the selection has nothing for it to expand. A rectangle is a live shape, so for a rectangle with a solid fill and a stroke, Object and Stroke are available and Fill is dimmed.
Expand Gradient To is dimmed unless Fill is on and the selection has a gradient fill. A freeform gradient always becomes a gradient mesh shaped like the object, whichever choice is set.
When the fill or stroke is in the art of a symbol instance, and nowhere else in the selection, Fill or Stroke is available only while Object is on.
Expand art with effects and several fills or strokes
Section titled “Expand art with effects and several fills or strokes”Object → Expand… is dimmed while the selection has appearance attributes:
- an effect, such as Zig Zag or a drop shadow;
- more than one fill or stroke;
- a fill or stroke with its own opacity, blend mode or effects;
- a brush on a path;
- a group or layer with fills, strokes or effects of its own;
- a type object with a fill or stroke added to the type object itself, even a single fill.
When you point at the dimmed item, a tooltip reads Expand Appearance first (Object › Expand Appearance). The same message shows in the status bar if you run Expand from the command palette or a shortcut, and the art is left as it was.
To expand such art:
- Select it and choose Object → Expand Appearance. Each fill and stroke becomes an object of its own, grouped in paint order. Shape effects are applied to the paths, and raster effects become embedded images.
- To turn the remaining strokes into filled shapes, choose Object → Expand… with Stroke on, or choose Object → Path → Outline Stroke.
After Expand Appearance, a stroke is still a stroke, with its weight, dashes and arrowheads, on its own copy of the path. Expand Appearance is available when the selection has any of the appearance attributes listed above. Apply effects and appearance describes what Expand Appearance makes of each effect.
Other expand commands
Section titled “Other expand commands”Several kinds of live object have an expand command of their own.
| Command | Where to find it | Result | More |
|---|---|---|---|
| Outline Stroke | Object → Path → Outline Stroke | Replaces each stroked path with a filled shape the size of the stroke | Draw and edit paths |
| Expand Shape | Object → Shape → Expand Shape | Turns live shapes into plain paths without their corner widgets | Draw and transform shapes |
| Expand Compound Shape | The Expand button in the Pathfinder panel, Object → Plug-ins → Compound Shapes → Expand Compound Shape, or the Pathfinder panel menu | Turns a compound shape into one path or compound path of the area it shows, painted as it looks | Combine and cut shapes |
| Blend → Expand | Object → Blend → Expand, or the Expand button in the Blend panel | Replaces the blend with a group of its objects and steps | Make patterns, blends and repeats |
| Envelope Distort → Expand | Object → Envelope Distort → Expand | Replaces the envelope with a group of the distorted art, with type turned into outlines | Reshape with the warp tools |
| Live Paint → Expand | Object → Live Paint → Expand | Turns a Live Paint group into a plain group of its painted faces and edges | Combine and cut shapes |
| Image Trace → Expand | Object → Image Trace → Expand, or Expand in the Image Trace panel | Keeps the traced paths and removes the source image | Trace an image |
| Objects on Path → Expand | Object → Objects on Path → Expand | Makes the objects and the path an ordinary group, with the objects where they are | Make patterns, blends and repeats |
| Expand Brush Strokes | The button at the bottom of the Brushes panel, or the Brushes panel menu | Replaces each brushed path with a group of the brush art | Paint with brushes and variable widths |
| Bake | The Contour bar, while the Contour tool is active | Turns the live contour into plain paths | Cut, join and refine paths |
Object → Expand… with Object on also expands blends, envelopes and live shapes, along with everything else in the selection.