
Check image resolution and color mode
This guide shows how to check the images in a document before you print or export it: reading each image’s PPI, effective PPI and color space in Link Info, listing every image with Document Info, selecting images by color kind, and fixing images whose resolution is too low or whose color mode is wrong.
Read an image’s resolution and color space
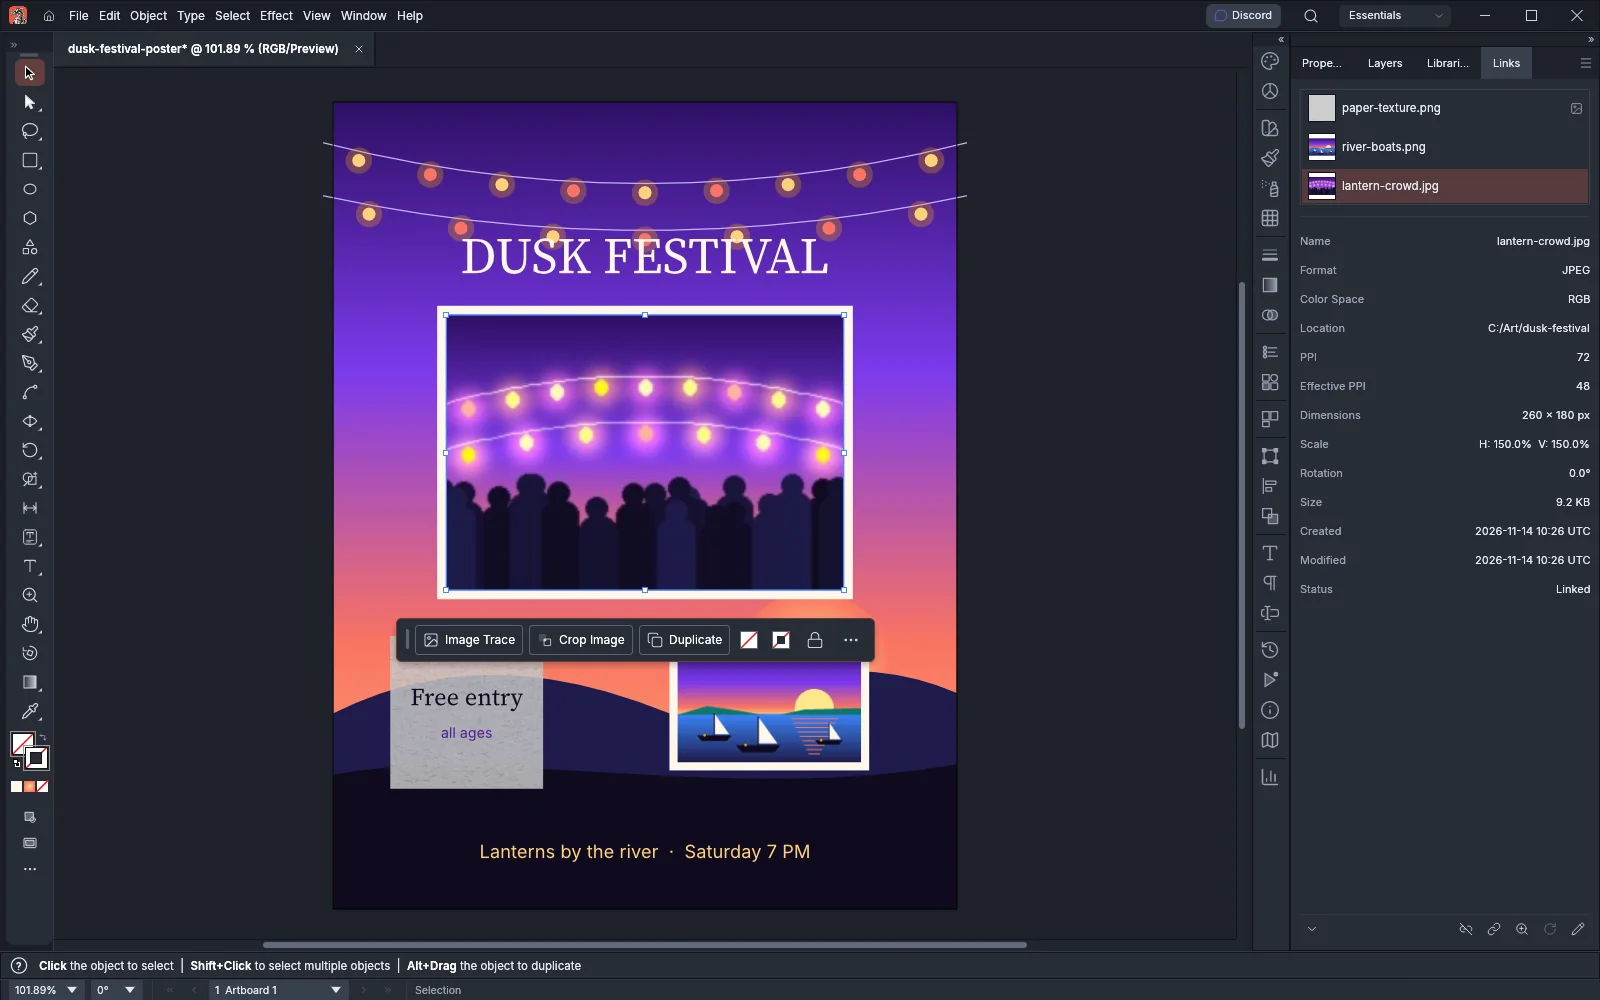
Section titled “Read an image’s resolution and color space”- Choose Window → Links.
- Click an image’s row, or select the image on the canvas.
- If the Link Info section is hidden, click the chevron at the bottom left of the panel, or choose Show Link Info in the panel menu.
Link Info shows the details of the first selected image. Its rows include these:
| Row | What it shows |
|---|---|
| Format | The file format, such as JPEG, PNG or TIFF |
| Color Space | RGB, CMYK or Grayscale. A 1-bit image reads Grayscale |
| PPI | The resolution stored in the file. A file with no stored resolution reads 72 |
| Effective PPI | The resolution at the size the image has in the document |
| Dimensions | The image’s size in pixels |
| Scale | The horizontal and vertical scale, as a percentage of the image’s 100% size |
| Status | Linked, Missing, Modified or Embedded |
Effective PPI changes when you resize the image. An image scaled to 150% has two thirds of its file’s resolution, so a 72 ppi file scaled to 150% reads 48. An image scaled below 100% has a higher effective PPI than its file.
For more about the Links panel and its commands, see See every image in the Links panel.
List every image in the document with Document Info
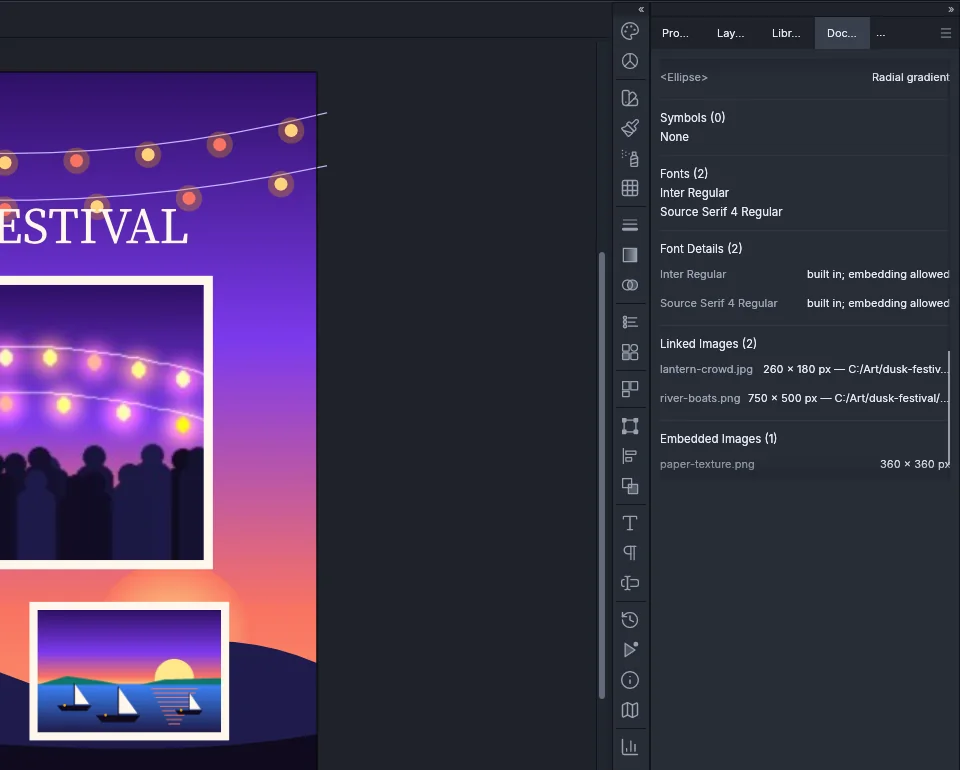
Section titled “List every image in the document with Document Info”- Choose Window → Document Info.
- Scroll to the Linked Images and Embedded Images categories. Each heading shows the number of images in it.
| Category | What each row shows |
|---|---|
| Linked Images | The image’s name, its size in pixels and the path of its file |
| Embedded Images | The image’s name and its size in pixels |
To show one of these categories alone, choose Linked Images or Embedded Images in the panel menu, and choose All Categories to show every category again. Choose Selection Only to list only the images in the selection, and Save… to write the list to a text file.
For the other categories, see List what a document holds with Document Info.
Select images by color kind
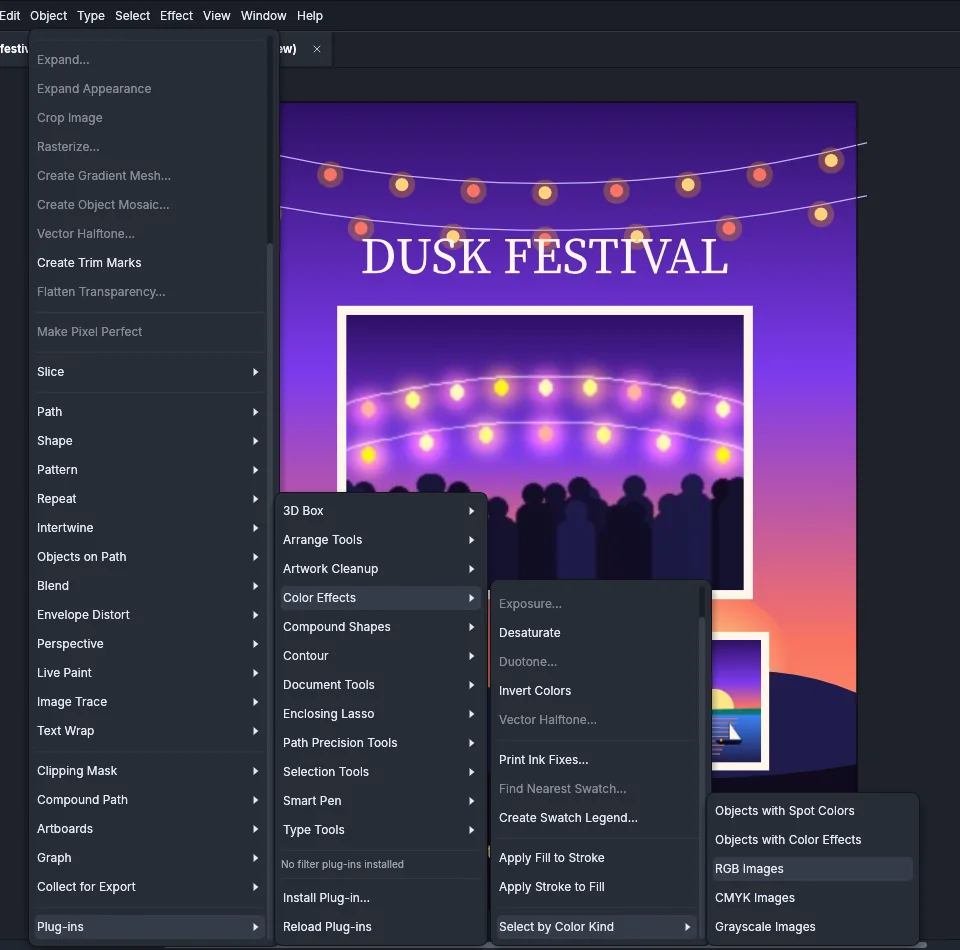
Section titled “Select images by color kind”- Choose Object → Plug-ins → Color Effects → Select by Color Kind.
- Choose RGB Images, CMYK Images or Grayscale Images.
The command selects every linked or embedded image whose pixels are of that kind, including images inside groups. It leaves out locked and hidden objects. The same submenu has Objects with Spot Colors and Objects with Color Effects.
To check the images one at a time after a selection, click each selected row in the Links panel and read its Link Info.
Fix low resolution
Section titled “Fix low resolution”When an image’s effective PPI is lower than the resolution your printer or export needs, use one of these fixes:
- Scale the image down. Halving its width and height doubles its effective PPI.
- Relink it to a file with more pixels. Select the image’s row in the Links panel, click Relink… and pick the file. With the default Bounds choice in Placement Options… in the panel menu, the new file is stretched into the image’s old bounds, so the effective PPI rises with the new file’s pixel count. A file with a different aspect ratio is distorted. To keep its proportions, choose Bounds (Fit Proportionally) or Bounds (Fill Proportionally) in Placement Options… before you relink.
Object → Rasterize… at a higher resolution also raises the effective PPI. It resamples the pixels the image already has and does not add detail.
Convert images to CMYK or grayscale
Section titled “Convert images to CMYK or grayscale”The Edit → Edit Colors commands change embedded images only. A linked image keeps the pixels of its file, so embed it first:
- In the Links panel, select the linked images’ rows.
- Choose Embed Image(s) in the panel menu, or click the Break Link button.
To make an image grayscale:
- Select the embedded images. Object → Plug-ins → Color Effects → Select by Color Kind → RGB Images selects every RGB image.
- Choose Edit → Edit Colors → Convert to Grayscale.
The image is stored with one gray channel, and Link Info reads Grayscale.
Edit → Edit Colors → Convert to CMYK changes an embedded image’s colors to colors CMYK can print, but the image stays an RGB image, and Link Info still reads RGB. To make an image whose pixels are CMYK:
- Choose File → Document Color Mode → CMYK Color.
- Select one image.
- Choose Object → Rasterize….
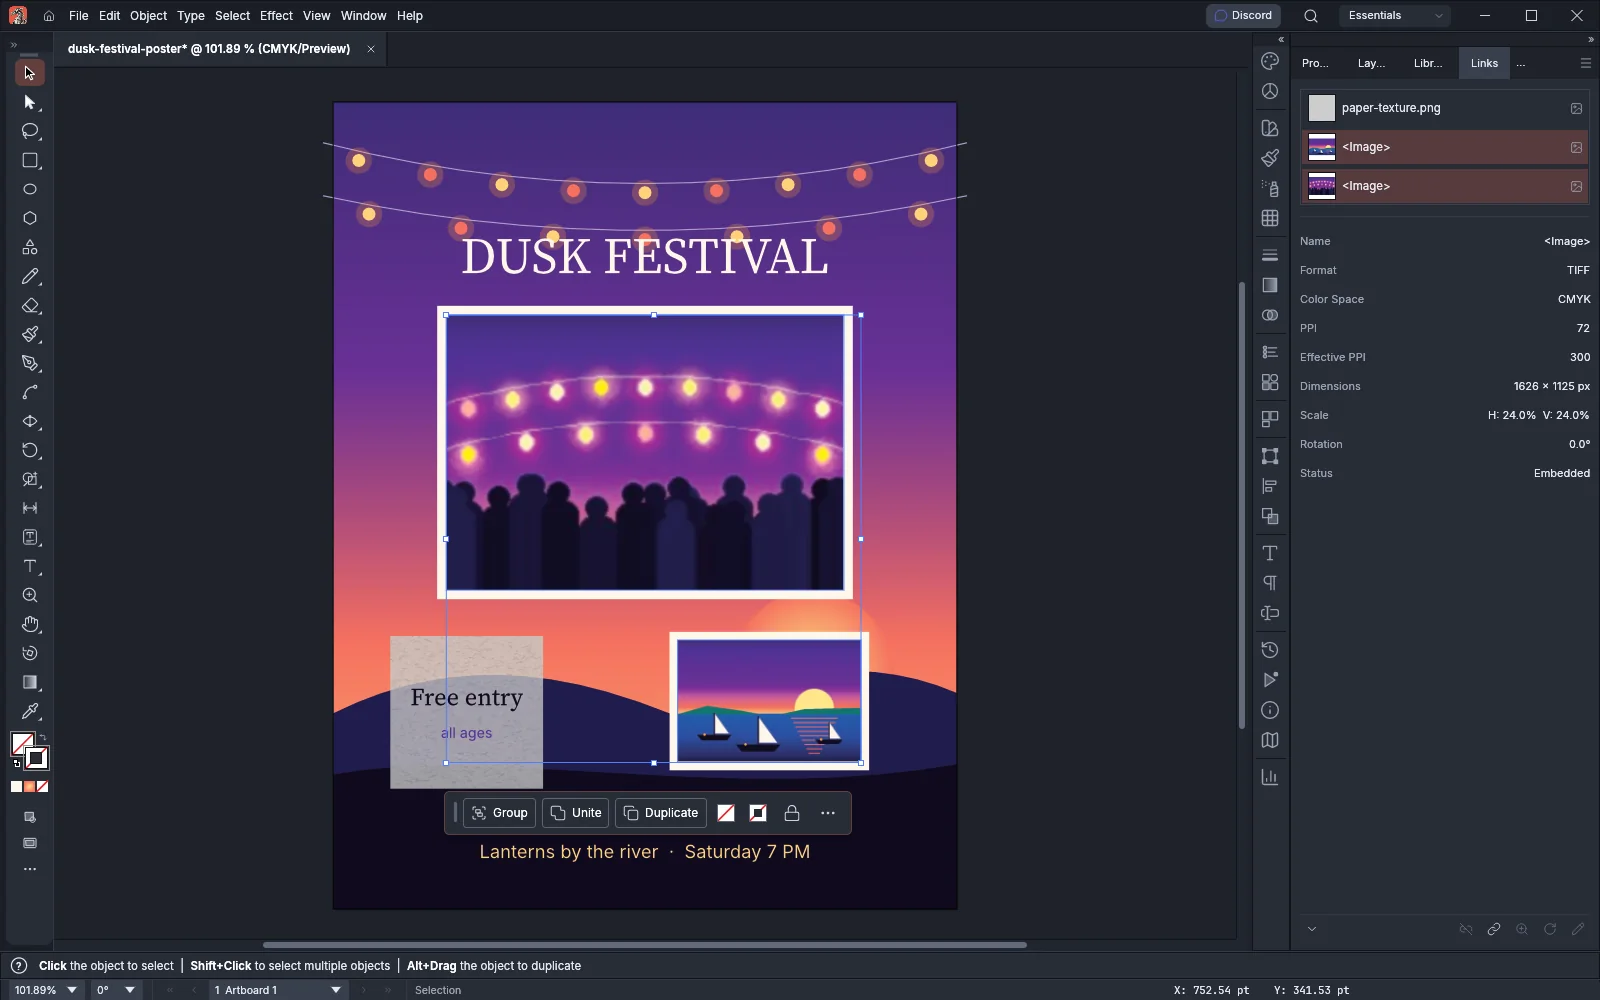
- Check that Color Model is CMYK, set Ppi to the resolution you need, and click OK.
- Repeat steps 2 to 4 for each image. When several objects are selected, Rasterize turns them into one image.
The new image is embedded and its format is TIFF. Link Info reads CMYK, and the Links panel lists the image as <Image>. A rasterized image stores no resolution, so its PPI row reads 72. Its Effective PPI row shows the resolution you rasterized it at.
Rasterize art at a set resolution
Section titled “Rasterize art at a set resolution”Object → Rasterize… turns the selected objects into one embedded image at the resolution you set, from 1 to 2400 ppi. For its options, see Rasterize vector art.